Limiting privilege in Microsoft 365 Business
One of the most important things you can do for boosting your security posture on any technology platform (Microsoft or otherwise), is limiting administrative privilege. We have long known that any given user should really only have enough access to do their jobs, and nothing more.
Now in the Enterprise subscriptions such as E5, you will see some super advanced stuff such as Just in Time administration (JIT) and Privileged Identity Management (PIM). But these features are usually more handy at the Enterprise level, where you may have multiple admins with different levels of access.
However, even in Microsoft 365 Business, we have plenty of advice to offer the small and mid-sized businesses who are struggling to know how or where to begin.
It doesn’t come in a pretty software package with a bow on it–you cannot just buy security in some kind of neat little SKU (contrary to what the marketing machines out there will tell you).
An obvious one that you can do right away, is to limit who has global admin privileges in your tenant. And, to be clear, this also means not assigning your own user account GA permission, just because you happen to be the guy or gal who takes care of 365 for your organization. You should have a separate admin account (e.g. [email protected], not just [email protected]). So I’d like you to be doing that right off the bat.
But aside from the obvious, we need to approach this problem systematically, and thoughtfully. We will accomplish this in four phases.
Step 1. Device inventory and management
Before we jump into anything super technical, just start with a simple inventory. This inventory is your source of truth. It doesn’t have to be complicated–you just want a true and correct record of whom in the organization has what.
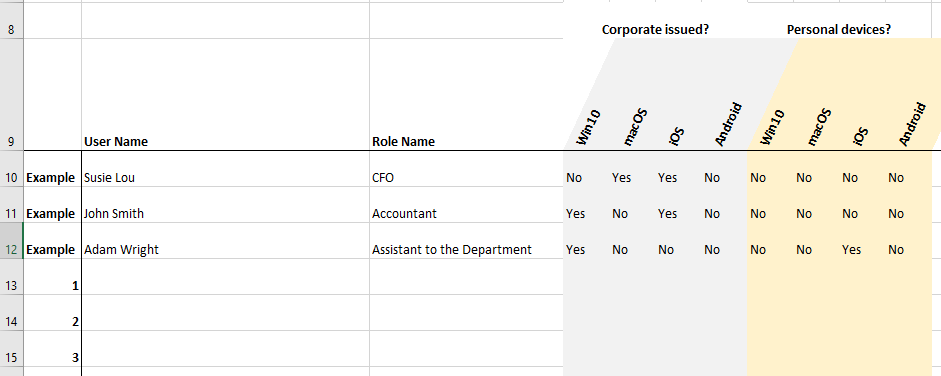
In this example I am not even recording serial numbers or asset tags for the devices, but you certainly could do that (I’m just marking whether they have a device of each type–and whether corporate or personal).
Now, once you have that done, you will want a way to know and not guess that the devices connecting to your environment do in fact match the inventory. For this, you need to complete these five steps:
- Setup iOS MDM enrollment certificate
- Create a device compliance policy for each device type in the environment
- Create device configuration profiles for each device type in the environment (e.g. would allow you to push Email or WiFi profiles, or enforce certain device restrictions)
- Enroll your devices
- Enforce a Conditional access policy that requires device management
Having that conditional access policy will mean no devices can connect that are not explicitly enrolled and managed. As an alternative to device management (MDM) you can also choose application management (MAM). MAM is often selected in BYOD scenarios. This would involve just two steps:
- Create application protection policies for each device type
- Enforce a Conditional access policy that requires users to use approved applications
It may also be a good idea to add MFA to your BYOD conditional access policies, and require both a second factor, and an approved app, such as Outlook.
At this stage, you can have a lot more confidence in the devices that appear in your device inventory. Not only do you have a “master list” that you can check against, but you also have a policy guarding the front door, so to speak: e.g. users must use two factors, must register their devices, or only use approved applications that can be isolated from the device and other (non-business) apps.
Step 2. Software inventory and management
Just as before, we start gathering an inventory of software with a human-driven process, and not fancy software or products. Of course, you can use a software product to help you take an inventory of what’s out there if you don’t already know, but in a small business with a limited number of users and applications, this does not have to be high-tech.

There will be a certain number of applications that are required for business use, and the others–well, we don’t need ’em.
So you have your applications identified. Great. Now you must ensure that the users who need those applications have them deployed to their devices, and those who do not need those applications, do not have them.
If the corporate issued machines are joined to Azure AD and enrolled in Intune/Device management (as they should be after step 1, above), then you can also require these applications to be installed on enrolled devices, and push applications as needed from Client apps > Apps.

This is important, because it means that users do not have to interact with their machines administratively to install software. You can take care of that for them.
To take this a step further, it would be possible, for example, to tie third party applications to Azure AD, using Enterprise applications from the Azure AD portal. That way, you can reduce your identity management footprint. Wouldn’t it be nice to provision and terminate access from one place, rather than several (or even several dozen, in some extreme cases)?
Step 3. Continuous vulnerability management
Since things tend to change, you need a way to keep your endpoints up-to-date and well-protected against emerging threats and vulnerabilities. Antivirus definitions, OS and application updates, etc. Microsoft 365 can absolutely help with these things.
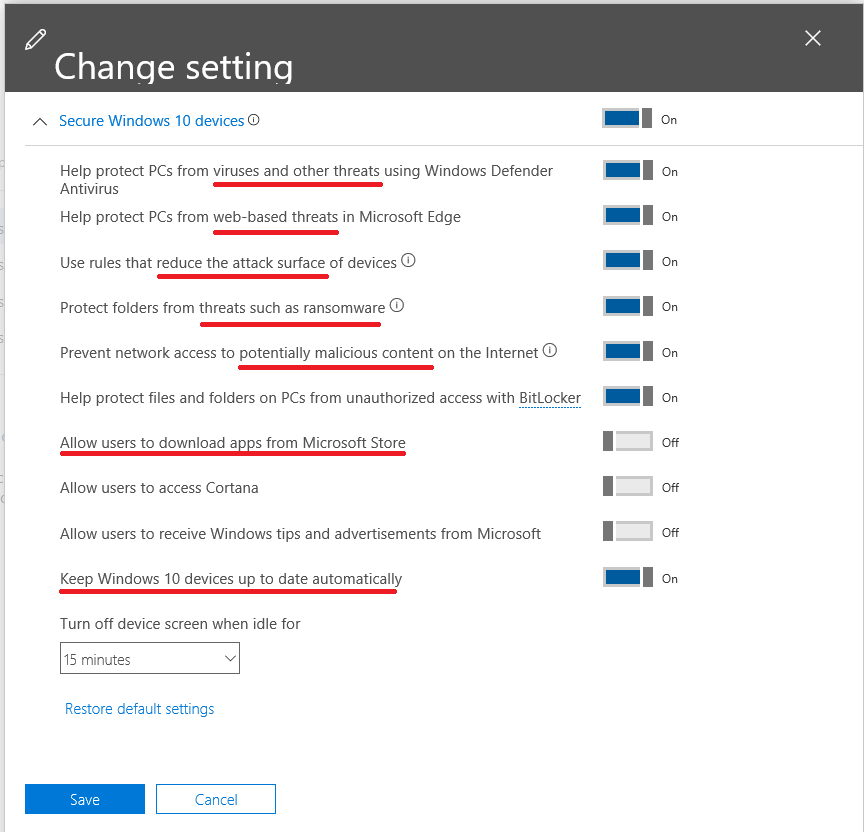
When you setup device polices from the 365 admin center > Devices > Policies, you can select options that will keep your device up-to-date and protected against certain known vulnerabilities and attack vectors.
Furthermore, you can enable Office 365 Advanced Threat Protection to assist with unknown zero-day and emerging threats using technologies like SafeLinks, SafeAttachments and AntiPhishing policies. Windows Defender ATP can take things further still, although this would require additional licensing (not included in Microsoft 365 Business).
And of course, you may have to revisit your application deployments, and push new packages or versions sometimes. It’s part of the job, and it keeps you employed. So don’t complain about it, just get to work.
Step 4. Limiting privilege
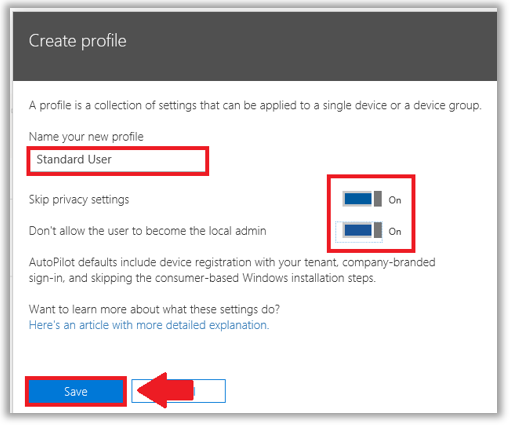
If you do a really good job on the first three, then you can absolutely take away admin privilege on the local workstation, too. This is probably done easiest when you provision workstations using Autopilot–you can tell the device that the user will not have local admin privileges.
I know, I know. You have memories and nightmares about this–maybe you tried it, and struggled when Windows 7 introduced UAC. You just couldn’t get that LOB app working without admin privileges for the local user.
Look, all of these things are easy to overcome.
First of all, UAC has come a long way, and it is absolutely recommended to require a secure desktop elevation prompt (so that users would need to key in a local admin credential in order to make changes to certain things on the computer). You can require UAC using an Intune device restriction policy.
If you have an LOB app that doesn’t seem to work without local admin, call the vendor. Find out, and really push them, for an answer here. I have never run into a situation like this that could not be fixed, in some way. Maybe it’s just a reg key, or some permissions to certain program/system files. Whatever it takes, you can solve the problem, with enough patience (and pushy questioning).
Remember: you can always fall back on that UAC with a separate local admin credential, for those few times it may be needed.
Conclusion
Those of you who were paying attention here will recognize that I didn’t just make all this up. The steps I laid out follow the first four Critical Security Controls published by the Center for Internet Security (CIS).

As always, I encourage you to keep going, keep growing. Cheers.
Comment (1)
Hi Alex,
I have noticed that admin rights on Azure AD joined PC with admin account does not really have full admin rights. Even though I’m the one with admin profile. I noticed this fact when I tried to install Quick Books and program didn’t run properly because it was missing full access to machine.
It also showing as a standard user under property of the user and you’re not able to switch to fully admin profile. Very weird.
-M