Adopting the Traffic Light Protocol (TLP) with Microsoft 365’s Sensitivity Labels
I have previously written about Sensitivity labels, along with a template of the core labels that I like to use when introducing Small Businesses to the concept of data classification. Recently, I decided to update this standard to align more closely with the Traffic Light Protocol (TLP). Let me share that with you here today.
In case you aren’t familiar with the TLP, you can read more about it over at CISA’s website. (CISA didn’t invent it, but they are evangelizing it here in the US.)
Why adopt TLP as my new baseline Sensitivity Label set? Well, here are the reasons:
- To take advantage of the “color coding” feature in Sensitivity labels (which was not around back when I first designed my label-set);
- To simplify the structure, specifically by removing the need for sub-labels;
- To eliminate differences between labels for “files and emails” vs “groups and sites,” and make sure they are more consistent with each other–so that they “track together” in meaning and application;
- And finally, I wanted labels that aligned with a more widely known protocol.
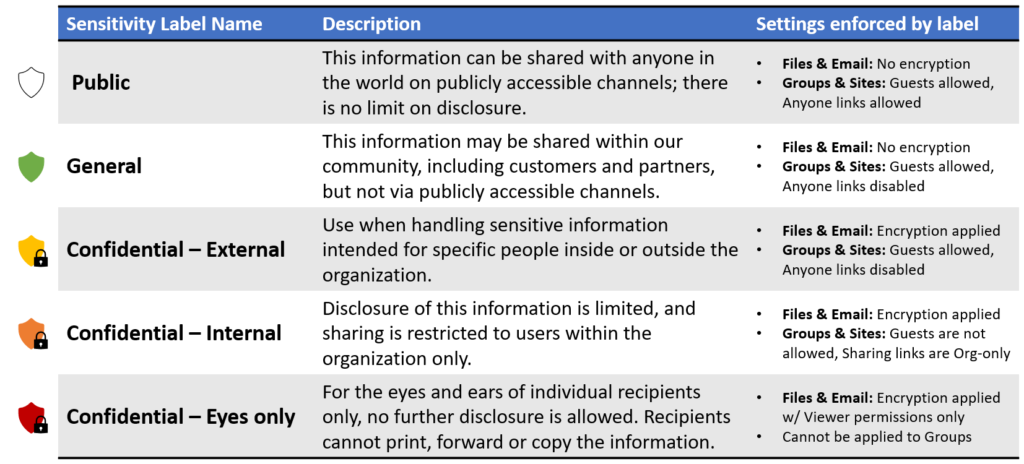
I think I have achieved these results in my updated label design. Before I show you the final result, let us review a table of the TLP colors and their meaning; I will also include a new “label name” next to each one, that is a little more user-friendly. These will become the placeholders for the labels we ultimately want to create.
I did toy with some other naming conventions: Public / Private / Confidential / Highly Confidential / Top Secret…. but ultimately, I decided to stick with the names in the table above. You are free of course to choose your own favorite label names if you decide to adopt the “TLP-inspired” labels yourself. Mostly I just wanted something that remained consistent with my previous taxonomy, so here we are.
Next, I will summarize my new Sensitivity label descriptions & settings in another table:
Other notes
My favorite improvement: One of the biggest improvements here over my old label set, is that we eliminated sub-labels. In my old taxonomy, none of the “sub-labels” were applicable to Groups & Sites. This meant that we had a different experience in Teams and SharePoint versus what we saw in all the other apps like Word, Excel, and Outlook. Most frustrating was perhaps the fact that for documents and emails, we had sub-labels which divided the “Confidential” label into External and Internal (much like we have in this new system), but we didn’t have the same distinction in Teams and SPO. Instead, we only had the top-level label, Confidential, and that meant no external users allowed. The new system rectifies these issues once and for all in an elegant way, and without using sub-labels.
Emojis for labels: I have also seen some implementations out there which are similar to TLP–the idea is to use a simple visual indicator that communicates something about the scope of that label’s use. Instead of TLP colors, they will leverage an “emoji icon” in the labels’ Display name (you can access a library of emoji’s using Windows key + Period). For example:
- Public 🌐
- General 📂
- Confidential – External 🔒
- Confidential – Internal 🏢
- Confidential – Eyes Only 👁
I tried this for a while, but ultimately, I decided I liked the “cleaner look & feel” of sticking to the built-in color-coding, following the TLP colors. But, to each their own. You can do whatever you like best.
Personal label: Some people have asked me about the “Non-business” or “Personal” label. You could still include that if you wanted to (another CLEAR label I suppose), but there is an argument says that personal data belongs on personal accounts/devices, not corporate ones. I think this is up to each organization to decide for themselves. I went with a streamlined list of labels intended for organizational data only.
Building the labels
To construct these labels from the Microsoft Purview admin center (https://compliance.microsoft.com), use the left navigation to find Information Protection > Labels. We will not be requiring sub-labels so this set up should be pretty straightforward. See below for a more detailed description of the settings contained within each label.
Public
The Public label has the following settings:
- Name & Display name: Public
- Description for users: This information can be shared with anyone in the world on publicly accessible channels; there is no limit on disclosure.
- Label color: None (TLP:Clear)
- Scope: Files & emails, and Groups & sites
- Do not apply any encryption or content marking
- Privacy and external user access settings:
- Privacy: Public
- External user access: Allowed
- External sharing and Conditional access settings:
- Control external sharing from labeled SharePoint sites: Anyone links
- Conditional access to protect labeled SharePoint sites: Full access
General
The General label has the following settings:
- Name & Display name: General
- Description for users: This information may be shared within our community, including customers and partners, but not via publicly accessible channels.
- Label color: Light green (TLP:Green)
- Scope: Files & emails, and Groups & sites
- Do not apply any encryption, and content marking is optional
- Privacy and external user access settings:
- Privacy: None (members can set privacy themselves)
- External user access: Allowed
- External sharing and Conditional access settings:
- Control external sharing from labeled SharePoint sites: New & existing guests
- Conditional access to protect labeled SharePoint sites: Full access
Confidential – External
The Confidential – External label has the following settings:
- Name & Display name: Confidential – External
- Description for users: Use when handling sensitive information intended for specific people inside or outside the organization.
- Label color: Marigold (TLP:Amber)
- Scope: Files & emails, and Groups & sites
- Content marking: Recommended to use a header, footer or both.
- Apply encryption:
- Assign permissions now
- User access to content expires Never
- Allow offline access: Only for a number of days: 30 days
- Assign permissions:
- Any authenticated users (AuthenticatedUsers) assigned Co-Owner
- Privacy and external user access settings:
- Privacy: Private
- External user access: Allowed
- External sharing and Conditional access settings:
- Control external sharing from labeled SharePoint sites: New & existing guests
- Conditional access to protect labeled SharePoint sites: Full access
Confidential – Internal
The Confidential – Internal label has the following settings:
- Name & Display name: Confidential – Internal
- Description for users: Disclosure of this information is limited, and sharing is restricted to users within the organization only.
- Label color: Orange (TLP:Amber+Strict)
- Scope: Files & emails, and Groups & sites
- Content marking: Recommended to use a header, footer or both.
- Apply encryption:
- Assign permissions now
- User access to content expires Never
- Allow offline access: Only for a number of days: 30 days
- Assign permissions:
- All users and groups in your organization assigned Co-Owner
- Privacy and external user access settings:
- Privacy: Private
- External user access: Not allowed
- External sharing and Conditional access settings:
- Control external sharing from labeled SharePoint sites: Only people in your organization
- Conditional access to protect labeled SharePoint sites: (Optional) Limited or No access for unmanaged devices
Confidential – Eyes Only
The Confidential – Internal label has the following settings:
- Name & Display name: Confidential – Eyes Only
- Description for users: For the eyes and ears of individual recipients only, no further disclosure is allowed. Recipients cannot print, forward or copy the information.
- Label color: Burgundy (TLP:Red)
- Scope: Files & emails (and not Groups & sites)
- Content marking: Recommended to use a header, footer or both.
- Apply encryption:
- Assign permissions now
- User access to content expires Never
- Allow offline access: Only for a number of days: 30 days
- Assign permissions:
- Any authenticated users (AuthenticatedUsers) assigned Viewer (or Custom permissions if this is too restrictive)
Wrapping up
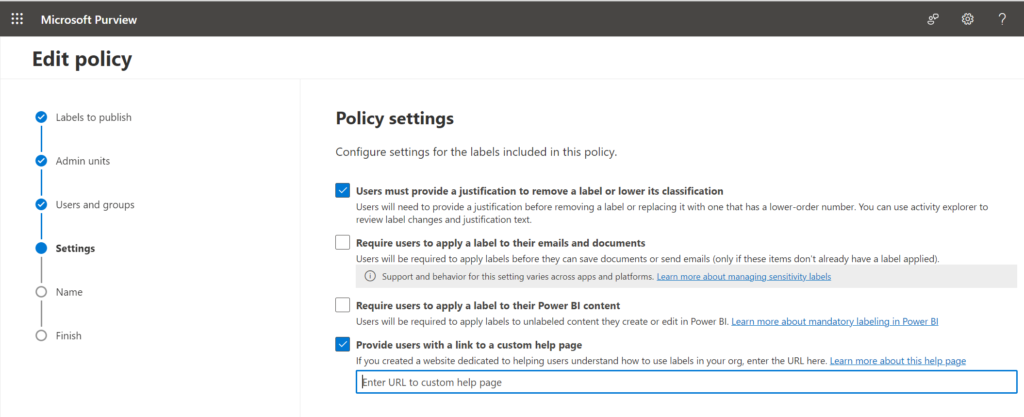
Don’t forget to publish your labels using a label policy. You are free to choose your own parameters for the policy of course, but I will provide some quick guidance on the topic. First, I like to require justification for removing labels or lowering classification–this way there is an event that is recorded to the audit log, and we can see why a label is changed or removed, as well as who did it and when. It can also be beneficial to provide a “help page” (e.g., usually a SharePoint site) that describes the labels and their usage with a simple example for each.
If you want to use the option for a “Default label” (which would be auto-applied to any new items moving forward), I suggest the “General” label is probably the best choice for most organizations who prefer to use this setting. Just understand that this means the user must always either upgrade or downgrade from General in order to change classification.
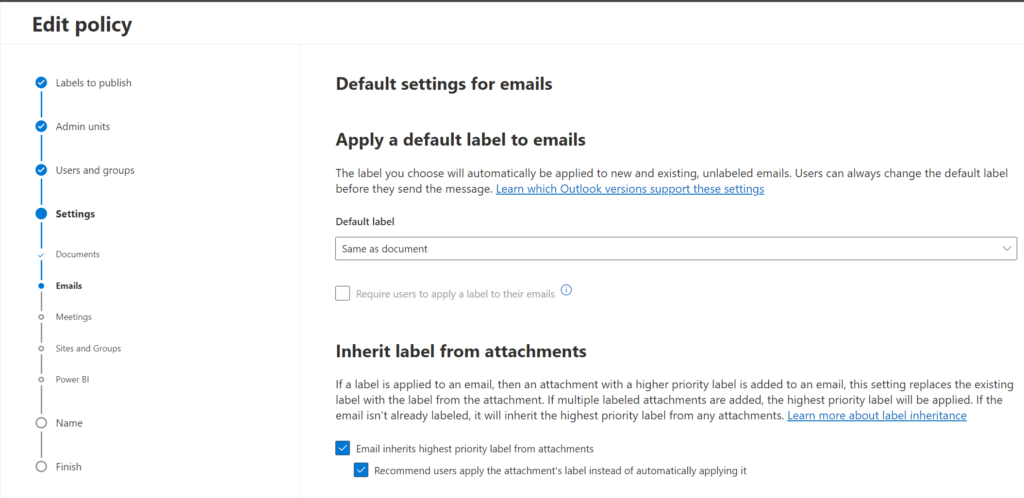
Note that we also have an option to make email messages inherit the classification that is present on any attachments which are added (either automatically or as a prompt to the user).
Obviously, all of these selections imply a training component. And yes, you can also require users to apply labels, so that they are forced to choose one before they can create, save, or send any item, but I generally do not start there, especially when we are first introducing the concept to the user base. You can always update this policy, and set expectations accordingly in your training: “Starting in December of this year, we are requiring the use of Sensitivity Labels, etc., etc….” However, I never just switch this on without training and ample communication/reminders in advance. Unless you want to end up in the Pit of End-User Despair. This is the way.
As I mentioned, I really like the Traffic Light Protocol for its simplicity: using fewer labels with commonplace color-coding is a really intuitive system that can make it easier for users to adopt data classification. And of course, you may have your own preferences in terms of how to name the labels or break down the permissions, etc., but I think it is a better path for many organizations to simply adopt a straightforward, pre-existing standard from a knowledgeable community.
Cheers, and Happy Labeling!


Comments (2)
Excellent Alex, thanks for sharing
You’re missing Privacy & External Sharing descriptions from the Eyes Only label
Ah, that’s because there are no group/site settings for the last label–it is the only one which is applied exclusively on files/emails. Confidential groups will either allow externals or not, and I am not sure how I would even define a “Read-only” group. Therefore, I think the other two choices are adequate for covering most use-cases/scenarios.