Simple Sensitivity Label design for the SMB
In the recent updates to the CIS Controls (v8), one of the most noticeable changes was the re-prioritization of Data Protection (now Control #3, up from #13 previously). This control calls out a number of safeguards: inventory of sensitive data and data classification is among them. Sensitivity labels can help an organization to solve for these safeguards.
Even before the CIS updates landed, I had been seeing an increase in requests and questions related to Sensitivity labels. It is easy to see why: Sensitivity labels are amazing! But of course, there are still several known limitations with them, so it is important to go in with eyes open. Now, for those of you curious about implementing labels in your own organization, you might be asking, “What is a good ‘default‘ data classification scheme? What labels should I create for users to start?“
Excellent question. There is of course no one single ‘best practice’ or ‘right answer’ here. But there are a few wrong answers. The most important point: you must not overcomplicate the labels in your organization. The simpler, the better I always say, and not just with regard to labels! The first time I began consulting on Sensitivity labels, the organization I was working with wanted to implement something on the order of 40+ labels. That’s a mess, and nobody is going to understand what labels to use when with that many choices.
Keep it simple
You don’t necessarily need to reinvent the wheel. You can always start small, and grow later. For customers who do not know where else to start, but want a way to begin identifying and protecting their most sensitive information, I suggest a simple set of labels such as the following:

This is a very basic classification scheme that will allow any organization to start separating their data into categories by sensitivity, and this helps satisfy a few safeguards under CIS Control #3, Data Protection:
CSC #3.2: Establish and maintain a data inventory. Inventory sensitive data, at a minimum. Review and update inventory annually, at a minimum, with a priority on sensitive data.
Notice that the order of the labels matters. Your most sensitive label should be listed last in the list. This is because the software will know to prompt users for a justification when they attempt to “downgrade” sensitivity (if you have enabled that option).
Some prefer to include a Highly Confidential label as well; the distinction between Confidential and Highly Confidential is where I find most people get confused (so I just leave it out). If you do choose to implement both of these higher-sensitivity classifications, I suggest making a clear distinction for end users. For example, data that should absolutely not be shared externally under any circumstances, even accidentally. Every org possesses at least some data that would be considered “toxic” or very bad if it were to leak. That is what you want to reserve your highest sensitivity for.

You can also have “sub-labels” and these will work much in the same way: you want to go in order from widest audience/least restrictive settings at the top, to most private/more restrictive at the bottom.

I will describe how I configure these “starter” labels, but first we have to do a little work to set the stage.
Step 1. Prepare for labels
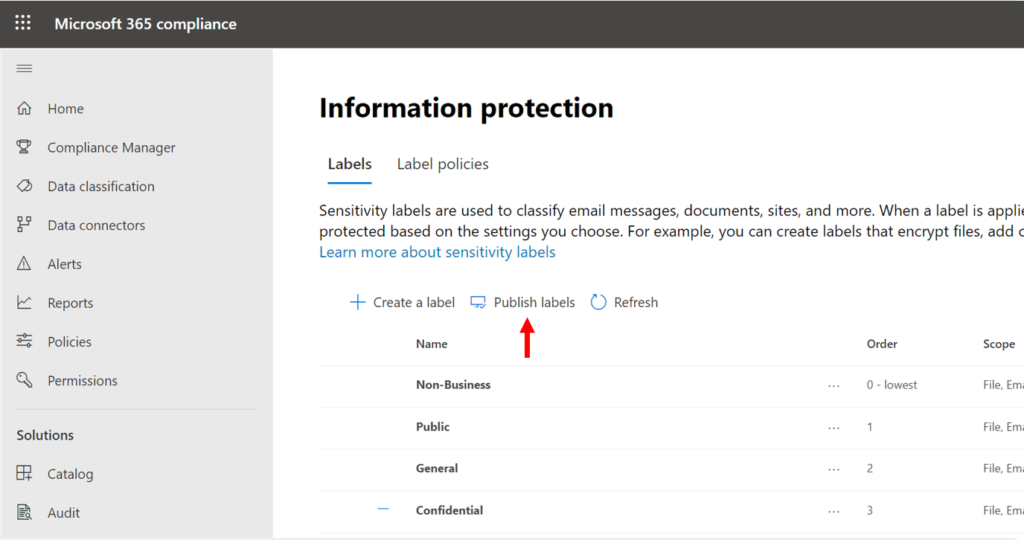
Before you even create your first label, go and turn on labels for OneDrive and SharePoint so you can have these superpowers available in the web as well as the client apps (note there can still be limitations when using them online). From the Compliance center (https://compliance.microsoft.com), go to Information protection and find the yellow banner, then click Turn on now.

You must also enable labels for Groups and Sites so that you can classify containers like Teams and SharePoint Sites rather than just files. You can use this PowerShell script to get that done quickly.
Note: You must have the Azure AD Preview PowerShell module and the Exchange Online Management PowerShell module installed in order to run that script; and yes, you will be prompted to sign-in twice, as you must connect both to Azure AD and the Security and Compliance center.
Step 2. Plan Settings for Groups and Sites
If you ran the script, then when you go to create or modify your labels you will notice that you have the option to configure settings for labels when they are applied to Files & emails, and also when they are applied to Groups & sites. Let’s start by planning our settings for the latter, first.
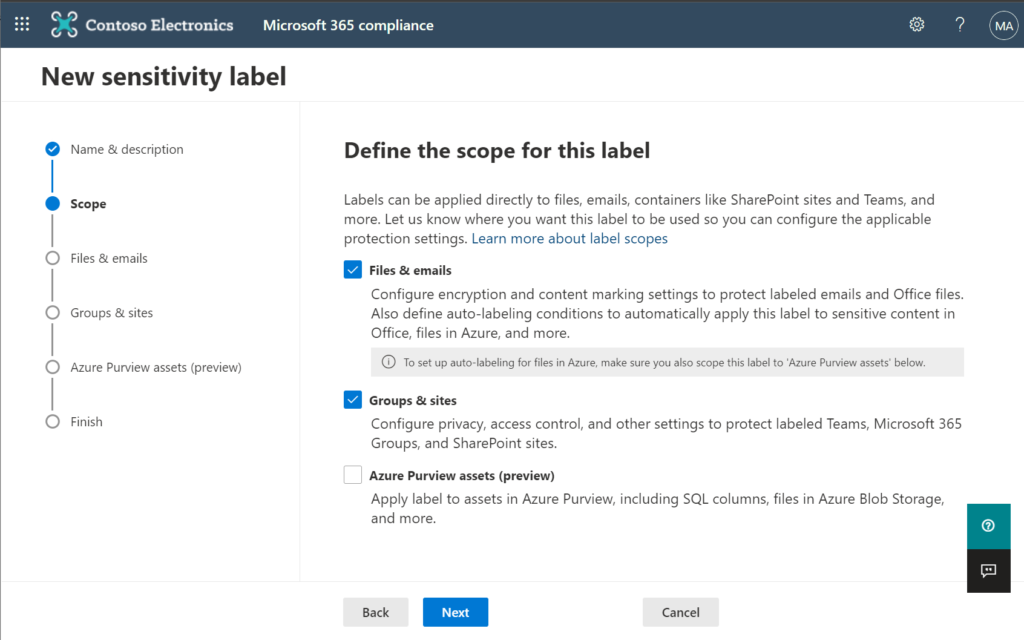
For Groups & sites, I recommend publishing the “top level” of labels only (do not configure any Group/Site settings on your sub-labels). There are not that many different settings to manipulate for Groups and Sites, so there should be no reason to have a large multiplicity of labels here. Not to mention, it just looks cleaner in apps like Teams (for some reason they don’t have a great way to display the sub-labels yet and it just looks awful).
Here is what I recommend using for settings:

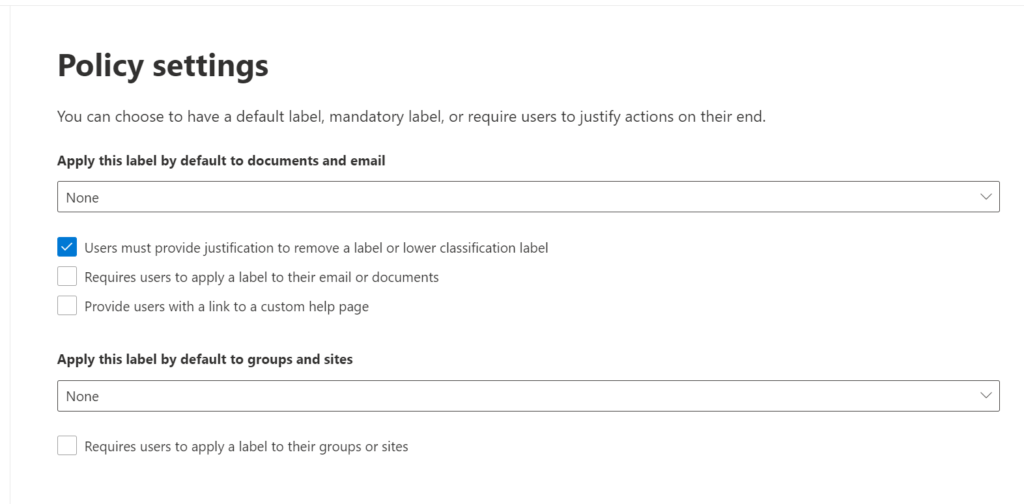
Simply edit each of the labels, and proceed through the wizard, indicating that you want to configure settings for Groups & sites. Then make the selections indicated in the table.*
Again, if you choose to implement Highly Confidential as a further privacy distinction, then the “no external sharing” line would generally be drawn at that last label. In that case I would still allow external users for Confidential groups & sites, but restrict the site’s sharing settings so that everyone has to authenticate (e.g. New and Existing guests, or Existing guests only) and therefore we will always have an audit trail.
*Note: in my experience, many organizations have not yet adopted Intune and Device Compliance via Conditional Access, therefore I would not include the Conditional Access settings such as Limited web access or Block access until the device on-boarding has been completed. However, check out the new integration with Conditional Access authentication context; this would allow you to require stronger access controls for sensitive groups and sites.
Step 3. Plan Settings for Documents and Email Messages
Next we should define the settings that we want to apply to Files & Emails. Here I am only going to define settings for the sub-labels, not any of the top-level labels (the top-level labels can still be applied to files, it just doesn’t do anything special like encryption or content marking). You can of course choose to do things differently; this is just my “starter kit” approach.
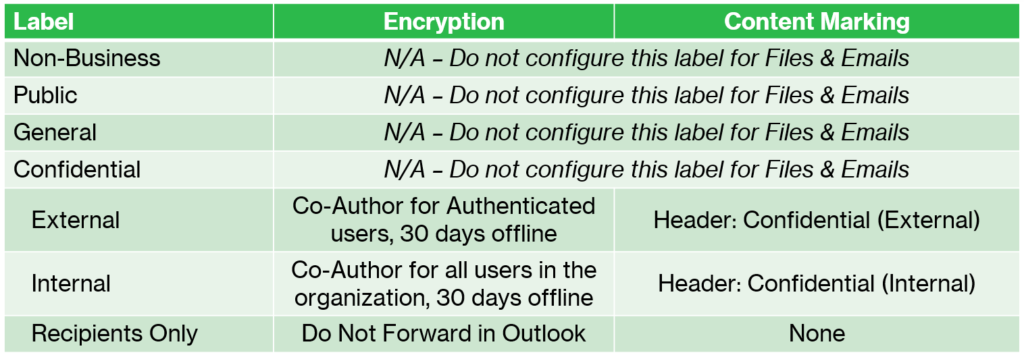
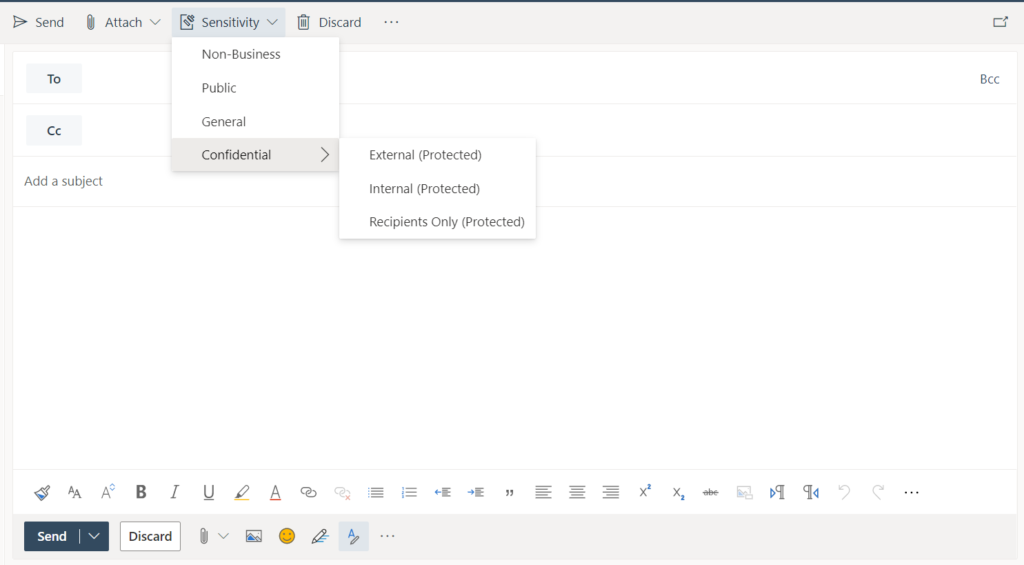
The External sub-label can be used to share protected (read: encrypted) files and email messages with any user inside or outside the organization, including guests who sign-in with a one-time passcode. In Outlook, this has a similar effect to the Encrypt-Only template.
The Internal label, by contrast, can only be shared with individuals inside the organization. Even if a file or message were to be accidentally sent to the wrong person (external to the org), that recipient would not be able to open and work with the data.
I include the Recipients Only (Do Not Forward) option just so that users have the ability to send messages that can be read and replied to, but not forwarded, copied, or printed. So some additional restrictive permissions get applied to the message and attachments in that case (this label is only available in Outlook).
You can optionally include another level above External called “Anyone” or “Not Protected” which does not apply any encryption, but perhaps still maintains a header marking or similar. This would make it easier to share certain confidential information, as it does not require the end user to authenticate in order to read the document or message. If that describes a use case in your org, then by all means you can add another sub-label and promote it up to the top of the list under “Confidential.”
Step 4. Publish the labels
Once you have the labels all created according to your plan, you can publish the labels using a label policy.
I keep this as simple as possible, and just assign all labels to all users. Policy settings are up to the organization’s preference. Remember: if you later added more classifications such as Highly Confidential or Top Secret, you can always publish those with another policy at that time (and sometimes a new label might only be published to a specific group of people, e.g. “Management team”).
For example, I generally always require users to provide justification to remove or downgrade a label. Optionally, you can set a default label for files and emails, as well as for groups and sites. Or alternatively choose to require a label for each (personally I would not implement both of those options: either apply a default label or require a label, but not both). Requiring labels can be a good path for the SMB, where most will not have access to automatic labeling (a feature locked behind the more expensive E5 subscription). This will force users to pick a label for any file created or modified moving forward.
You could also provide a “help page” for users (just use a Communication site in SharePoint), which can be a nice touch and give them a place to go for more detailed descriptions of each classification along with some examples. The same site can be used to communicate other policies such as Data Retention, Personal Mobile Device Policy, and so on. And that brings us to the final step!
Step 5. Train users (a.k.a. data owners)
The step that everyone forgets!
If you do not train your end users, then your implementation will fail. Success is measured by adoption! Data Protection is the responsibility of all members in an organization. We can implement some technical “stuff” like labels and label policies to make the task easier, but at the end of the day the responsibility falls on your people. They need to understand the importance of data classification, and protecting sensitive information in particular.
I recommend that you offer live instruction (can be done over Teams) with Q+A time at the end, and be sure to offer it multiple times to catch different schedules. Record the events for playback. Then update/refresh the training annually. This can be one part of a larger Security Awareness and Skills Training Program (Critical Security Control #14).
Conclusion
This is obviously a very simple classification scheme, but that is why I love it so much. Most SMB’s that I work with have no experience with Data Classification at all, and currently have trouble separating sensitive from non-sensitive or internal from external datasets easily. They would normally rely on segmenting data by containers and ACL’s in the past, which certainly has its limits in today’s modern workplace.
The “starter” set of labels that I have laid out above dramatically improves the situation for any SMB with limited cybersecurity or compliance resources, and is pretty easy to adopt, as well. In some orgs, there will be more compliance requirements which may suggest more or different labels, but this is a really good first step.
Later this year I will launch a Data Protection Starter Kit. This product will include scripts, written guides and policy templates, training decks with example video instruction, and Statements of Work to implement several Data Protection and Data Governance features in Microsoft 365, of which Sensitivity Labels will be just one aspect.
When it launches, I will be sure to announce it. Stay tuned.
Comments (17)
Thanks Alex for this. Can you plan when you get time do a bp if there is one on Information governance in M365 Compliance?
That is sort of what the Data protection toolkit will be about. The thing with the governance stuff is that there is no “best practice” except to not ignore it. Every org may have different requirements that suggest different labels with different values, different retention requirements, external sharing considerations and so on. But the Kit I am working on is something that I find works for a lot of small and mid-sized orgs, and in some cases it just means knowing what values you have to choose from. But the labels outlined here, for instance, will be importable via PowerShell when that kit drops.
What should the top-levels be scope to?
Non-Business: File,Email
The others: File,Email,Site,UnifiedGroup
Note that you only have to specify actual settings/controls for Sites and Groups on Public, General, Confidential top-level labels; e.g., you do not have to apply content marking to them (highly optional–only if you want to).
And thank you, looking forward to the kit.
Hi Alex,
first of all thank you for this great write up. You mentioned, that you configured the “Do Not Forward” label to only be available in Outlook. May I ask how this is achieved? I could not find that option anywhere, not even in the advanced settings for label policies one can set via PowerShell.
Best Regards
Yes, since it is a user-defined option it just means that you select the Outlook option but not the other option to allow users to label in Word, Excel, etc.
Hi Alex,
please ignore my previous comment, I found the option I searched for.
Best Regards
Ho Alex, really love this article and keeping this Information Protection topic simple. You really can het lost in this subject but i like your baseline. Any idea when the kit will be available, it will help the community so much
I’ve been a bit slower than anticipated with some unexpected life stuff, but I still hope to have it out before the end of the year.
Why do Non-Business, Public and General show up as sensitivity options for an email as per your screenshot when they’re only enabled for Groups and Sites?
Labels will always show up in files and messages, whether you have settings specified or not; they can still be used to label the document in that category. For groups/sites it is different: no settings = label not available.
Helpful article, thanks. We need to go beyond Office documents though – PDF and various image formats primarily. Judging by the Microsoft web pages PDF looks doable with effort by moving to unified labeling. Images may not be possible, and we need to see if labels are retained when Office documents are converted to PDF. Ideally inbound emails and attachments would have labels applied automatically, but we’re a way off that yet!
There is a Windows client you can install that would allow you to apply labels to images and other files using file explorer (right click to find the protection option), but I would want to test various file formats to see how they work in production thereafter: on the web and off. My guess is the same; it probably isn’t 100% where we’d like it to be just yet. But I still have to spend more time playing around outside of the Office apps to know for sure (I do 98% of my work in the MS Office suite, and it works pretty well there). As for automatic labeling, there are many options but they are all E5 (usually not in SMB budget).
Thanks for the response, and for mentioning a Windows client – something that didn’t occur to me. Is there a product that you would be comfortable mentioning? In the average week, we have a thousand or so PDFs and maybe ten times that number of images, but far fewer MS Office documents. As you can see, the situation for us is the exact inverse of yours. I like the idea of Term Sets, but to work for us they would have to be fully functional outside SharePoint. It’s as though we’re operating in a grey area between document classification labels and Term Sets with insufficient cross over to help us.
Hi Alex,
RaM here again :). With all the new changes is this blog still applicable? FYI, I still use it as a reference. Thank you!
I don’t see why not. I guess there are a couple more options now that you could optionally add such as label color, etc. But the concepts are still the same, and I still start from the same template.