How to migrate from Office 365 Essentials Dashboard Integration to Azure AD Connect
As we’ve previously discussed on this blog, Windows Server Essentials comes with the ability to integrate with Azure AD & Office 365, using the Essentials Dashboard plugin. It is important to know that this technology is very different from the more widely adopted Azure AD Connect. While there is nothing really wrong with the Essentials plugin per se, it should never be used in conjunction with the Azure AD Connect tool.
True Directory Synchronization does provide a host of other benefits over and above the Essentials integration, such as the option to configure Single Sign-On (SSO) and some advanced write-back capabilities (e.g. if you want your users to have self-service password reset). So how do you move from one tool to the other, if you’ve already implemented Essentials for example?
Before you proceed, just know that installing Azure AD Connect on Windows Server Essentials edition is not supported. So it should be deployed on a Windows Server Standard edition server.
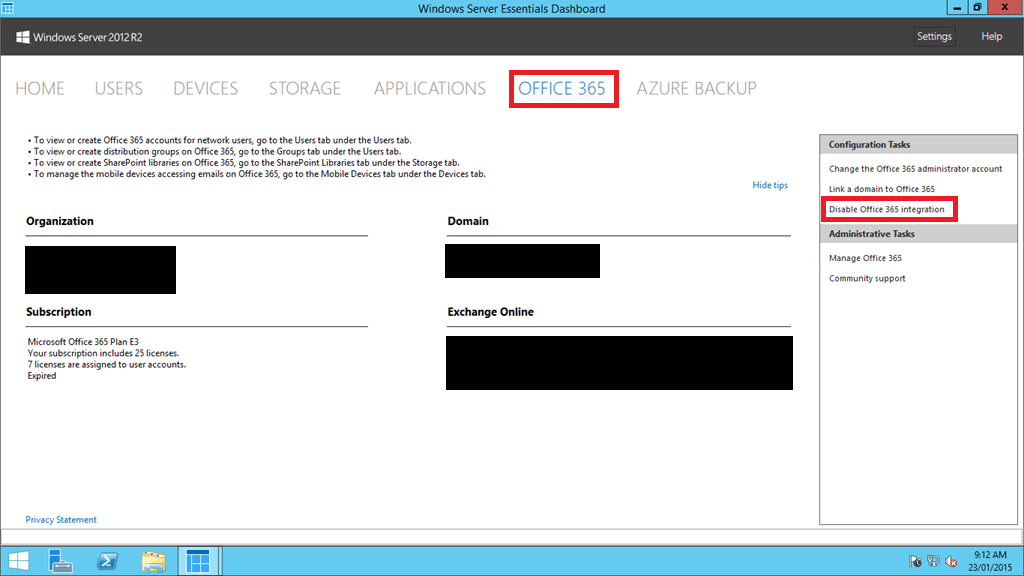
Step 1. Disable the Essentials plugin
First, open the Essentials Dashboard, and find the Office 365 area. Click Disable Office 365 Integration.
Step 2. Prepare SMTP matching & the UPN suffix
By default, Azure AD Connect will attempt to match accounts up based on SMTP address. Therefore, you should have the Email address field accurately filled out on the General tab of each user account. But more than that, it is strongly recommended that you match the UPN / logon names as well.
Most often, organizations have a more localized domain name like “company.local” internally, which is different from their external (email address) domain name “company.com.” What you need to do in preparation for this switch-over to true Directory Synchronization is to match the user account logon names between the on-premises Active Directory and Azure Active Directory in the cloud.
Most likely, the cloud accounts are already using the email address as their logon name. On-premises, this may or may not be the case. Check it out in Active Directory Users & Computers: select one of your users to view the Properties of a user object, then pick the Account tab.
The goal is to have this logon name be [email protected]–that is, matching the domain suffix used for the email address–and not the local domain name [email protected]. Note that you can also bulk-select accounts and make this change on many objects at once.
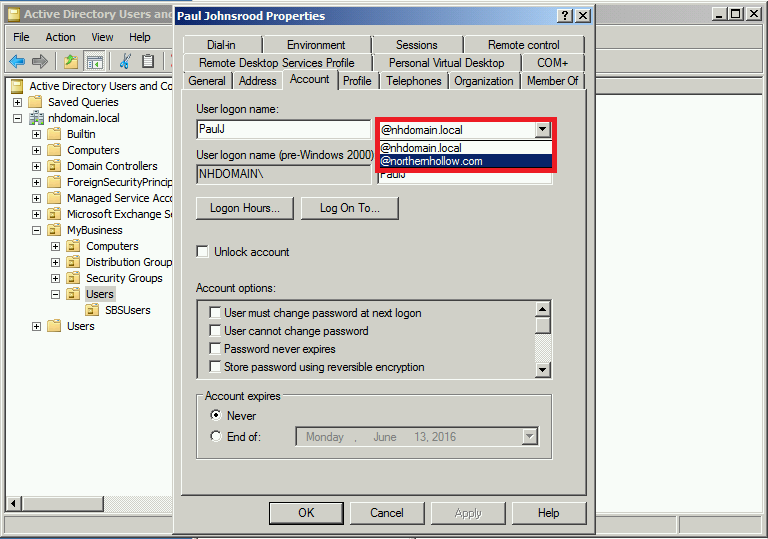
If you do not have the option to drop down your suffix and choose the alternative, you can easily and quickly add the suffix using the Active Directory Domains & Trusts console. Right-click Active Directory Domains and Trusts, and select Properties. Enter your email domain name and click Add. Click OK.

Step 3. Ensure you have the Exchange schema extensions for Active Directory
You are going to want to see the footnotes at the end of this article for more information about this, but the high-level is that Microsoft wants you to maintain an on-premises Exchange server for management purposes when you setup Directory Synchronization, wherever Exchange Online is present.
However, that having been said, if you previously had an on-premises Exchange server in your environment, then you probably have everything you need to proceed as-is. For example, if your user accounts on-premises already feature the proxyAddresses attribute (see this post), then you can skip ahead to Step 4.
Otherwise, you will want to run the Exchange Server setup first. You can basically follow the steps in this article, you just won’t have a legacy server to remove, most likely. Yes, you can install this on a member server, or also on a domain controller. It is supported, but not recommended by Microsoft.
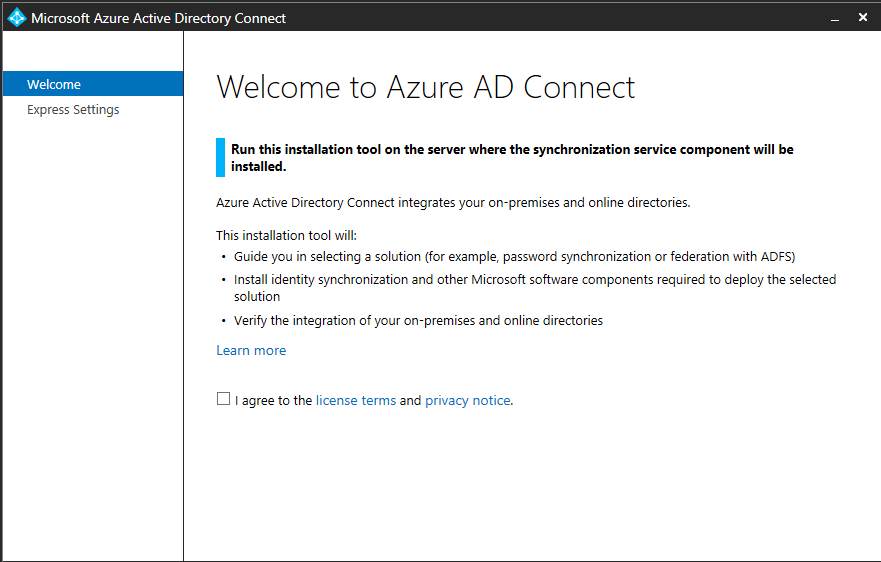
Step 4. Install Azure AD Connect
Now that you have your email addresses and logon names with UPN suffix matching, you can download and install Azure AD Connect to synchronize the accounts, and configure the other options you like. I typically choose the option to filter by OU, so that you don’t synchronize unnecessary objects.
After you complete the installation and data begins exporting, you should be good to go. If there are any issues with the soft-matching process to link up the accounts, you can also refer to my article on hard matching. From here on forward, all on-premises adds/deletes/changes will be automatically synchronized to Office 365.
Once a new user is created on-prem, you may have some additional work in the 365 cloud portal to assign them an Office 365 license, thereby activating their mailbox, etc. While you will edit user account properties on-premises using familiar tools such as Active Directory Users & Computers, some things will just need to be done online in the portal (in other words, don’t keep using the Essentials Dashboard).
(Footnotes)
As I mentioned above, technically speaking, Microsoft’s official stance is that you should maintain an on-premises Exchange server to help with managing the accounts on-prem and in the cloud. (For example, so you can add alias Email addresses, without modifying the proxyAddresses attribute through a third party tool or ADSIedit.)
But, it is not a hard requirement, just strongly recommended. The reason I say this now is because I have received mixed messages from Microsoft lately as to the support status of Azure AD Connect without an on-premises Exchange server. The support team has directly told me over the phone during two recent (and separate) support cases that it is indeed supported, but their online documentation (cited above) still seems to suggest the opposite.
If you do want an on-premises Exchange 2016 Server, go ahead and add one as described in this article, and run the Hybrid Configuration Wizard to make it all “official.” That will also give you the option of having the local server act as an SMTP relay, which should successfully relay local mail (e.g. from a scan-to-email device) into the Office 365 tenant. Of course, you can also configure a connector to do that in 365 directly. But it is your choice.
That’s a wrap, let me know if you have any questions or comments, below!
Comments (5)
Hi Alexander,
Can we still continue usng the remaing Essentials Experience features, as long as we don’t enable office 365 intergartion?
Thanks
I think so. The sync is the only thing I know of that is truly terrible.
great info on how the ADConnect sync works.
I’m replacing a Windows 2012 Essentials Server + Office/MS 365 Premium with Windows 2019 Essentials server. The Essentials dashboard is the only way users have been managed to date.
To simplify my AD migration to 2019 Essentials, I would like to simply create a new DC and manually add the 12 local AD users with their matching email addresses. Then setup AD Connect.
Would this work if AD Connect is matching email address?
It should, but you can always do a hard match if it fails or tries to create duplicates on you.
By the way, why keep a server at all? Most SMB’s can go to 100% cloud now.