Understanding Email authentication (SPF, DKIM and DMARC) in Office 365 Exchange Online
For a long time now, we administrators have had the ability to provide email authentication for our customers using SPF, DKIM and DMARC. However, an embarrassingly low percentage of us actually take advantage of these tools. That means it is fairly trivial business for a third party to spoof messages that appear to originate from your domain. Therefore, to prevent Hacker McHackerson from taking advantage of this situation, it is strongly recommended that you publish an SPF record, as a bare minimum, though implementing DKIM and DMARC on top of that is even better.
Let’s go through each of the authentication methods, and what they do for you.
SPF = Sender Policy Framework
The SPF is essentially just a TXT record that is published in DNS, and its function is to advertise to the world who is allowed to send mail on your domain’s behalf. When you build this TXT record, you should try to include as many “legitimate” sources of email as you can. For example, for mail that is just hosted at Office 365, with no other possible senders, you only need the following:
Host: @ <or your domain name>
TXT value: v=spf1 include:spf.protection.outlook.com -all
For other third party mail systems such as Mail Chimp, Constant Contact, your web host, etc., you can usually find their SPF information using a quick Google search, or by contacting their support. (Often, they will even help you with DKIM.) For your own on-premises apps or MFP/scan to email devices, you may want to include an ip4 entry for your company’s external IP addresses. Let’s say you had a combination of Office 365 for hosted email, Constant Contact for bulk mailing/marketing emails, and an on-premises copier/scanner internally, with your organization’s external IP being 87.65.43.21. Then you would have this SPF to publish:
Host: @ <or your domain name>
TXT value: v=spf1 include:spf.protection.outlook.com include:spf.constantcontact.com ip4:87.65.43.21 -all
Notice the hyphen preceding the word all at the end of the record. The hyphen indicates that your policy is set to “hard fail.” In other words, you are saying to recipient servers: if a message came from my domain, but is not one of the senders on this list, then it is not legitimate mail–treat it as junk. If you aren’t sure if you have accounted for all of your legitimate mail sources, then you can opt for a “soft fail” policy option, by using a “tilde” or ~all rather than a “hyphen” or -all. This tells recipient servers that if the sender is not listed on your SPF record, then it is still okay to allow the message through, but they may treat the message with more caution. The last policy option available to you (and not recommended) is ?all, and that policy is the same effect as having no SPF record–it just lets all messages through–so again at least stick with soft fail until you are more confident you have tracked down all legitimate sources of email.
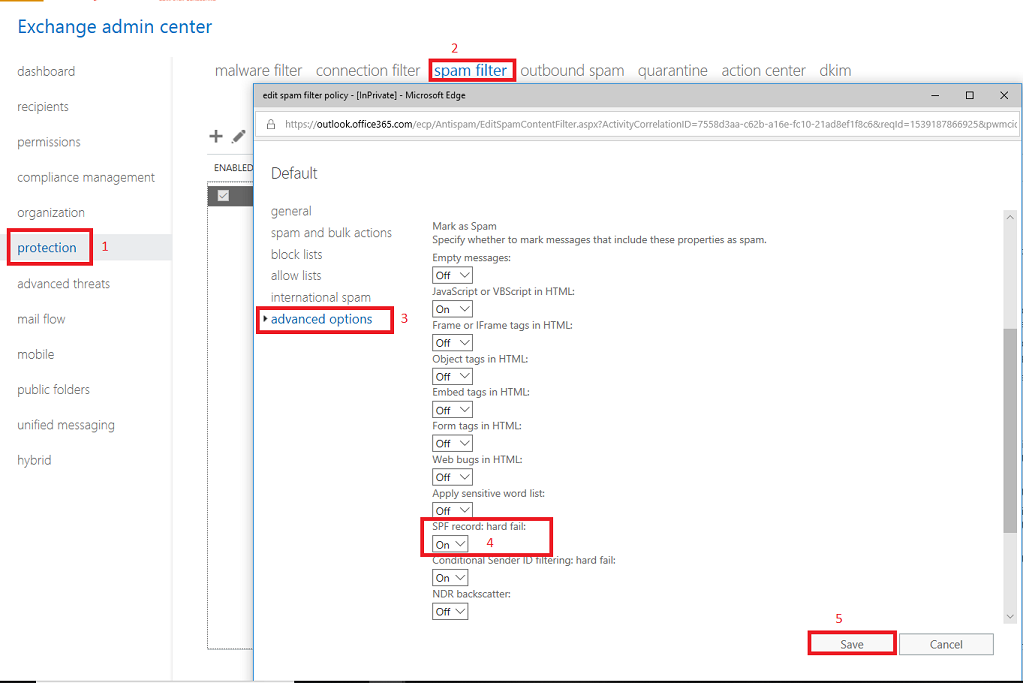
Let me also show you one place where you can tweak your anti-spam settings, so that your Office 365 Exchange Online instance will reject senders who “hard fail” the SPF check. However, realize that the protection is effective only when the sender’s domain has properly configured their SPF (most major service providers already do). Like everything when it comes to questions of security, this is not a blanket protection by any means, but it is nevertheless an important layer you should have in place.
In Exchange Online admin center, go to protection > spam filter. Edit your policy, and go to advanced options, scroll down to find the option SPF record: hard fail, turn it to On. Save.
In PowerShell, this can be accomplished on your default policy as follows:
Get-HostedContentFilterPolicy | Where-Object {$_.IsDefault -eq $true} | Set-HostedContentFilterPolicy -MarkAsSpamSpfRecordHardFail On
DKIM = Domain Keys Identified Mail
DKIM is an authentication system based on an asymmetric cryptographic key pair–a private and public key. When a message leaves Office 365, it is digitally signed with the private key. The public key is published via a DNS CNAME record, so that recipient servers can validate the signature. Using this with SPF is a much stronger form of authentication, since your digital signature proves to recipient servers that individual messages really did come from the “right place.”
By default, your “OnMicrosoft” domain already has DKIM configured and working. But if you are bringing a “vanity” domain name such as contoso.com (most organizations are), then you will need to setup DNS records for your domain(s), and then enable DKIM message signing in Exchange Online.
Step 1. Build your CNAME records
You will need to build two CNAME records per domain for DKIM. How these records are built is as follows:
 Host name: selector1._domainkey.CompanyDomainName.com
 Points to: selector1-CompanyDomainName-com._domainkey.TenantName.onmicrosoft.com

 Host name: selector2._domainkey.CompanyDomainName.com
 Points to: selector2-CompanyDomainName-com._domainkey.TenantName.onmicrosoft.com
Therefore, contoso.com looks like this:
 Host name: selector1._domainkey.contoso.com
 Points to: selector1-contoso-com._domainkey.contoso.onmicrosoft.com

 Host name: selector2._domainkey.contoso.com
 Points to: selector2-contoso-com._domainkey.contoso.onmicrosoft.com
Note: Under “Points to,” the hyphenated version of your domain name that comes after selector1- or selector2- should match the domain as depicted in the MX record that is generated by Office 365. E.g.: contoso-com.mail.protection.outlook.com. So just make sure those values match. Also, the tenant name is found on all users as an alias, and if you create a new cloud-only user, you could choose to create one with this suffix, e.g. [email protected]–that suffix should match the tail end portion.
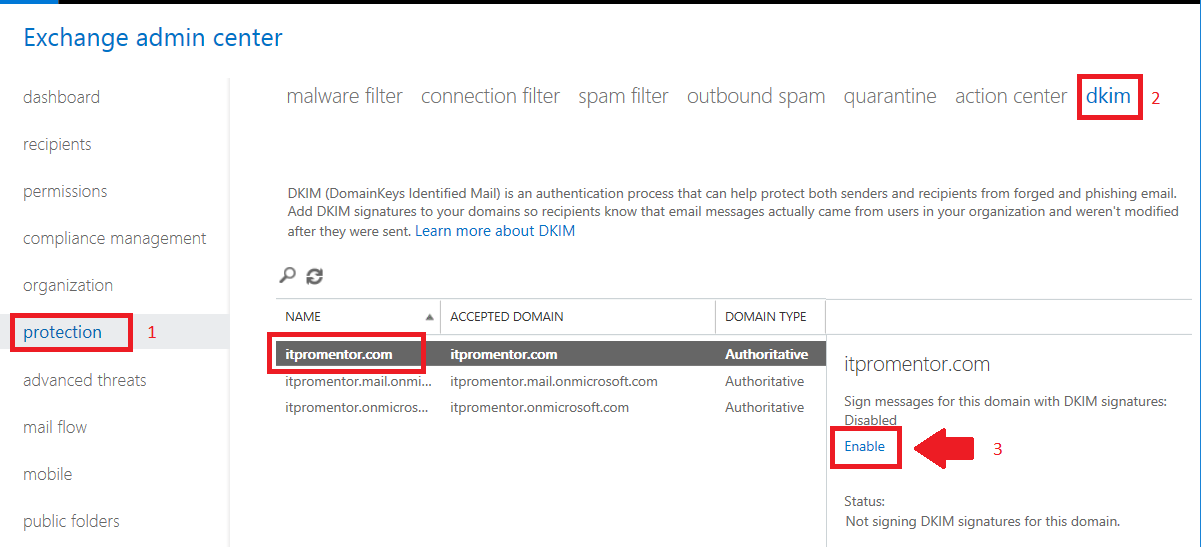
Step 2. Enable signing
Go to protection > dkim, pick the domain that you want to enable for DKIM signing. On the right pane, click Enable. If you haven’t configured your DNS records, this operation will fail out, so be sure to allow enough time for DNS to propogate.
NOTE: You should also have third-party senders get their DKIM information to you, so that you can add the necessary records following their direction, and have them enable signing. This is strongly recommended before moving on to DMARC.
DMARC = Domain-based Message Authentication, Reporting & Conformance
First thing is first: understand that you should not attempt to implement DMARC until you have taken care of the other two, SPF and DKIM, first. The cool thing about DMARC is that you can get feedback, and review reports about messages that are not authenticated by recipient servers. This allows you to see the impact of strengthening your policy, before you do it.
DMARC is a DNS record that tells recipient servers how to treat unauthenticated messages that come from your domain, based on policy. It can also communicate where to send reports about mail from your domain. Constructing your policy and building the record with the correct options is not a trivial task, and you should roll it out very carefully. I won’t go over all of the options here, but instead I will refer you to a couple of helpful resources, and one example.
- This is an article from Microsoft which I highly recommend for Office 365 Exchange Online customers
- dmarc.org can also help you build your policy with these resources
By way of example only, here is what DMARC could look like for contoso.com:
 TXT Name: _dmarc.contoso.com

 Value: "v=DMARC1; p=none; rua=mailto:[email protected]; fo=1"
Walking through the logic of the text record:
- v=DMARC1; = This just indicates the version (1) that is being used for DMARC
- p=none; = The policy is set to “none” in this case, meaning that recipient servers need take no special action on your messages if they fail authentication (you can also choose to advertise quarantine or reject–more on that later)
- rua=mailto:<[email protected]>; = this is where you can specify a place to send failure reports (aggregate), you can also choose to get message-specific reports using ruf=
- fo=1 = this indicates that a DMARC failure report should be produced for anything other than a “pass” result on either DKIM or SPF; other options are 0 (report only if both mechanisms fail), d (DKIM failures only), or s (SPF failures only)
When you are first rolling the DMARC out, it is best to start with the policy set to p=none, because this will allow you to start collecting data about messages that fail the DMARC, and take necessary actions to course-correct using SPF and DKIM before moving the DMARC policy up to a setting of quarantine, or even reject (the strongest setting). The policy setting p=reject, for instance, tells recipient mail servers that they should reject all messages which fail DMARC. Much better to start out with a less restrictive policy, and monitor the results, so that you have a chance to make adjustments before ratcheting up this setting.
Final notes
There are certain situations where email authentication can be enhanced even further with more advanced threat protections such as Microsoft’s ATP add-on product. For instance, this subscription includes anti-phishing policies, safe links and safe attachments. This protection is included by default on Microsoft 365 Business, as well as Microsoft and Office 365 E5 plans. Or, you can add it to any other plan for USD 2.00/user/month.
In general, I hope that more organizations, even (or especially) small ones, are taking the time to setup the full boat of email authentication and related protections–this really is the best approach you can take in today’s world. I recommend all of these options to my customers, and in this order:
- Configure SPF
- Add Microsoft’s ATP subscription and setup all of its features, to help further protect you against phishing and other types of email-based threats and attacks
- Configure DKIM
- Configure DMARC with policy set to none, and monitor results
- Make any necessary adjustments to SPF and DKIM based on DMARC data
- Dial up DMARC restriction from there as results level out
You might wonder why I push the ATP subscription ahead of DKIM and DMARC. The reason is simple: this subscription does not rely on any third parties or feedback loops–you don’t have to do any monitoring and adjusting over a period of time–you can simply get started with it by implementing policies within your tenant, and quickly.
So again, at a bare minimum, take care of your SPF record. I highly recommend ATP to all my customers on top of that. And finally, I urge you to take the time to get your email messages signed using DKIM, and then work toward enforcing that authentication by erecting the DMARC, and monitoring for failures. I know that sounds like a lot of homework assignments, but I can’t stress the importance of this enough. Things out in the wild are getting crazier, before they are getting better. And this is how we get better.

Leave a Reply