A Crash Course in Azure VMs
So you got that Azure trial subscription and deployed your first virtual machine in just a few clicks–good for you! As you proceeded through the deployment, no doubt you would have been asked about stuff like deployment models, resource groups, locations, affinity groups, storage accounts, cloud services and more. Hm, what are those? You think, “I dunno, but it looks like I can accept these defaults and just keep moving.”
If this sounds familiar, then you are probably not planning and deploying your Azure virtual infrastructure properly. Let’s take a time-out to learn more about some of the key building blocks that make up the Azure Infrastructure-as-a-Service offering, as it pertains to deploying new virtual machines.
This “crash course” is intended for an SMB or IT generalist audience, to help quickly familiarize new-comers with some of the lingo, and so they can be better prepared to dive into the IaaS offerings from Microsoft Azure.
Resource Manager vs. Classic VM’s
The first thing to understand is that there are actually two versions of Virtual Machines in Azure, and you can see this through the new Azure portal, from the left menu. The first type is called “Classic,” so-called because it came first and is now the “older sibling” in the family of offerings. The new type is called Azure Resource Manager (ARM). Through the new Azure portal, you are given the choice between deploying either-or.
Note: the old (Classic) Azure portal will only allow you to deploy Classic VM’s. VMs created under the newer ARM model will not be visible here–you would need to choose Classic for them to show up under the old portal. I typically still work out of the Classic portal for preparing this deployment model.
At the time of this writing, the Resource Manager model is still pretty new, and some of the more advanced features are only available through PowerShell. As a result, for SMB’s, I recommend sticking to the Classic deployment model for now.
As we proceed, I want to focus mostly on the parts involved in building on the Classic model, but I will be highlighting some differences in Resource Manager along the way. In the Resource Manager model, through the new portal, it is much easier to address the component parts right when building the VM, because of the way the menus and navigation work.
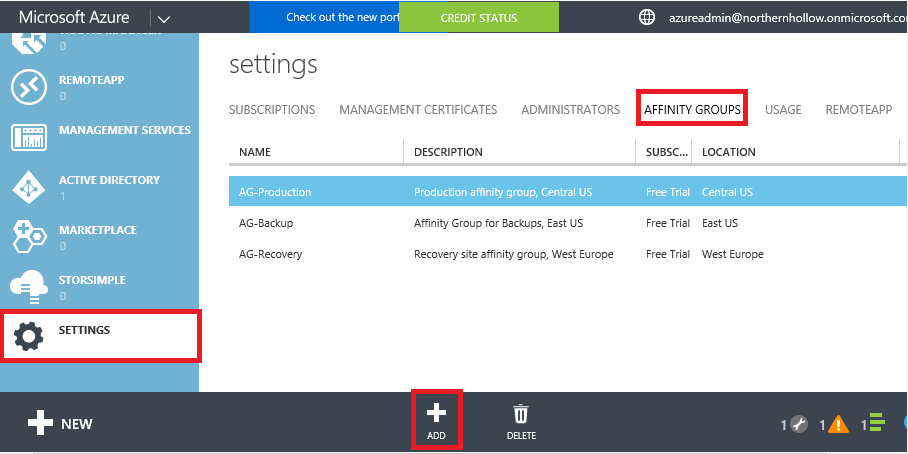
1. Affinity Groups – An affinity group is a type of container used in Classic deployment models only to group objects that should be located “close by” to one another–literally and physically speaking. For example, you probably don’t want to spread your resources all over different parts of a datacenter or even a few different datacenters–for optimal routing and co-location of items, you will start by creating your Affinity groups.
Each affinity group is associated with a region/ datacenter (e.g. Central US). Most SMB’s will probably need a single group, or at most two or three groups. For example, you might create a production group and a backup group, or a development group, and associate them with different regions. In the classic portal, get started by going to SETTINGS > AFFINITY GROUPS, and clicking ADD.
2. Storage Accounts – We started with Affinity groups for a reason–other items such as storage accounts will be associated with them. I recommend assigning each virtual machine it’s own storage account; VM’s that are stored in the same storage account will only boot up one at a time in a serial order, and you are not always able to determine that order, so go 1-1 here.
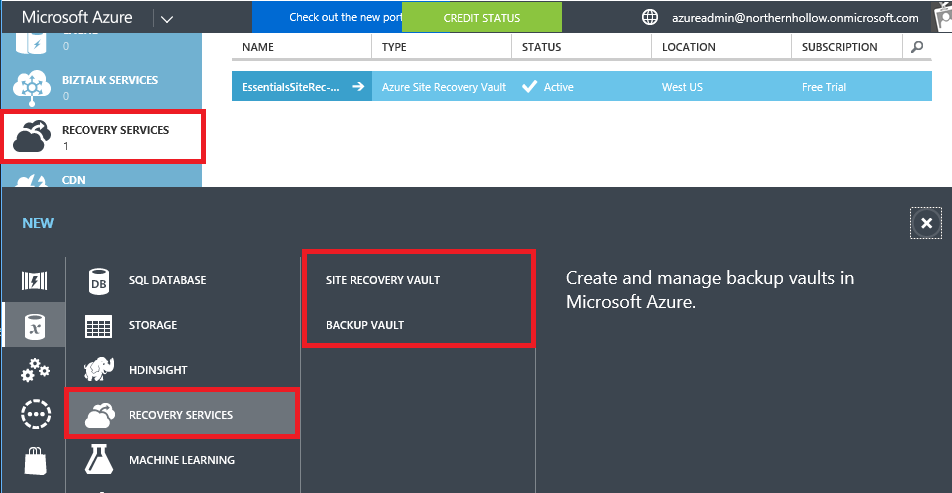
When you setup backup vaults and site recovery vaults, keep those separate also (tip: associate the vaults with an affinity group in a different region from your production site). Note: you will find Backup & Recovery Vaults in a different place from normal Storage Accounts. The former are located under RECOVERY SERVICES, while the latter is located under STORAGE. Backup vaults are for use with Azure Backup, and Recovery Vaults are used for Azure Site Recovery.
A quick note about storage replication: most folks will default to Geo-Redundant Replication for all their storage accounts (GRS)–meaning that your storage will be automatically replicated to another datacenter far, far away in a different region. You can save some coin by selecting Locally Redundant (LRS) storage, which is cheaper (particularly if you are going to manage backup/recovery in another site anyway).
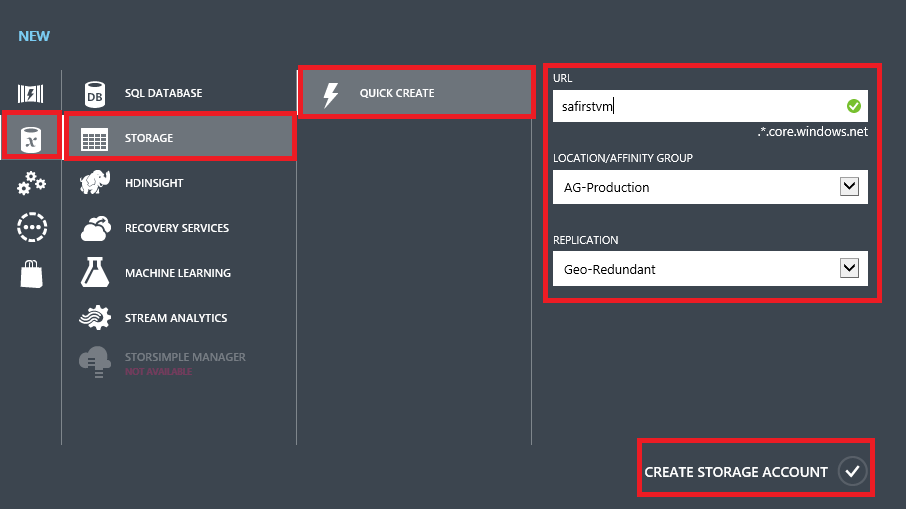
Last, it is worth noting that storage accounts are used in the Resource Manager model of deployment also. They will be part of a resource group, not an affinity group, and you will get to define an additional storage account with each VM that you deploy, for diagnostics purposes–log information is written here, and is configurable in the portal.

3. Cloud Services – Classic VMs are deployed into something called a “Cloud Service“–this is a way of wrapping a single DNS name and public IP address around a set of cloud resources (e.g. VMs).
By default, the New VM wizard will have you create a cloud service with the same name as your virtual machine. But let’s say you create a VM called MyWebServer1, and later on you add MyWebServer2 with the intention of load-balancing these servers using an Azure cloud service. Won’t it be a little confusing to have both of those accessed by the DNS name MyWebServer1.cloudapp.net? Better to choose a neutral name such as MyProdWebServers.cloudapp.net, and put both web servers into this single container.
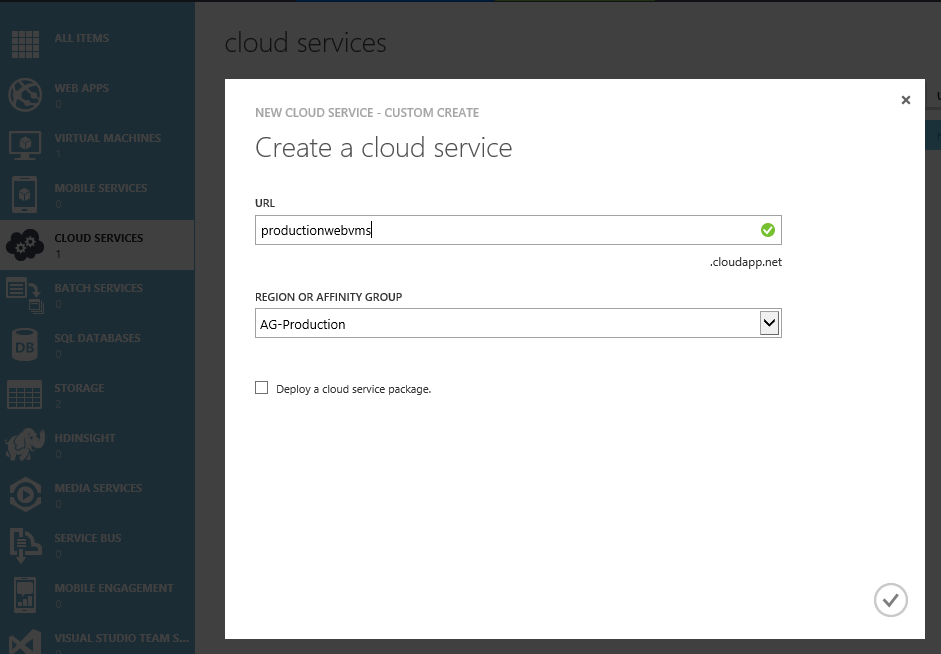
Again, if you’re deploying standalone virtual machines for an SMB, this probably won’t make any difference to you. Still, you should know what it is, and why it is there. Note: in ARM, you will see a public IP with a name instead of a cloud service.
4. Resource Groups – ARM uses something called Resource Groups, which gather resources that are related to one another (and share the same life-cycle). For example, the resources required to support a particular 2-tier app might include a virtual network with two subnets, a load balancer, a DC & database server for the back-end subnet, and some load-balanced web servers for the front-end. These components would be gathered into a Resource Group, which can make templating, managing and deploying new copies/iterations easier moving forward.
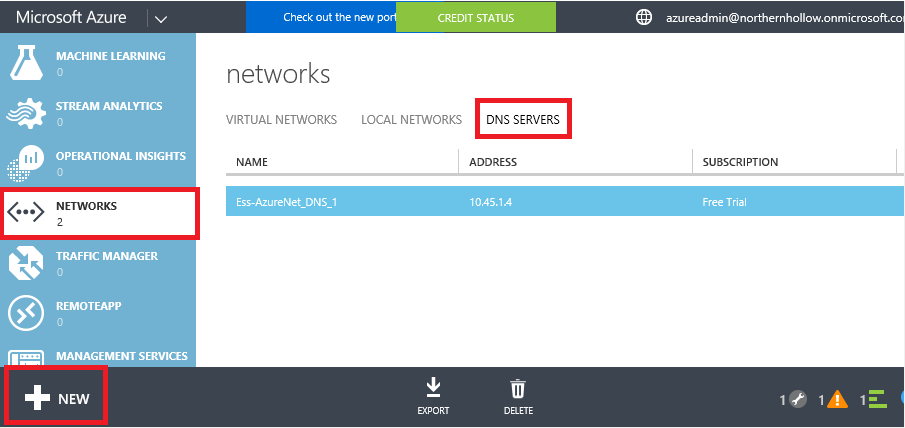
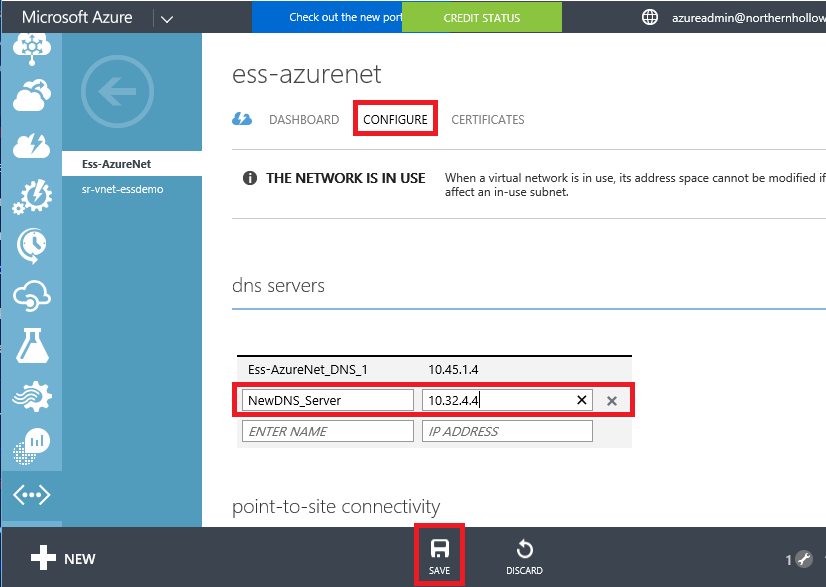
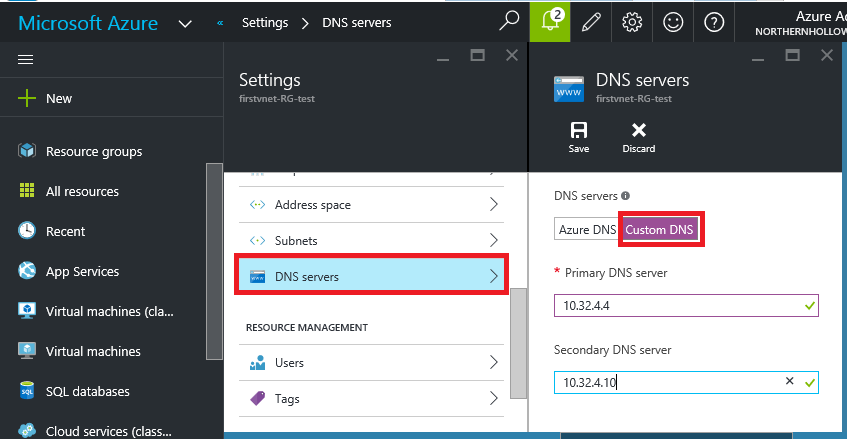
5. DNS servers – These can technically be added either before or after you setup your Virtual Network (next). When you first start out, you will probably be limited to specifying your on-premises/internal AD/DNS servers. You can also add AD/DNS servers that you have deployed in Azure, later on. If you do not specify DNS servers, you will not be able to resolve internal names or join Azure VM’s to your on-premises domain. Input your DNS servers from the Classic portal by finding NETWORKS > DNS SERVERS.
You can also add these at a later time in either portal to virtual networks that have already been created. See Classic and Resource Manager examples below.
6. Virtual Networks – In Azure Resource Manager, these are associated with Resource Groups–just like VMs are. In a Classic deployment, these are associated with a location (e.g. East US)–so be sure to choose the same geographic region as the Affinity group where your VMs will be located. Note that for a standard SMB deployment, might need at least two virtual networks–one for production, and another for DR/restores.
There is more to Virtual Networks than meets the eye. In order connect your virtual network to other networks (e.g. site-to-site VPN to your on-premises location), you will need to create a Gateway. You can also define traffic rules between networks, but we will cover some of these concepts in more detail later.
In the Classic portal, I almost always choose Custom Create, since it allows you to select whether you want to setup VPN right away, and provides options for defining specific subnets, but Quick Create will also work for most SMB’s–you can always choose to setup your Gateway & S2S VPN later in either case.
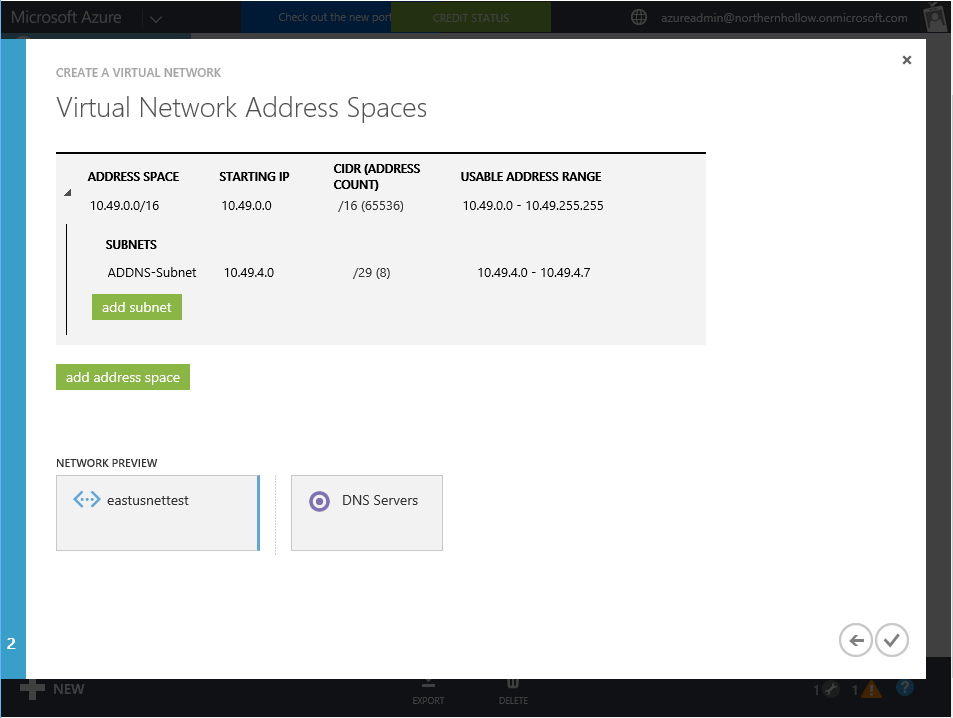
You can split your IP space into several subnets–they will all be able to route with each other by default, and on-premises you only need to create a single VPN tunnel for the full virtual network IP space, not individual tunnels for each subnet.
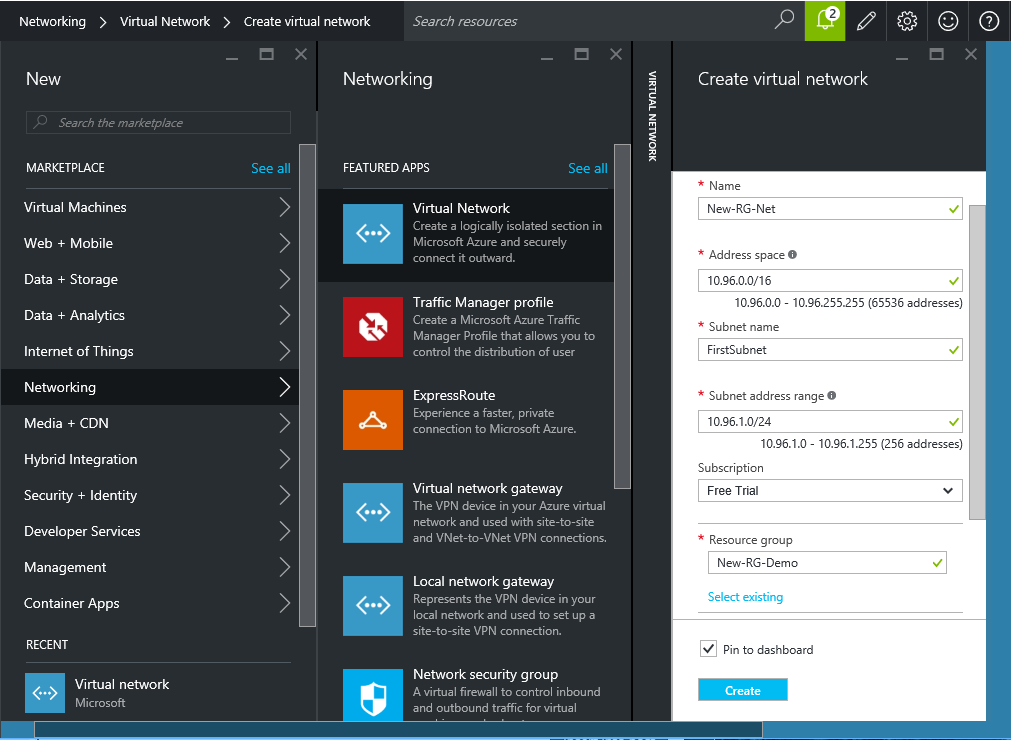
In the new portal, it looks a bit different, but the options are basically the same, just note you will have to configure your gateway & VPN later.
7. Gateways – As mentioned, if you plan to connect your Virtual Network to anything beyond itself, you will need a gateway. This usually gets put on a /29 subnet in your IP space with just a few IP’s. Most SMB’s will just use a Basic gateway, most often with static routing enabled. You can also choose dynamic routing, which is technically more flexible, but most third-party firewalls will not support it–for example, to get this working with my WatchGuard XTM firewall, I have to choose static routing, not dynamic.
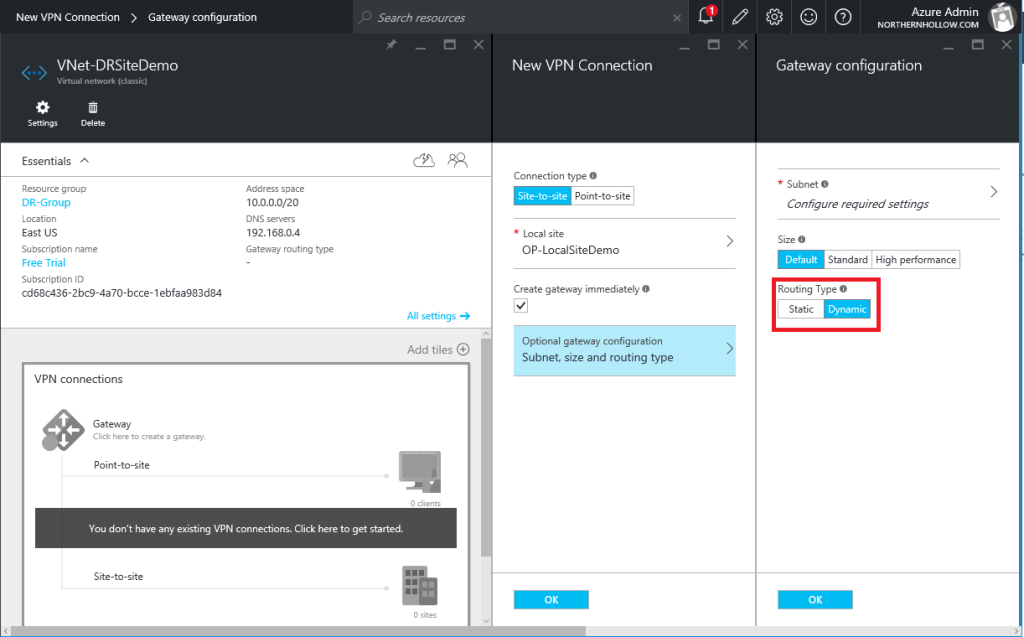
You will also notice a “Size” selector for your Gateway. Default will be fine for most SMB’s. It is limited in bandwidth (less than 100 Mb), which is sufficient for most small businesses connecting over say, a high speed Cable or DSL connection, often with speeds less than that anyway. You can double the bandwidth (and increase your cost) by selecting the next size, Standard.
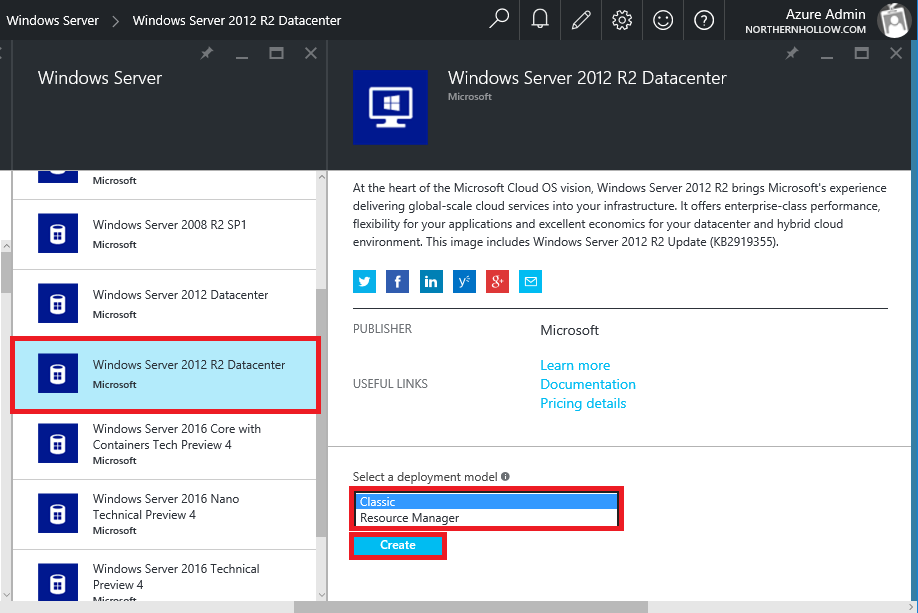
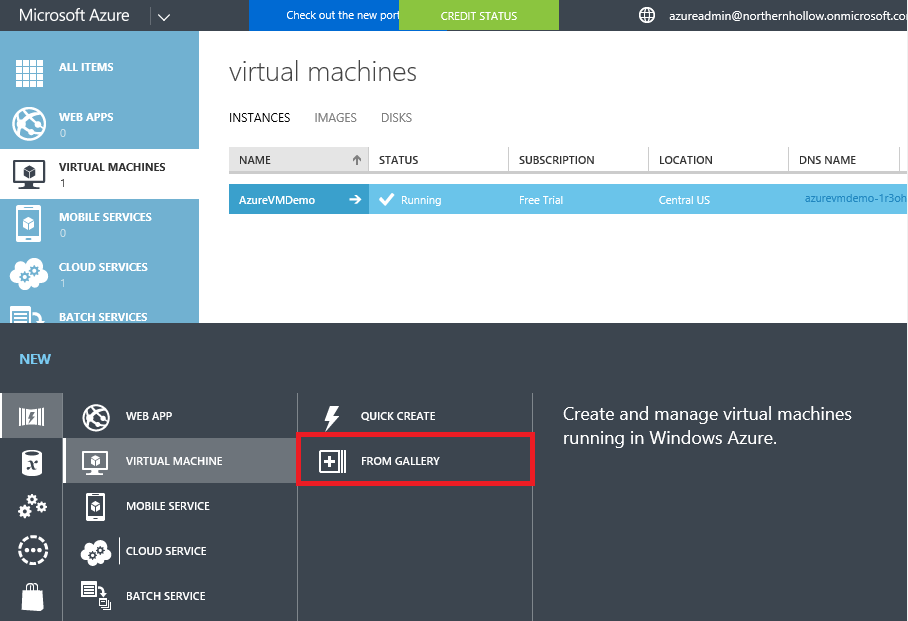
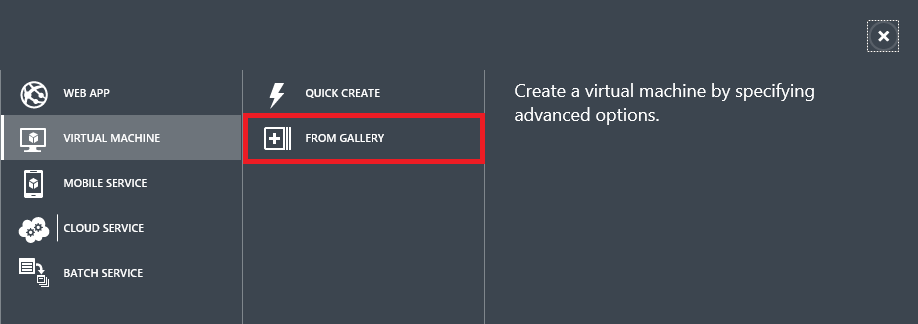
8. Virtual machines – Wheew, now that we’ve created some containers like virtual networks, storage accounts, cloud services and affinity groups, we are finally ready to deploy virtual machines. But before you get too next-next-finish-wizard-happy, let’s be sure we understand a few more things. The first is this: when building VM’s through the Classic portal, always choose From Gallery rather than Quick Create, so that you can specify particulars such as: to which Virtual Network should this VM be attached?
There will be just a couple more items you need to know as you build your VM in the proceeding steps.
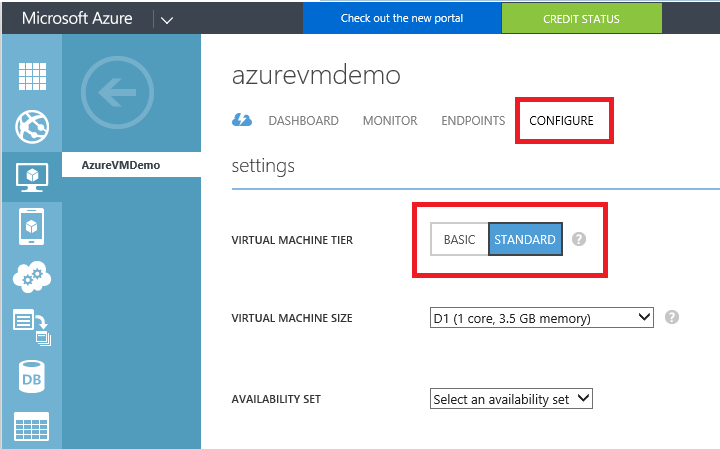
9. Basic vs. Standard VMs – Basic VMs are smaller and cheaper to run than Standard VMs, but there are some important limitations that you should take into consideration.
For example, Basic VMs cannot be load balanced or auto-scaled. Furthermore, they are limited to 300 IOPS/disk. Standard will be limited to 500 IOPS/disk. In either case, if needed you can aggregate these IOPS using Storage Spaces inside the VM (WS2012 or newer). With Basic, you will not have access to SSD/premium disk options either. Last, on both Standard and Basic VMs, it is important to pay attention to the maximum number of data disks you are allowed for each instance. It will not actually tell you this information in the Classic portal, but here is what it looks like in the new portal:
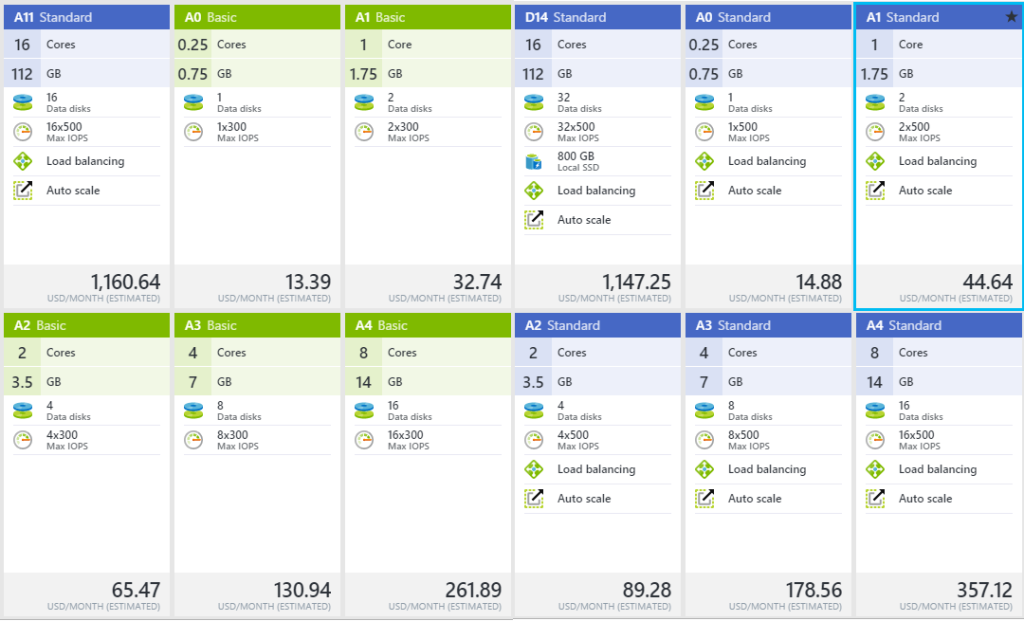
Basic tier is okay for small standalone VM’s, and many SMB’s will find it acceptable for their needs. For instance, if an SMB wants to deploy a backup Domain Controller in the cloud, and replicate their directory information from their on-premises domain–this is a good tier. But for many other use cases, I would recommend sticking to Standard VMs, which will be deployed by default on newer hardware, and have better performance overall. You can always switch from one to the other type as well, after the fact.
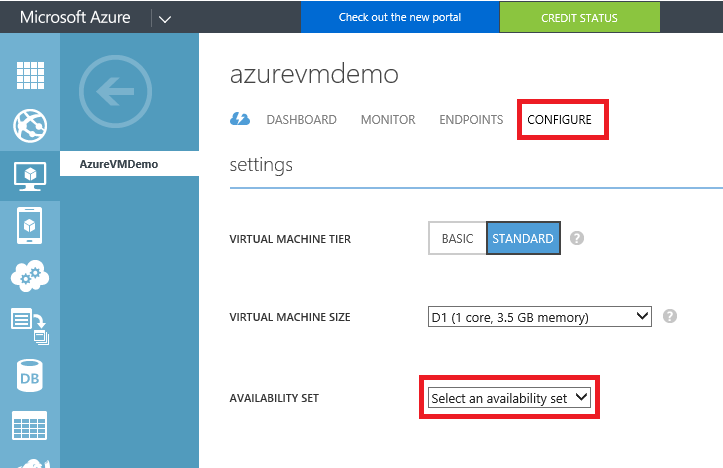
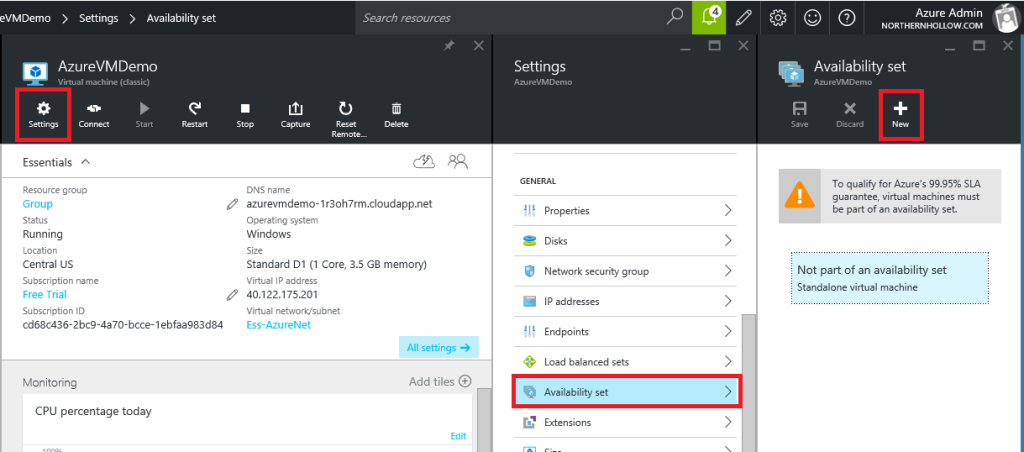
10. Availability Sets – An availability set is another type of container that is used by Azure to ensure that two or more virtual machines are not placed into the same fault domain within a datacenter. If you are deploying a stand-alone VM, then you do not need an availability set. Note: you will not be protected by the Azure 99.95 % uptime SLA unless you use availability sets and build 2x or more of each virtual machine. You can create the set when creating the VM, or you can always edit/add the availability set later by clicking on the VM. In the old portal:
In the new portal:
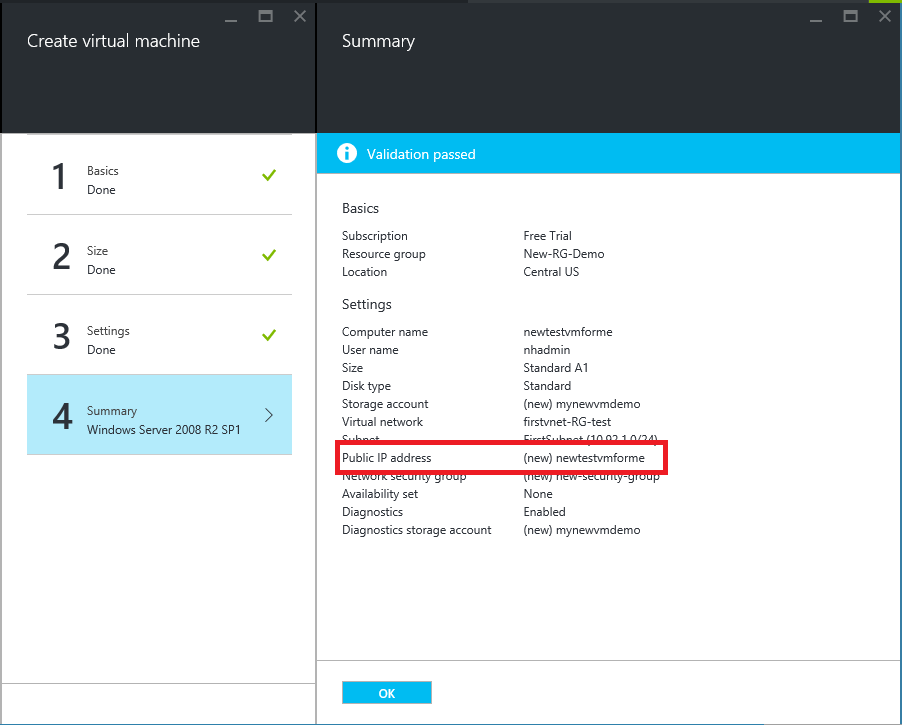
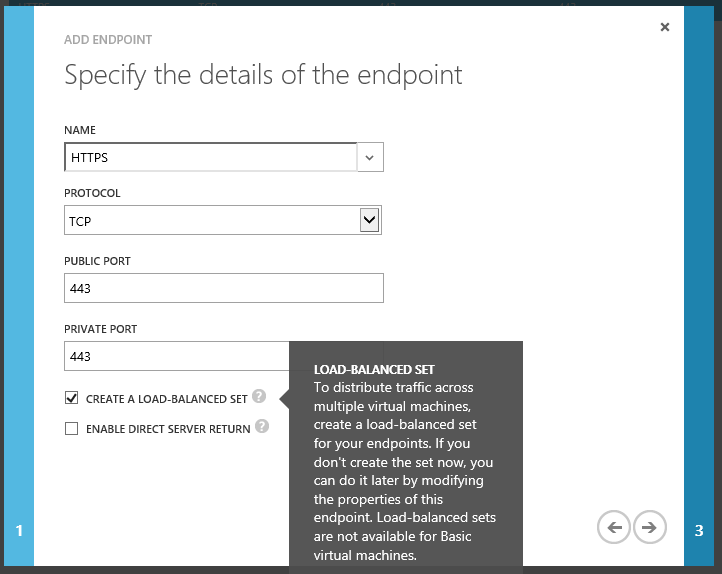
11. Endpoints – An Endpoint is simply an open port in your cloud service or public-facing IP/DNS name that allows external source traffic to enter the VM. For example, all VM’s will be created with a random external port number that maps to 3389 for RDP (Remote Desktop) by default. You can optionally open others, and assign different port numbers on the outside than what the VM uses on the inside. Or, you can choose to leave them the same, for example, as is common with port 443 (HTTPS/SSL). You can create these endpoints as you move through the wizard, or you can set this up after the fact by clicking on the VM and selecting ENDPOINTS from the top menu.
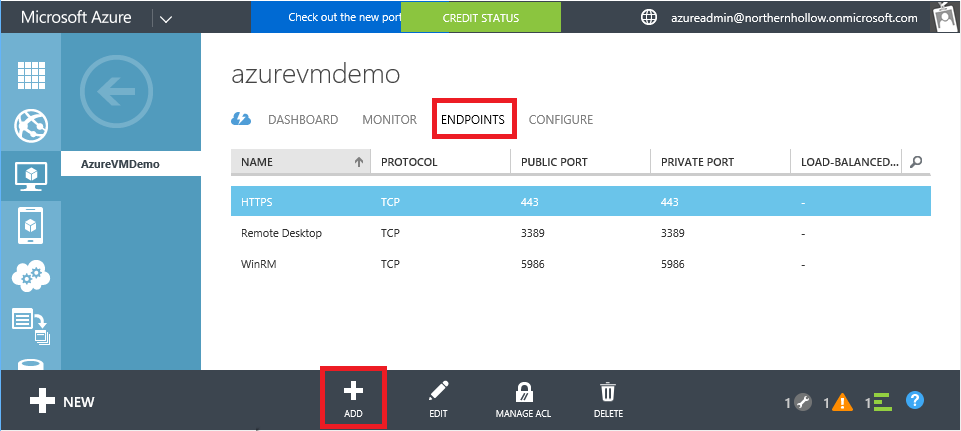
You can also choose to load-balance if placing multiple VM’s behind a single cloud service (Standard VMs only). Note: in ARM, a load balancer is created separately.
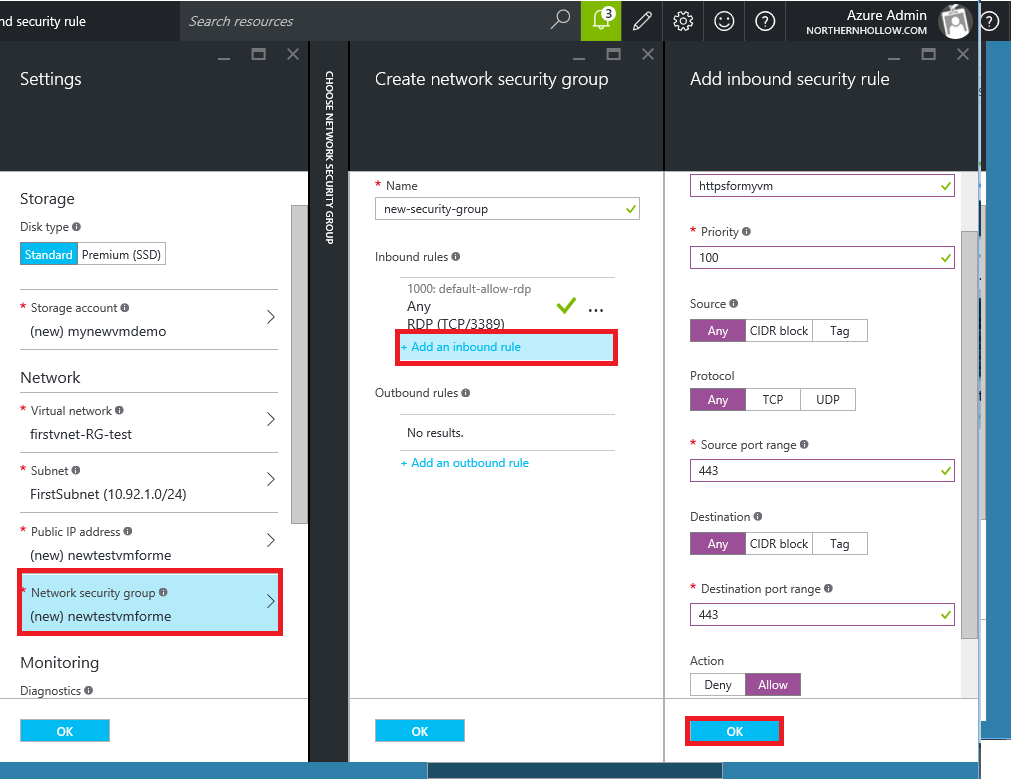
12. Network Security Groups – The concept of “endpoints” is not to be confused with Network Security Groups. These are more advanced than endpoints, allowing you to define inbound as well as outbound rules (i.e. as in a firewall), for allowing and/or denying traffic on ports of your choosing through the Public IP address. Note that endpoints are applied directly on a VM, and they have to be individually defined each and every time. A Network Security Group can be applied not only to a VM–these rulesets can also be applied to Virtual Networks to restrict traffic flow between subnets. Furthermore, they are able to be created once and reused over and over again on different resources.
Conclusions – This is one of my longer articles to date, and I did not even go into all the details behind each of these, or explain everything you need to know about deploying VM’s in Azure–by a long shot. We’re just covering the basics.
The point is, deploying a VM intended for production is not a trivial operation, and you will need to understand all the component parts in order to properly plan and implement an Azure IaaS solution. So if you’re at all confused by all of this, be sure to contact a partner (or reach out to me with questions).
Leave a Reply