Fast and Free Incident Response Tools in Microsoft 365
As part of the SquareOne Summer Security Series, our group recently explored the topic of Incident Response in Microsoft 365. This was a very well-received course, and I felt a blog post was in order to cover off on some of the important content from that segment, which I think everyone should have in their back pocket, especially if their daily work revolves around serving SMB customers.
Now the ideal scenario would be for every single small business to have a Managed Security Services agreement, and as part of that agreement, I would want them to have a Security Information and Event Management (SIEM) platform such as Azure Sentinel in place to capture audit log data. This kind of setup makes incident response MUCH easier for those of us who actually have to respond to cybersecurity events. But we do not live in a fantasy world, do we? No, we live in the real world, and especially in the SMB market, such fancy agreements and high-tech tools are rarely available (though I hope this changes over time).
Even if you are one of those oddballs who is ahead of the curve, and you actually offer decent managed security services (this is still incredibly rare according to my research), you will likely still run into situations with prospects or otherwise, where you will need to work with whatever data you can get natively from the cloud services, without any other products or tooling in place. So to that end, I wanted to share with my readers some of the tools I have been using when called upon to help with responding to incidents in a Microsoft 365 environment.
The PowerShell Modules
There are three basic PowerShell modules I recommend that everyone have installed in order to work effectively with audit data in Microsoft 365.
- Hawk module: Install-Module Hawk
- Exchange Online Management module (V2): Install-Module ExchangeOnlineManagement
- Azure AD Incident Response module: Install-Module AzureADIncidentResponse
Note: You will also need to have the Azure AD module and MSOnline module installed.
The amount of data you can access with these free tools varies depending on the subscription level of your tenant, and also on whether you have enabled the Unified Audit Log. For most SMB customers, we are seeing tremendous adoption of the Microsoft 365 Business Premium subscription. I do not recommend anything less than this to my customers, as it is dollar for dollar the best value in the cloud, and it even includes Azure AD Premium P1. With this subscription you will have 30 days of audit data available from Azure Active Directory (with Business Standard or Basic plans you will only have 7 days).
As mentioned, you should also be enabling the Unified Audit Log using the Exchange Online Management module:
Set-AdminAuditLogConfig -UnifiedAuditLogIngestionEnabled $true
This is not on by default, but once you have turned it on, the Unified Audit Log will allow you to capture and store up to 90 days of audit data from the services in Microsoft 365 (e.g. including Azure AD, Exchange, SharePoint, Teams, etc.). If you have Microsoft 365 E5 subscriptions then you actually get 365 days by default, with the ability to create audit log retention policies up to 10 years if you wish. But again, this option doesn’t exist for most SMB customers (E5 is almost 3x the price of Business Premium).
How you use the PowerShell modules, and what steps you take to respond to incidents will generally depend on what is being reported: what is it that happened which caused us to say, “Wait, we’re in incident response mode now?” But for most of the incidents I have been involved with, I find that the steps follow this pattern:
Step 1. Gather data and highlight low-hanging fruit, form hypotheses
The best way to gather data up front, regardless of what other tools you have at your disposal, is to run the Hawk module. There are two major functions and a couple of dozen minor functions included with this module.
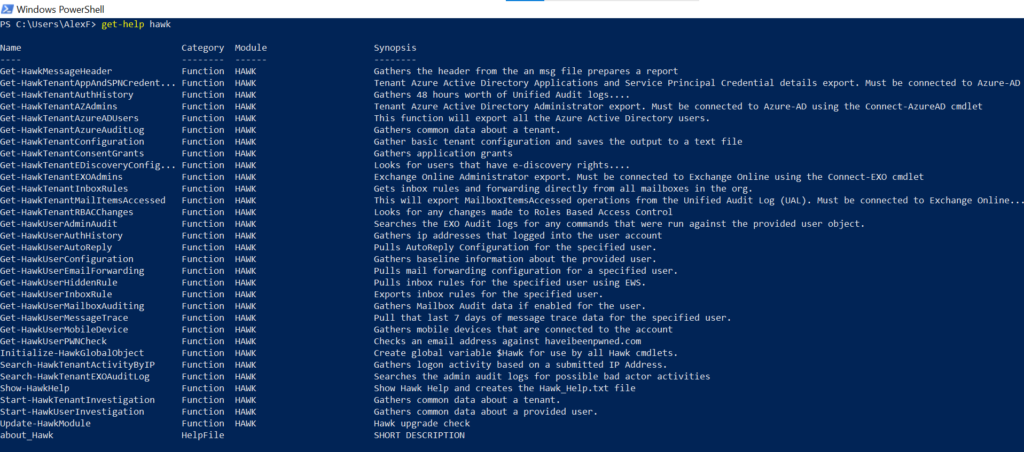
The two you want to key in on are Start-HawkTenantInvestigation and Start-HawkUserInvestigation, each of these basically run all the other functions and output the resulting data into a directory of your choosing. If you have specific users you are interested in already as part of your incident, you can execute the user investigation for them, but I generally always execute the tenant investigation also, regardless of what else we know about when we start.
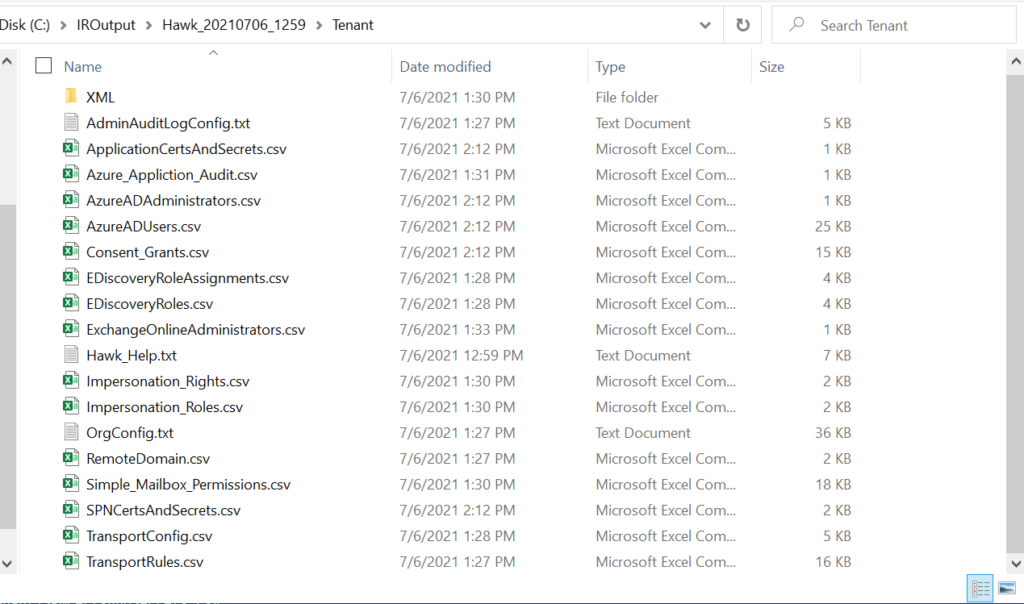
You will be get a few prompts to sign in, specify an output directory, as well as a timeframe you are interested in investigating (90 days is the default but this window is dependent on having the Unified Audit Log enabled). Once the gathering is done, in your output directory you will have several files to review. There is a txt file called _Investigate.txt that is worth checking out, because it will highlight anything especially risky, such as mailbox forwarding, etc.

Then under the Tenant folder, you would find output that was gathered using the tenant investigation, and under any folder named for the users of interest, you would find the output relating to the individual users you investigated.
You can use this information to highlight interesting facts, like who are the admins, who has impersonation rights, what are the transport rules, have their been any forwarders set up, what apps and permissions are in the environment, etc. These facts can help you to supplement the other facts of which you are already aware (again, why are you investigating). Once you have this initial information, you can start to form some hypotheses or “guesses” about where to look next. Proceed to the next step after your initial analysis.
Note: Another way you can use this module is during assessments or as part of normal maintenance visits to a tenant: be sure you have a known “baseline” of the output, and then investigate changes to things like admin roles and applications as needed.
Step 2. Get more granular and follow the breadcrumbs, prove your hypotheses
Now the Hawk module is great because it will give you a bunch of information quickly, but most often it is not enough on its own. For example, Hawk will output all of the Enterprise apps connected to your Microsoft 365 environment with a list of permissions that have been consented for each app, but you will probably want to see who authorized these permissions, and when. Another example: it will also spit out a listing of the members belonging to admin roles in your org, but you may want to find out what other activities those accounts have performed around the time of the incident. For these types of inquiries, you would need to hunt for more evidence in the audit data.
Using the Exchange Online Management module, you can search the audit log (again, up to 90 days for most subscriptions). The search results can be piped to output via Export-Csv or Out-GridView. What you are searching for will vary depending on what you want to know. For example, you might want to search for all the events performed by a certain user account, or perhaps you want to investigate all of the events related to a particular IP address. You can see examples of each using these scripts on GitHub:
This is similar to using the Security & Compliance center (or new Compliance center) to perform an audit log search (e.g.: Audit – Microsoft 365 compliance).
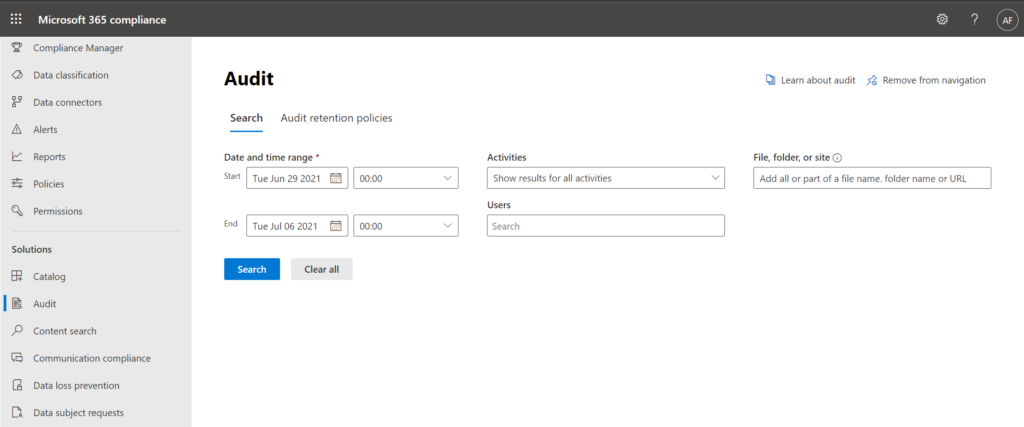
You will notice however that the PowerShell search returns results much faster, and allows for better queries. For example in the web UI there is no option to search by IP address, and they do not give you all the possible activity types. Take a look at an example of the syntax required to look at specific records that match the activity “Add user” which comes from the Azure Active Directory activity log:
Search-UnifiedAuditLog -StartDate 05/15/21 -EndDate 06/15/21 -RecordType AzureActiveDirectory -Operations (“Add user.”)
When you use the PowerShell cmdlet, you can specify the record types (see a list of types here) as well as the operations within those types (see the list of operations here), and I have found several that are not represented in the webUI for some reason.
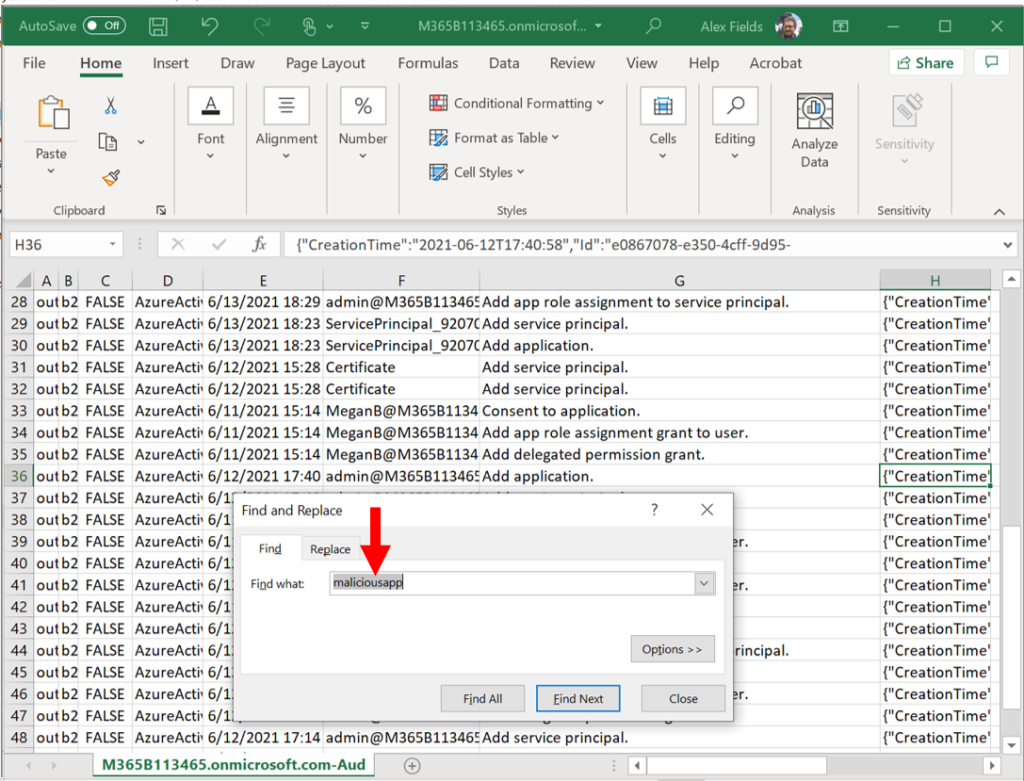
I also have a few things that I am interested in sniffing out during almost any investigation (for example, whether someone has modified admin roles, whether anyone has added or modified users, apps, or devices, etc.), and for that I have another script which will output several csv files describing different activities by type:
I usually will search (Ctrl-F) within the csv file for the content I am interested in. For example if I have identified an application that I think is suspicious, I will search for that application name to see if it has been recently added or modified (these events will turn up in the audit log).
I cannot really do that type of searching until I get the audit data out of the portal, unfortunately. I find that PowerShell makes this whole thing much easier, by allowing me to parse out specific events into different files, and then I can browse the data more closely on my own. Some people take the output files and upload them into something like Azure Data Explorer, and you can do that if you want to. I just use low-tech tools like “Find” and (where it makes sense) copy-and-paste into Notepad to make it more readable (it is admittedly difficult to read all the audit data in Excel).
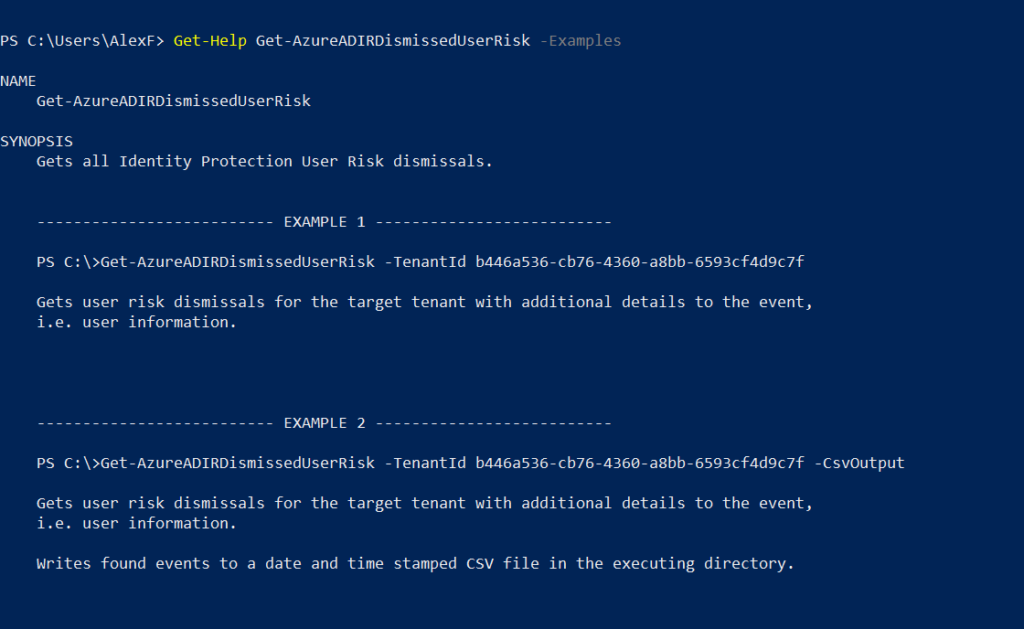
Now unfortunately, not everyone has the Unified audit log enabled when disaster strikes, so in that case, you may need to switch over to using the other PowerShell module I mentioned: the Azure AD Incident Response module. Again this is my second choice since you only get 30 days without the Unified audit log (provided you have Azure AD Premium P1). This module contains several different functions; all of them start with Get-AzureADIR(something). For example:
- Get-AzureADIRSignInDetail: this function will return sign-in data
- Get-AzureADIRAuditActivity: this function can return activity log data
There are many other functions, which you can browse simply by typing Get-AzureADIR and then pressing tab to rotate through the rest of the functions, but many of them basically rely on the two I listed above, and just output a sub-set of data from either the sign-in log or the activity log. For instance, there is a function called Get-AzureADIRUserLastSignInActivity, which will return just the last sign-in event for users in the tenant. You can also use some additional parameters to just see stale sign-ins (if the las sign-in is beyond a threshold of say 30 days).

For any function you might be interested in, you can always type Get-Help {Function} -Examples to see examples of how these are used.
Some of the scripts that I use and provide as examples are:
- Export-SignInByUser.ps1
- Export-SignInByIpAddress.ps1
- Export-PrivilegedUserSignIn.ps1
- Export-PrivilegedUserActions.ps1
Those last two will loop through any users assigned Azure AD administrative roles and output sign-in and activity data, respectively. There are a bunch of other functions too, and I have included a few other interesting outputs from the various Azure AD IR functions in this script:
I find that the output from this tool is a bit easier to read than the output from the Unified Audit Log, whether going to Export-Csv or Out-GridView. But you should explore the module more on your own. Completing these steps will help you to confirm your hypotheses and/or expand the scope of your investigation (for instance you might start out looking at a particular account of interest, but through your investigation of sign-ins, IP addresses, and activity information, find additional users or apps that are potentially compromised).
Step 3. Remediation
How you remediate the incident depends on what you found in the preceding steps. For example, you might have to delete an application, or remove some permissions. You might also need to reset a user’s password and/or clean up their devices. It all depends on what happened during the incident and what you found in your investigation. One script that I will use when cleaning up compromised user accounts is:
This will give you the option to disable accounts and registered devices, and also an option to reset passwords and re-enable accounts and devices. Last, you can loop through all the admins and reset passwords for privileged users (excluding the current account and up to one other you specify).
But there are many other things you may need to do during this phase. One other resource I can recommend: Incident Response Playbooks by Microsoft (https://aka.ms/IRPlaybooks). They currently publish three common scenarios: phishing, password spray, and app consent abuse. Each contains a nice flowchart and some detailed step-by-steps for accomplishing various tasks, like searching for and removing malicious emails using content search.
Limitations
Obviously there is little to no tooling included for stuff like endpoints and local area network devices (or even traditional Active Directory), without upgrading to other subscriptions such as Microsoft 365 E5 or purchasing add-ons individually like Defender for Identity, Defender for Endpoint, etc. But the point is that you will still be able to investigate and remediate certain types of cyber incidents impacting Microsoft 365 customers, regardless of their subscription level. Also I want to stress the limitations on your time horizon based on your subscription level. Business Premium is the bare minimum I recommend to any customer, and of course you absolutely must get the Unified audit log turned on for the full 90 days of visibility.
In the future, as more SMB’s out there ditch their on-premises infrastructure and move more and more of their workloads into Microsoft 365 and other SaaS apps, it is increasingly important to link as many of those services to Azure AD as possible; by setting up SSO for all of your various corporate apps, you will have one place to enforce security policies (i.e. Conditional Access) and also to investigate and hunt across the audit data when there is a suspected breach event.
Ideally, we would see more service providers standardizing on Azure Sentinel for every managed customer. There are a few out there who have figured this out (especially because this is one of the areas where we already have multi-tenant support). Not to mention, data ingestion is free for many Microsoft cloud services (but to be clear there is still a cost to Azure Sentinel). But all of that is a topic for another day.
Comments (3)
This is a great summary of our first, what I call “Summer of Security” 3 part training for M365 Biz Prem security courses. Highly recommended!
Great and useful article Alex! Do you know how can we calculate the average GB per day for log ingestion for a typical 20 user SMB on M365 Business Premium?
I don’t know that they have a tool for this, but from my experience I can say it is miniscule $ each month.