Tutorial: How to Setup a Site-to-Site VPN between an Azure Virtual Network and WatchGuard Firewall, part 2
In this article, we will cover how to configure a WatchGuard firewall for site-to-site VPN with an Azure Virtual Network. Prior to this, you will have already built your Azure Virtual Network and related objects, to enable the connection. See the previous article for details on how to do that.
Note: In this guide, we are configuring a static, route-based VPN connection. This requires Fireware v11.12 or higher. Azure also supports dynamic route-based as well as policy-based VPN, but most small businesses will stick to a static configuration, which is a bit easier. I may decide to cover dynamic in a future post, however.
To complete this guide, I used these resources, which you are free to cross-reference:
- Configure a Route-based VPN Connection to a Microsoft Azure Virtual Network – This is from WatchGuard support, but it only contains the WatchGuard side of the configuration steps
- About VPN Devices… – Great resource from Azure with links to instructions for all kinds of other hardware vendors, including SonicWALL, Fortinet and many others.
Before you begin: Find the Azure gateway IP address
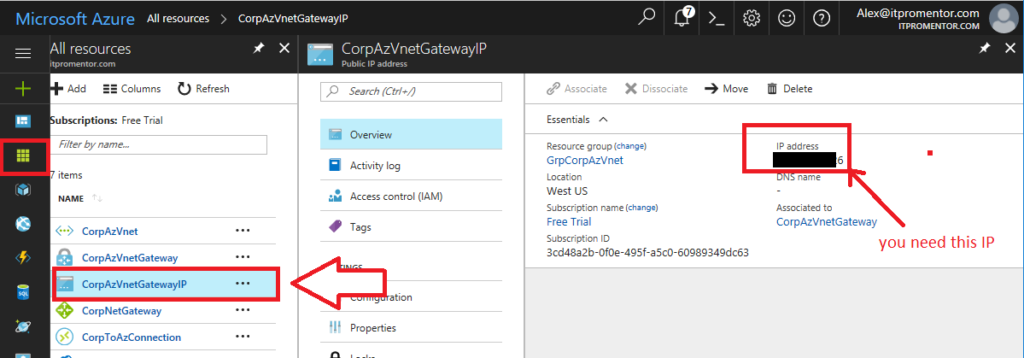
If you don’t have the IP address noted down yet, you will need it to configure the VPN. Go to the Azure portal > All resources. Find the Gateway Public IP address that we provisioned earlier.
Using the WatchGuard Policy Manager
Most long time WatchGuard admins are huge fans of the graphical client utility, WatchGuard System Manager (WSM), which includes the Policy Manager. We will cover this method first, and then turn to the web interface second.
Step 1. Create a new BOVPN virtual interface
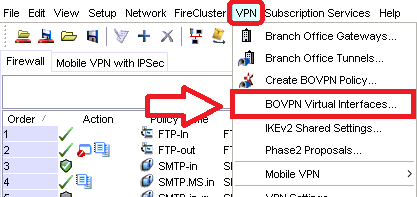
From Policy Manager, go to VPN > BOVPN Virtual Interfaces…
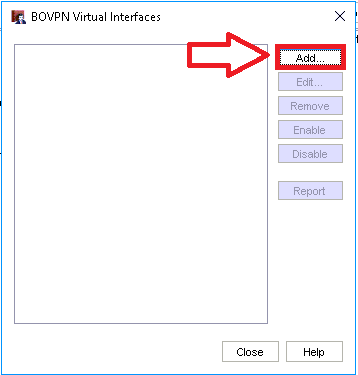
Click Add.
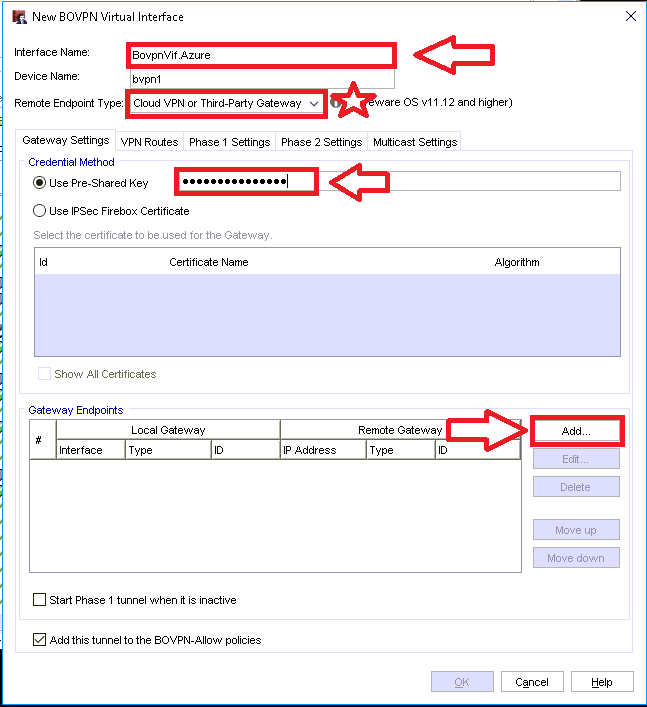
The fields you need to edit are:
- Name: give the BOVPN interface a descriptive name
- Remote endpoint type: pick Cloud VPN or Third-party gateway
- Use Pre-Shared Key: enter the key that you setup earlier, you can still refer back to it in the Azure portal (on the Connection object)
Now under Gateway Endpoints click Add, which will bring you to the following step.
Step 2. Setup the local and remote gateways
You will enter your own public IP on the first line, and then enter the Azure public IP on the following two. The Interface section should match whichever physical interface is associated to your external IP address. Click OK.
Step 3. Configure the network route
Back on the New BOVPN Virtual Interface screen, go to the VPN Routes tab and click Add.
Here you need to tell the virtual interface what network address space is behind the gateway in Azure.
Choose Network IPv4 from the drop down, then enter the IP address space of the Azure virtual network, which was setup previously. Click OK.
Step 4. Configure Phase 1 settings for IKEv2
Now go to the next tab over, Phase 1 Settings.
The only setting we need to modify here is to choose IKEv2. Click OK.Then Close. You will notice two new policies added:
![]()
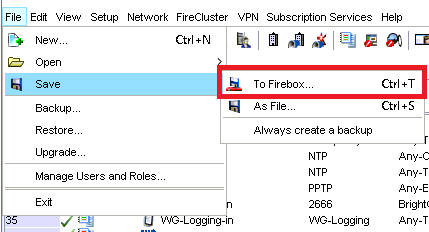
Step 5. Save configuration to the Firebox
Now we are ready to save the config. Go to File > Save > To Firebox… and enter your configuration passphrase to save.
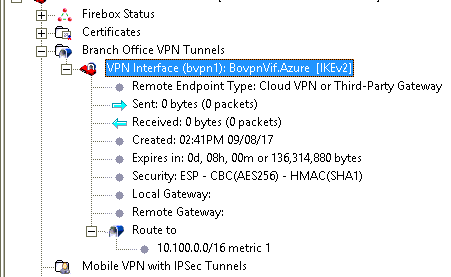
After you have saved, you will be able to confirm the connection comes up.
Check the WatchGuard System Manager:
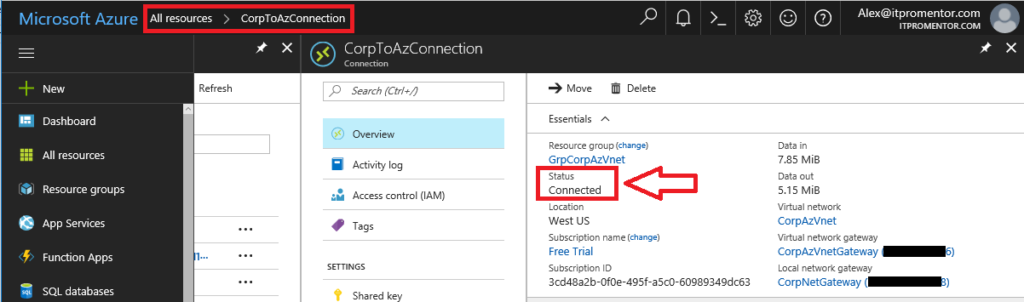
You can also see the status Connected on the Connection object in Azure portal:
And you’re done!
Using the WatchGuard Web UI
I’ll be honest, I literally never use the web UI on a WatchGuard. If I wanted a crappy web UI experience I would have just bought a SonicWALL. But to each their own. Let’s go step-by-step.
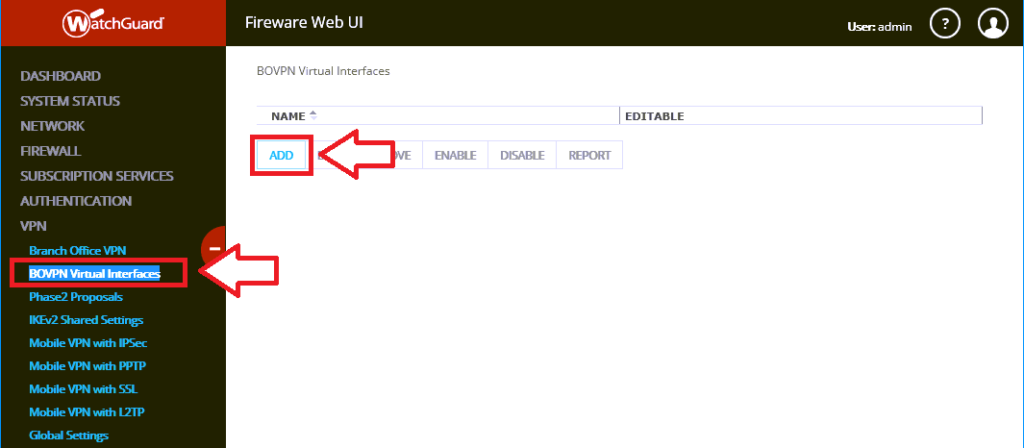
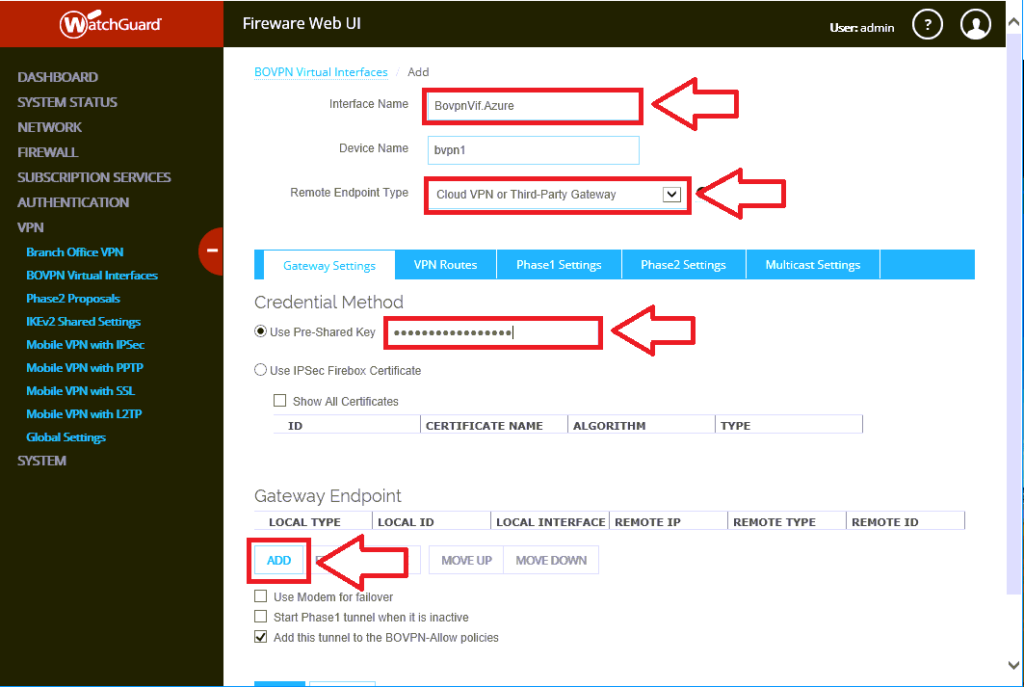
Step 1. Add a BOVPN interface
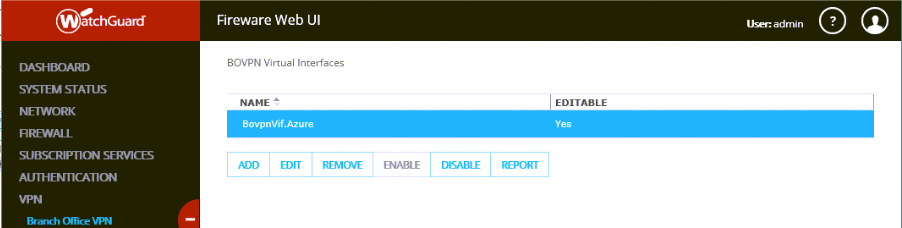
Navigate to VPN > BOVPN Virtual Interfaces and click Add.
Next, we have some information to fill in, specify:
- Interface Name: Any name will do, mine is BovpnVif.Azure
- Remote Endpoint Type: choose from the drop-down Cloud VPN or Third-Party Gateway
- Use Pre-Shared Key: You would have specified this in the Azure portal on the Connection object. To find it again, All resources > click your Connection > Shared key under Settings.
Now under Gateway Endpoint, click Add, which will bring you to the next step.
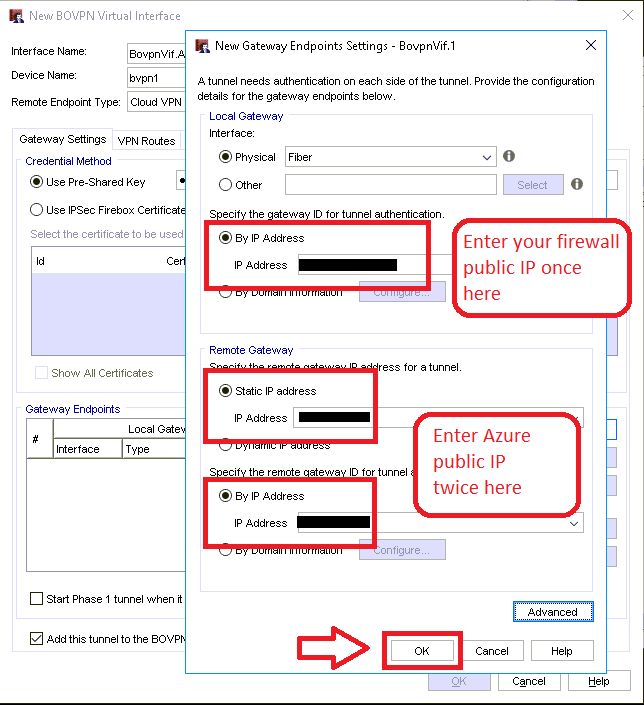
Step 2. Setup the local and remote gateways
In this screen you need to tell the interface what IP addresses it is using to build the tunnel. Under this first area, you need to specify the local address (that is, the public IP that is assigned to your firewall).
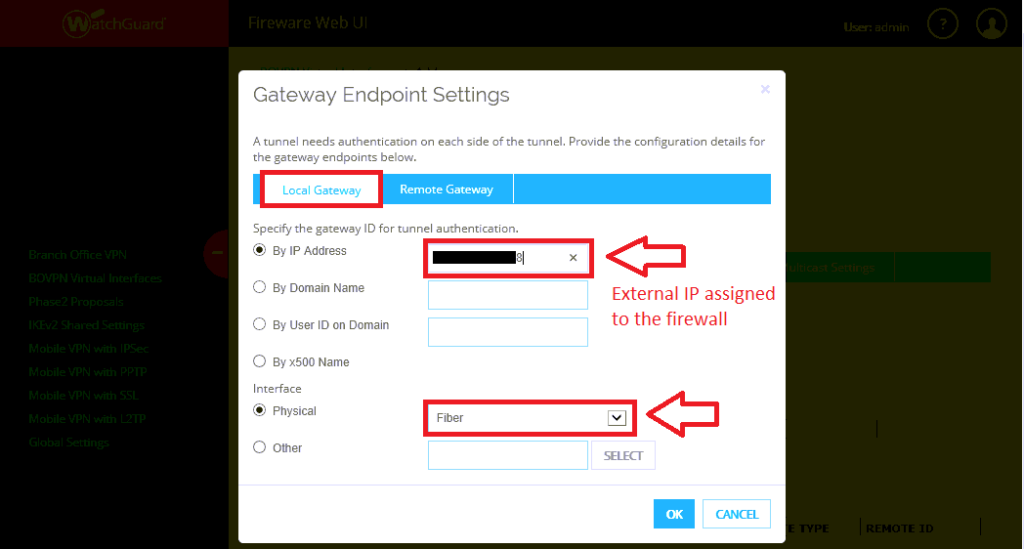
Note: You also need to pick the physical interface that corresponds to this external IP address. Mine is called “Fiber,” but yours will probably be different.
Click on Remote Gateway. Here you specify the Azure public IP address that was provisioned during the previous setup–twice, in both fields.

Click OK.
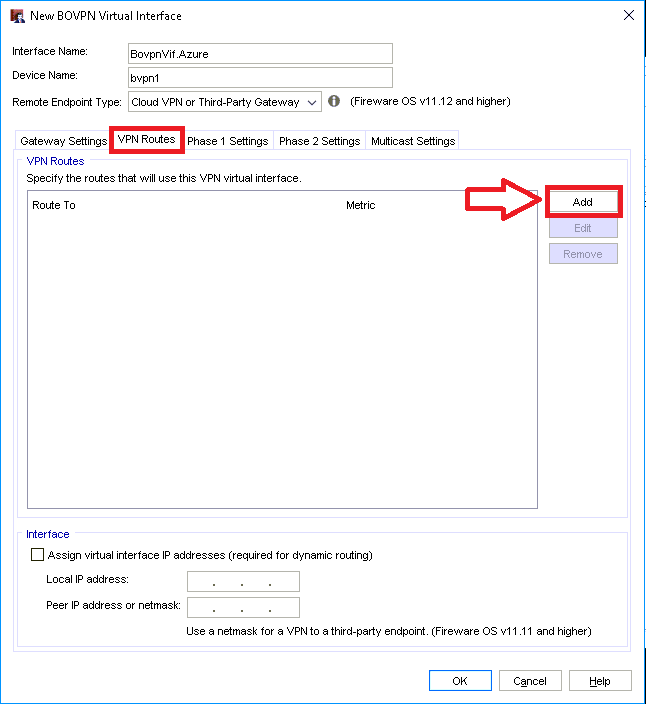
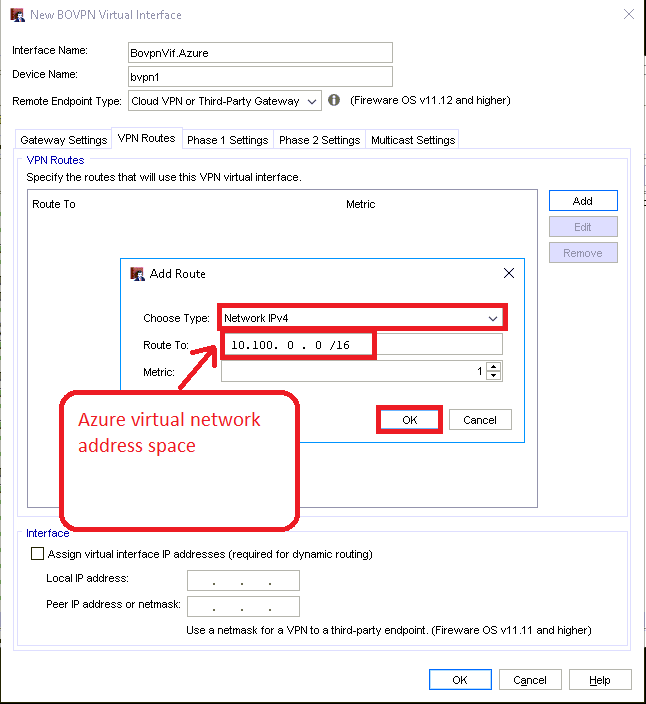
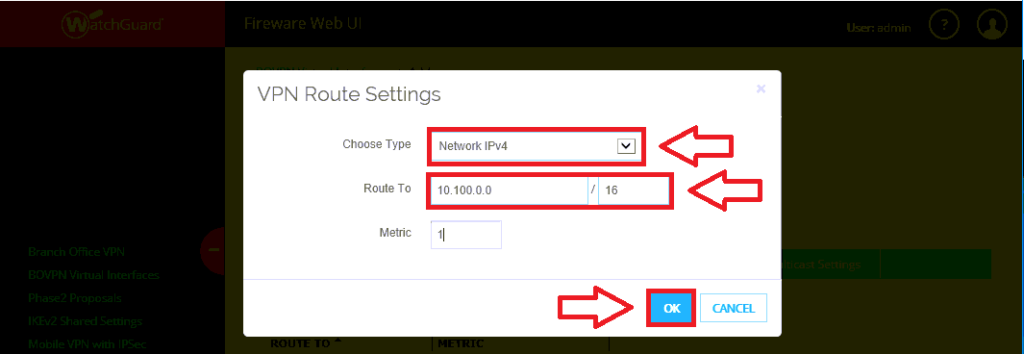
Step 3. Configure the network route
The network route is what tells your firewall about the address space hiding behind that cloudy gateway in Azure. In other words, it’s where you specify the IP ranges that you provisioned for your virtual machines in the cloud.
Click on VPN Routes, then Add.
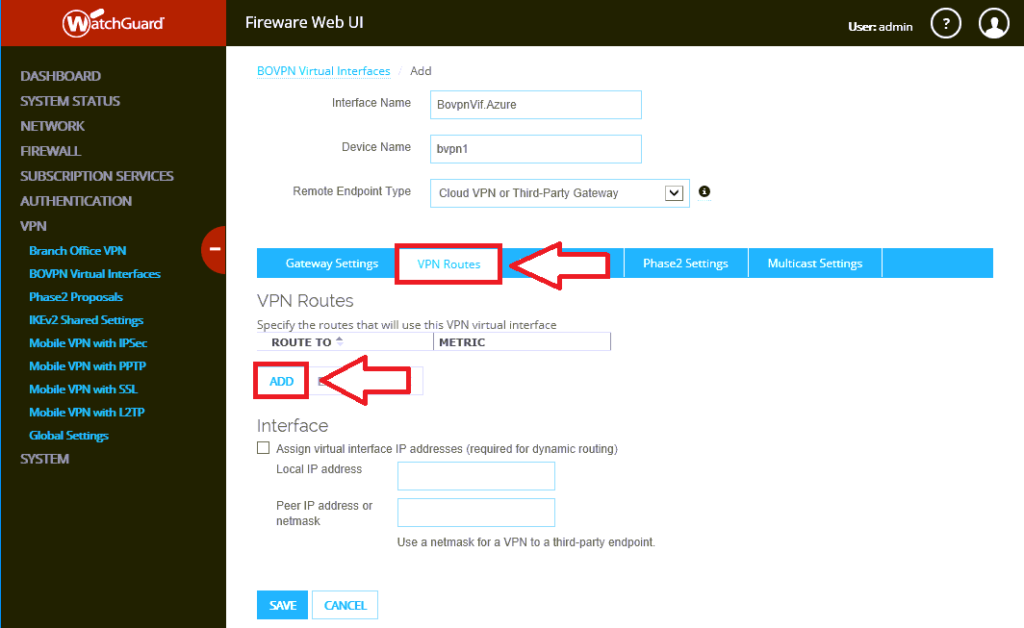
First choose the drop down option for Network IPv4. Under Route To, add the Azure address space, and click OK.
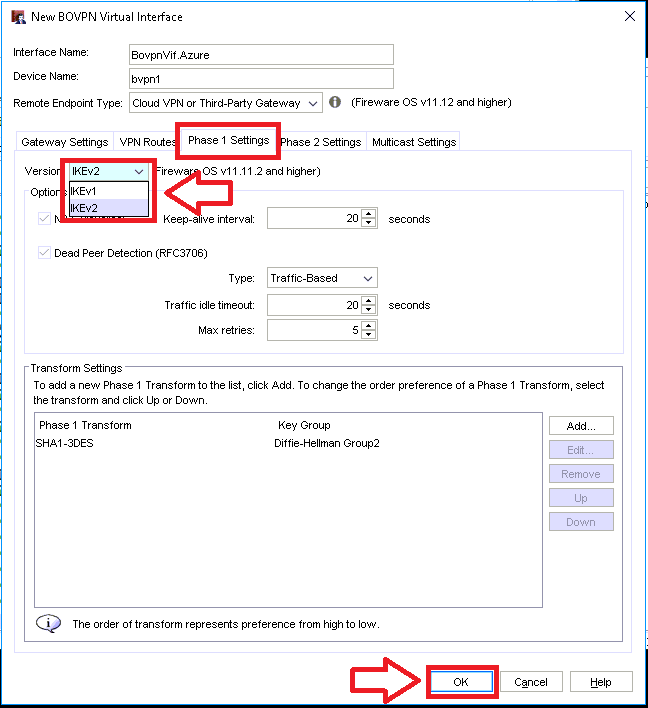
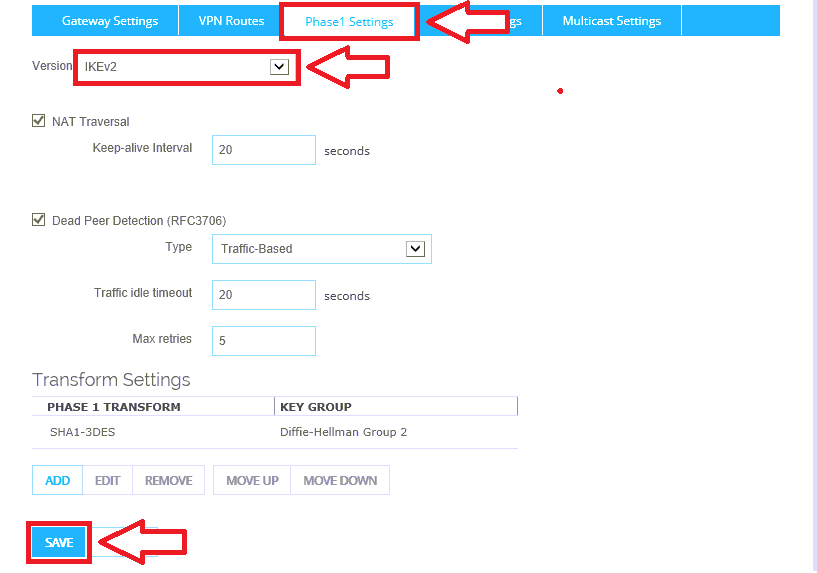
Step 4. Configure Phase 1 settings for IKEv2
Now go to the Phase 1 Settings tab. Under Version choose IKEv2 from the drop-down. Click Save at the bottom of the screen. This completes the setup.
You will see the BOVPN interface now in the UI.
Last step: Verify connectivity
Returning to the Azure portal, go to All resources, and click on your Connection object.
Note: an even better test is to actually deploy a VM into the new network, and verify that you can communicate back to your on-premises network.
Conclusion
In this series we learned how to deploy an Azure Virtual Network and Site-to-Site VPN connection, using a WatchGuard Firewall. Having this infrastructure in place is what allows us to build a number of different solutions to common Small Business problems, which will be the topic of some future posts, which I have in the works for you.
Comments (7)
Many thanks for this step-by-step explanation, Alex! We also use this setup for our clients.
Thank you! This worked great.
How to do you specify the on-prem subnets that will go through tunnel?
See the previous article where we setup the objects in the Azure portal first.
Hi Alex! Nice tutorial
I have a lot of BOVP VPNs to other Fireboxes. Does this configuration affect them?
Thanks!
This is just like adding one more BOVPN office to the mix–no different.
Thanks very much for taking the time to write this, was very helpful!
This may be specific to my config, but I just wanted to mention that I had to make one further change before I was able to successfully connect.
BOVPN Virtual Interface > Phase 1 setting > Edit transform > Authentication: SHA2-256, AES256, SALife 8hrs, Diffie-Helman Group2.