Teams, SharePoint and OneDrive best practices? Part 2: Access control and notifications
In part 1 of this series we discussed how there is really no such thing as “best practices” on a rich and flexible collaboration platform like Office 365, which includes many applications–Teams, SharePoint and OneDrive to name just a few. However, you can certainly end up with some “bad” practices if you do not implement the features and settings that are right for your organization or for your customer.
While part 1 focused on sharing and external collaboration settings, in part 2 of this series we will look at considerations related to access control. It is again difficult to argue that there exist one set of access controls that are appropriate for everyone, but it is definitely a conversation you should be having with your stakeholders. Start by reviewing some of the things that are possible from the SharePoint admin center > Policies > Access control area.

With regard to these options, I would begin by disabling Apps that don’t use modern authentication–this is one of the few I would recommend for everyone, but again some older clients (Office 2010, legacy OneDrive clients) will not be able to connect once this is done–so keep that in mind.
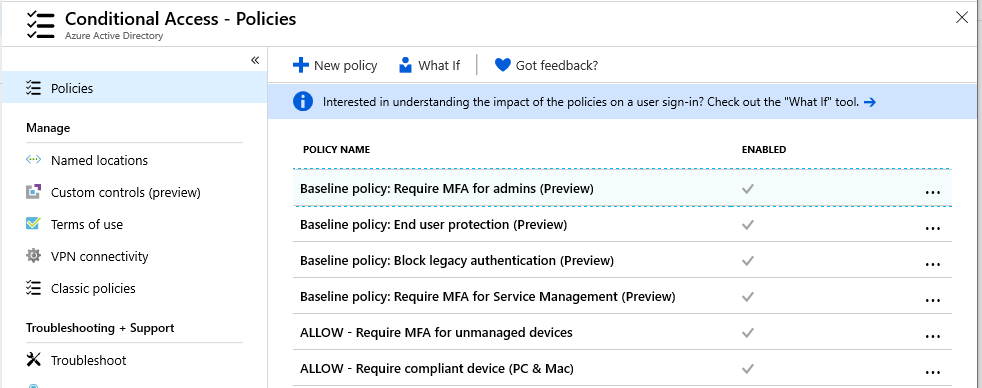
Blocking legacy auth can also be accomplished en masse for all Microsoft 365 services via Conditional access policies: there is a baseline policy available to all tenants, or you can create a custom policy to handle this if you need more granular control. Or again, just block this at the service level, right here in the SPO admin center.

Next, consider whether you would like browser sessions to automatically time-out after a certain period of inactivity (Idle session time-out). While it is recommended for most deployments, certainly the values here could vary widely depending on industry and how much tolerance the business has for being annoyed by the setting change ;)

Network locations does exactly what it sounds like it would do, and limits access from specific (use external) IP ranges. But this setting is not as likely to be employed in most environments–highly regulated ones perhaps. And of course, location-based restrictions are also possible via Conditional access policies.
Speaking of Conditional access policies, the Unmanaged devices access control that you find here in the SPO admin center essentially auto-creates and deploys Conditional access policies in Azure AD. This control will require Enterprise Mobility + Security or a Microsoft 365 plan in order to be configurable.
Managed devices are devices which are enrolled and compliant with Intune policy, or devices that are hybrid Azure AD joined. Unmanaged devices meet neither criteria.

From here, you can either choose to “Block access” for unmanaged devices entirely, or “Allow limited web-only access“–which just means that downloads are not possible (you can still work with content in the web browser only).
WARNING: If you have the right subscription but have not setup hybrid Azure AD join or Intune, then enabling this setting will have the indicated effect on every device (since every device is considered unmanaged). So nailing down your device management strategy is usually step #1 here.
Custom conditional access policies
Consider also creating some other Conditional access policies to bring up your baseline level of security and access control. For example, requiring Multi-factor authentication. This can be accomplished in the Azure AD admin center > Conditional access area, and with the proper licensing of course (Azure AD Premium or an EMS or Microsoft 365 plan).
With custom policies you can also target specific groups of users, even external users, with different policies, or, target specific apps, giving some apps different access controls than others. Just be aware that when you target SharePoint with an access control, you also end up impacting other related apps such as Teams, which stores its data in SharePoint.
See my Conditional access baseline and guide for more ideas and details.
Notifications and alerts
Access controls are certainly important, but notifications and alerts are another layer you will want to consider. Taking the time to set this up well will provide your organization with deeper insights into what is happening after access has been granted. Alerts can also help tip you off when strange things are taking place, that maybe shouldn’t be. After all, no set of access controls, however robust they may seem, will successfully prevent every bad situation from happening.
We will look at notifications in a couple of different places. First, navigate to the OneDrive admin center > Notifications area.
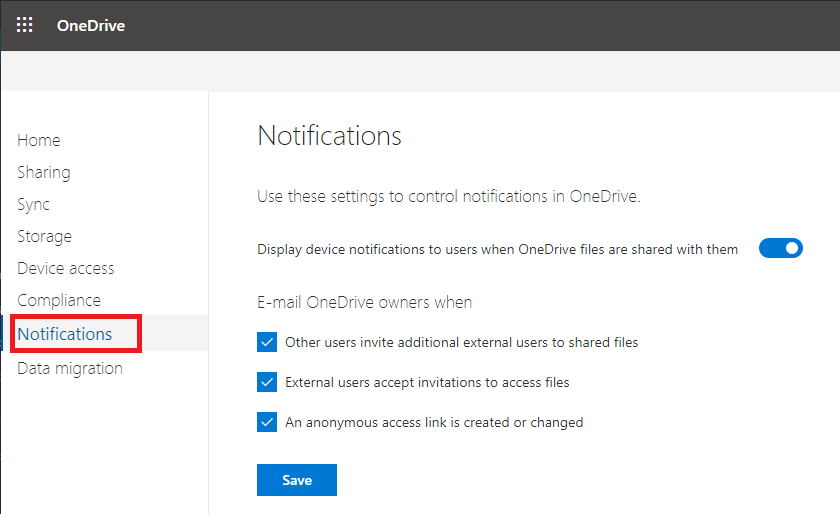
Here we have a few basic notifications that we can enable for activities that take place from each user’s own OneDrive. They should all be on by default. Beyond this, you can enable custom alerts for all types of activities using the Security and compliance center > Alerts > Alert policies area.

As you will notice, there are several system alert policies in here by default, mostly related to Exchange Online. But other alerts will be up to the organization: who needs to know about what types of activities?
Click New alert policy to create your own. As you step through the wizard, you will have an opportunity to pick an activity that will trigger the alert. There are several activities related to File sharing, for instance.

You can also add conditions, for example targeting specific IP addresses, users, or URL’s for Site Collections that you want to watch in SharePoint, even specific files or file types.

You will notice that the list of activities is somewhat limited here. That’s because the full activity log and the best alerting is held hostage in other subscriptions, such as E5 plans which include stuff like Office 365 ATP plan 2, and Microsoft Cloud App Security (MCAS). If you do own at least one of these licenses then you will be able to view the activity log in greater detail and create custom alert policies based on your queries.

Find the Activity log under Investigate. Notice that you can create a policy right from any query that you make against the log. Additionally, if you go look into the policies that are included out of the box (Control > Policies) there are already several good ones in here already.

In my opinion this data and these alerts are so highly valuable, that it is absolutely worth investing the extra $ for a subscription–at least for your privileged accounts. It could be argued that one “best practice” is to ensure that your most privileged and sensitive accounts be assigned subscriptions that include an appropriate level of protection based on their sensitivity. Especially if you are in a highly regulated industry and your business objectives call for it.
Next time, we’ll finish off this conversation with Data governance–retention, classification and Data loss prevention (DLP).


Comment (1)
Very nice article indeed