How to securely deploy Remote Desktop Services (RDS) with the Gateway Role
Remote Desktop can be deployed in any number of different ways, and not all of them are created equally when it comes to security. In the Enterprise, we’d most likely see RDS deployed using a “DMZ” or “Demilitarized Zone,” which is a special type of network, that usually contains some internet-accessible resources, and sometimes also has restricted access to other resources on the internal network.* This type of approach can help to limit attack surface on the perimeter of your network, and make it a bumpier ride for any would-be attackers trying to find a way in.
What is typical in the small business is not only a complete lack of DMZ & internal network segmentation, but very often, a Remote Desktop connection is made available through the firewall right on port 3389. Meaning that a person can just open the Remote Desktop client, and hit an external DNS name or IP address–finding themselves on an interactive desktop inside your network. Which is crazy.
A much safer alternative is to close RDP access from outside the network, and make it accessible only from a secure protocol, such as SSL VPN on your firewall, or Microsoft’s own Remote Desktop Gateway service. Either way, we note that the correct architecture is to have only one port available externally on the firewall: port 443. That secure, encrypted port is how your client computers will attach to the network. From inside of that connection, you can then establish a (shielded) port 3389 Remote Desktop session.
Secure Remote Desktop Architecture using a DMZ
Enter the Remote Desktop Gateway & Web Access role. Again, in the Enterprise, these roles would be deployed on a server inside a DMZ, and only listen on port 443. In turn, the Gateway/Web Access server will have the ability to make a connection via 3389 to your Remote Desktop Session Host, which is located on the internal network.
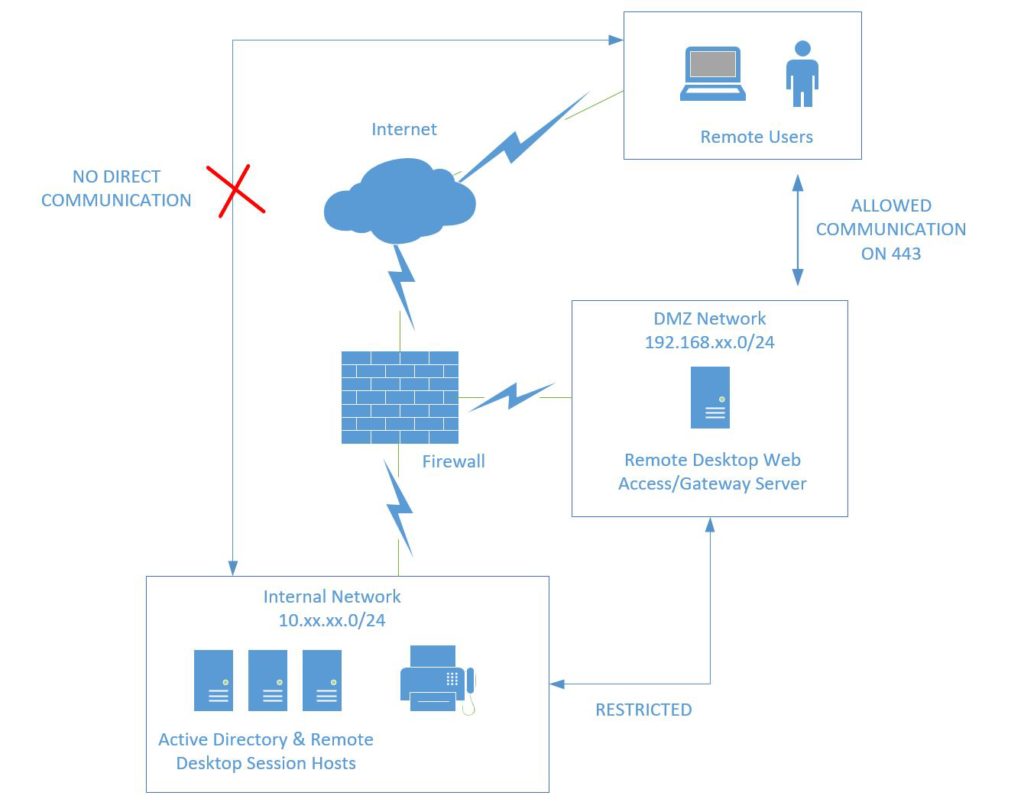
However, it is important to note that several other communications with the internal network are required in order for your Remote Desktop Gateway/Web Access server to properly function (authentication to Active Directory, communication to connection broker, certificate services if it is present, etc.). A full list of ports and setup instructions can be found here. Also see here for a full list of ports listed out by role in RDS.
(Simpler) Alternatives to this Setup
As I mentioned, I hardly ever see a DMZ when I consult with small business clients where Remote Desktop is present. And maybe that is okay, but we at least like to see that port 443 is the only open port on the firewall–for example, an external IP address with a static NAT mapping to a single RDS server on the internal network, that contains all the RDS roles including RDS Web Access and Gateway. This setup is way better than leaving port 3389 open right into a Session Host.
Another option is requiring clients to connect to an SSL VPN on your firewall appliance, and then opening the Remote Desktop client from there, this can be handy if there are other resources besides desktops that you also need to grant access to, and you’re managing those endpoints as you would any other machine.
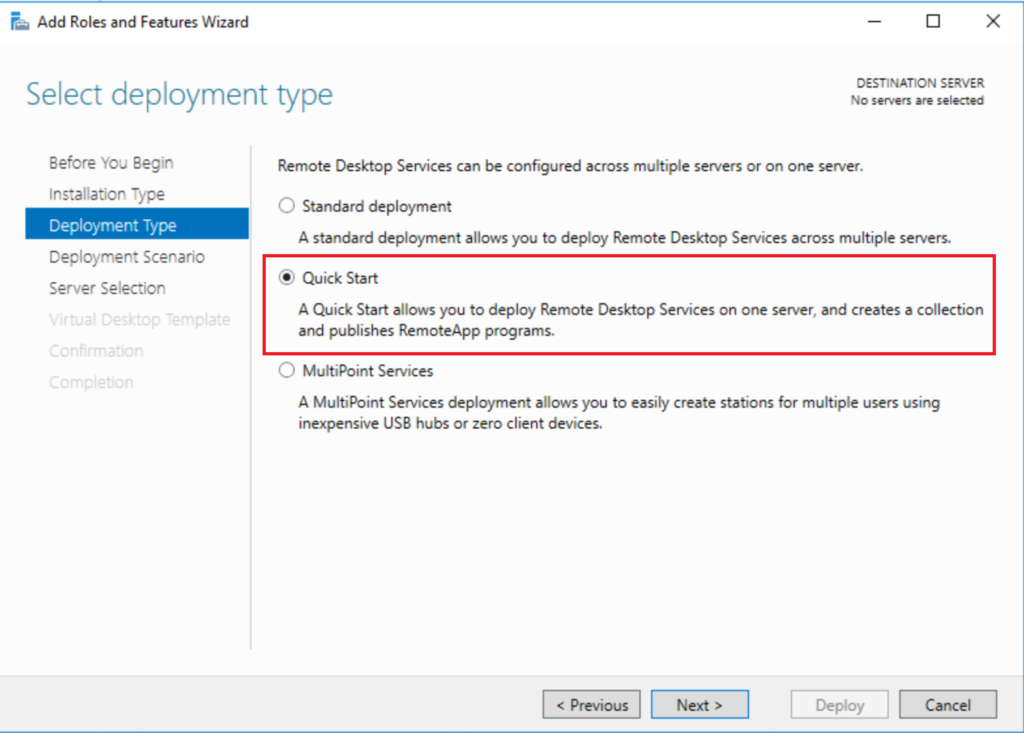
To deploy RDS in either manner, you will be able to start with the Windows Server Remote Desktop Services “Quick Start” deployment. The server should already have a static IP address, be named and joined to the domain. From Server Manager > Add Roles and Features. Select Remote Desktop Services installation. Then choose Quick Start.
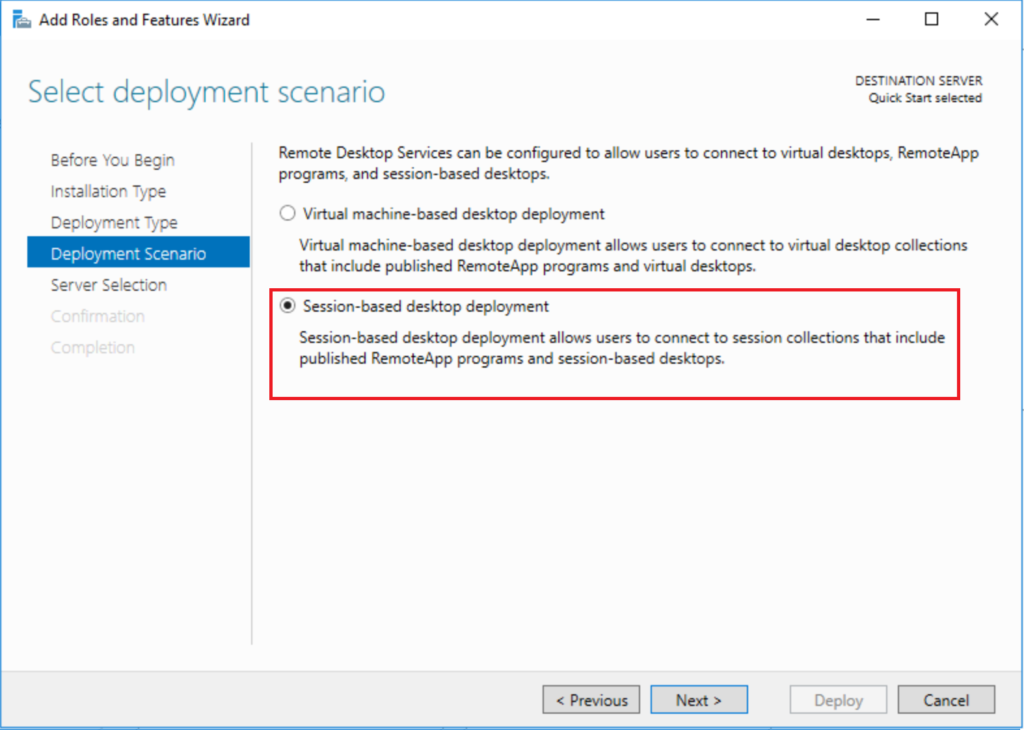
Next you should select Session-based desktop deployment (this means desktop sessions on the RDS server itself, as opposed to separate individual virtual desktop computers).
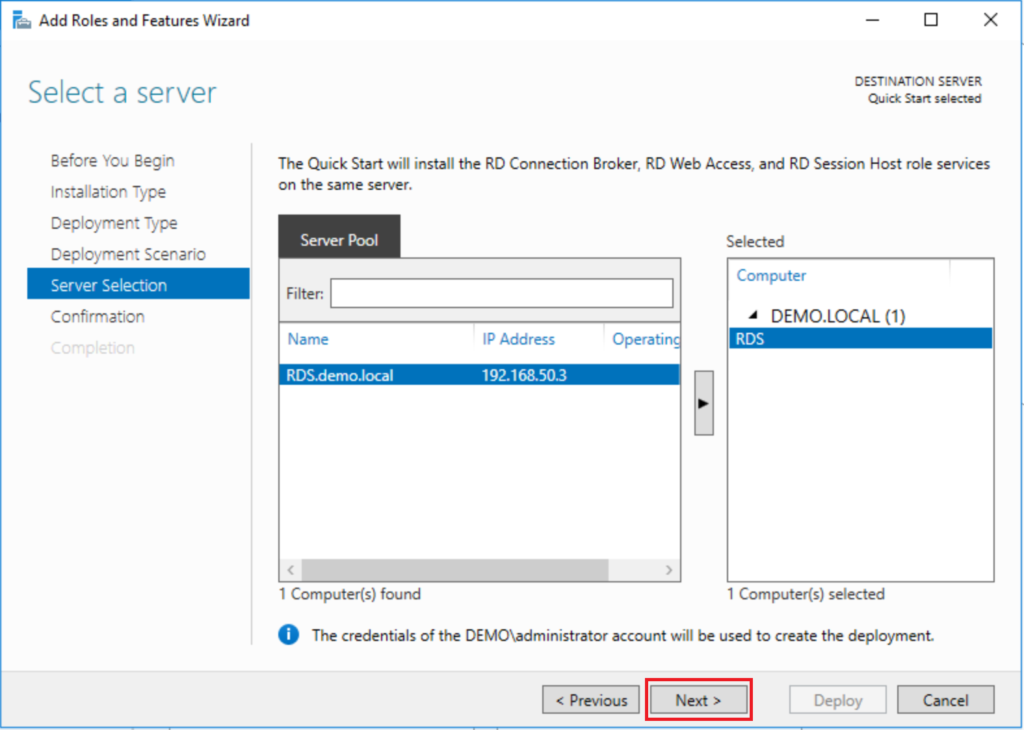
Since this is a Quick Start deployment, in the server selection screen, you can just leave the settings here as-is (it should be adding the RDS server and no other computers to the deployment). If you were going to have separate web access servers, or multiple session hosts, or anything more complex than a single server, you would have picked “Standard” deployment in the beginning. Most small businesses I serve can get by with a single server. Click Next.
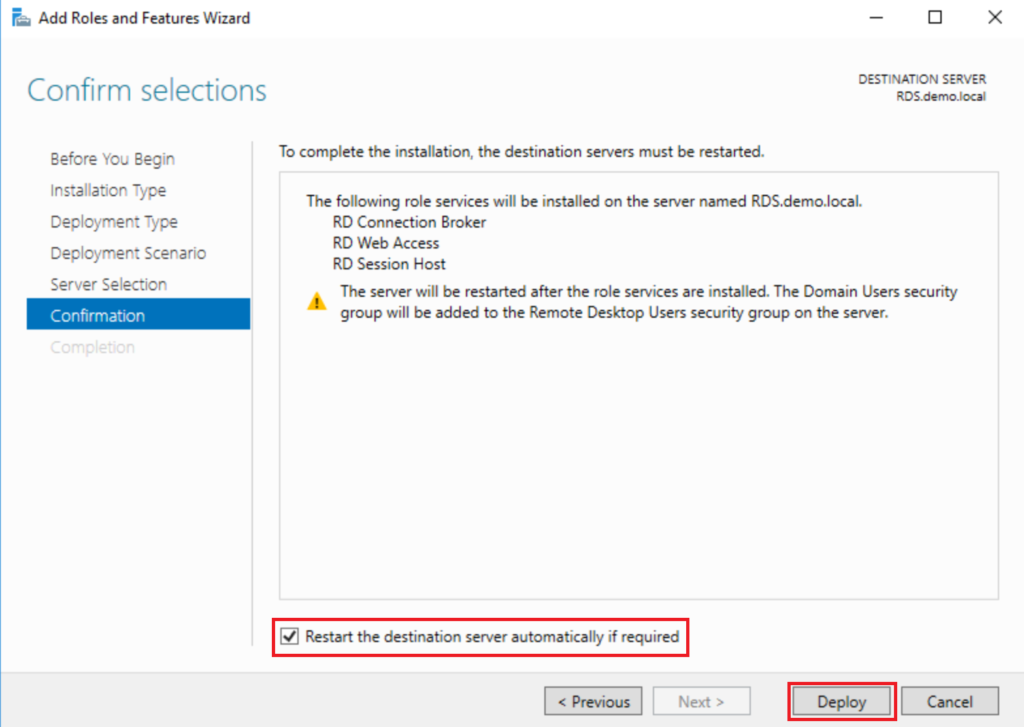
On the last page, just be sure to tick the box for Restart…, so that you can Deploy.
After the reboot, there is still additional work to complete! At this stage, you have one of two options that you can take.
Option 1: Configure the Gateway Role OR
Option 2: Configure SSL VPN (if available)
For Option 1, you will need to do the following:
- Install the RD Gateway role
- Obtain a public third-party SSL certificate and configure DNS & firewall rules
- Associate the certificate with the deployment
- Install the RD Licensing role & add your licenses
- Test functionality of the system
1. Install the RD Gateway role
The Quick Start deployment installs almost all of the roles you will need, except for: the Gateway role, and the Licensing role. From Server Manager, you can find Remote Desktop Services on the left. In the Deployment Overview section, click the “plus” (+) symbol for RD Gateway.

In the wizard, select the RDS server for your deployment (you could add a separate server for this role e.g. if you had another server deployed in a DMZ). On the next screen you just have to tell it by what name this service will be accessed by clients. I usually use “desktop.domainname.com” or something similar. Finish the wizard.

Note: this is a self-signed certificate only. I strongly recommend getting a real SSL certificate from a trusted third-party provider. See details in the next section.
2. Obtain a third-party SSL certificate, and configure DNS & firewall rules
This is pretty easy to do from common providers such as GoDaddy or Digicert. Typically the process is to create a certificate request (CSR) from the server, give this request to the provider, and from there a unique certificate is keyed for you. Then you will be able to download and “complete” the request, importing the freshly minted cert into the server’s local certificate store. Digicert publishes helpful how-to’s on generating a CSR and installing the certificate.
Also do not forget to create a host record for this name at your DNS hosting provider, pointing to the external IP address on your firewall that will be used to NAT that traffic over port 443 to your RDS Gateway server. You can find instructions for completing this step at most DNS hosting providers, such as GoDaddy and Network Soultions.
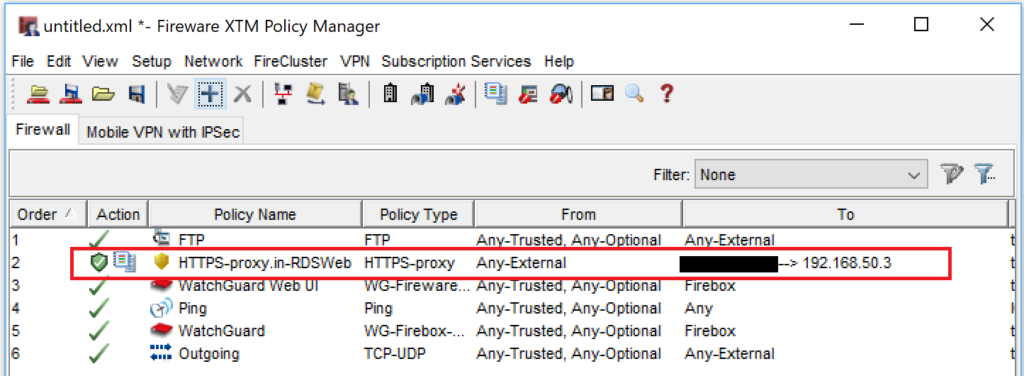
Finally, create the firewall rule. An example of what that could look like is included below, in a screenshot from a mock-up WatchGuard config. You will see that we are only allowing HTTPS inbound (with IPS & logging enabled), coming from Any External address, and going to a NAT, which maps the external IP onto the local IP address of the RDS Gateway server. See your firewall’s support documentation for more details.
3. Associate the certificate with the deployment
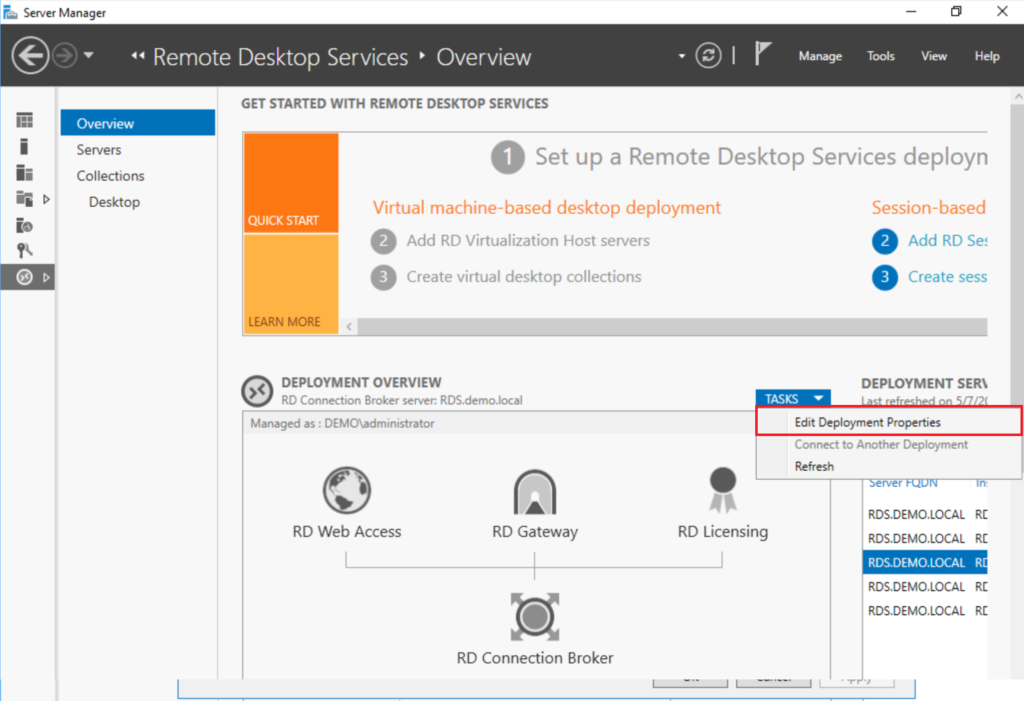
From Server Manager > Remote Desktop Services, find under the Deployment Overview section Tasks > Edit Deployment Properties.
Now you can find Certificates on the left. For each of the roles, you can select the certificate by browsing to the file obtained from your certificate provider. You will need to select one role at a time, Select existing certificate…, then you must click Apply in-between doing each of these roles until they are all completed.

4. Install & Configure the RD Licensing Role
You also need to add a licensing server. Back in Server Manager > Remote Desktop Services, you can add the Licensing Manager by clicking the plus (+) symbol for RD Licensing, just as before when we added the RD Gateway role. Step through the wizard to select the server and Add.
After you purchase RDS User CAL’s, then you will receive an email from Microsoft with the information needed to complete the setup of licenses for the role. The first step will be activating the server. From Server Manager, go to Tools > Remote Desktop Licensing Manager. Right-click on the server and go to Activate Server. Complete the Wizard.

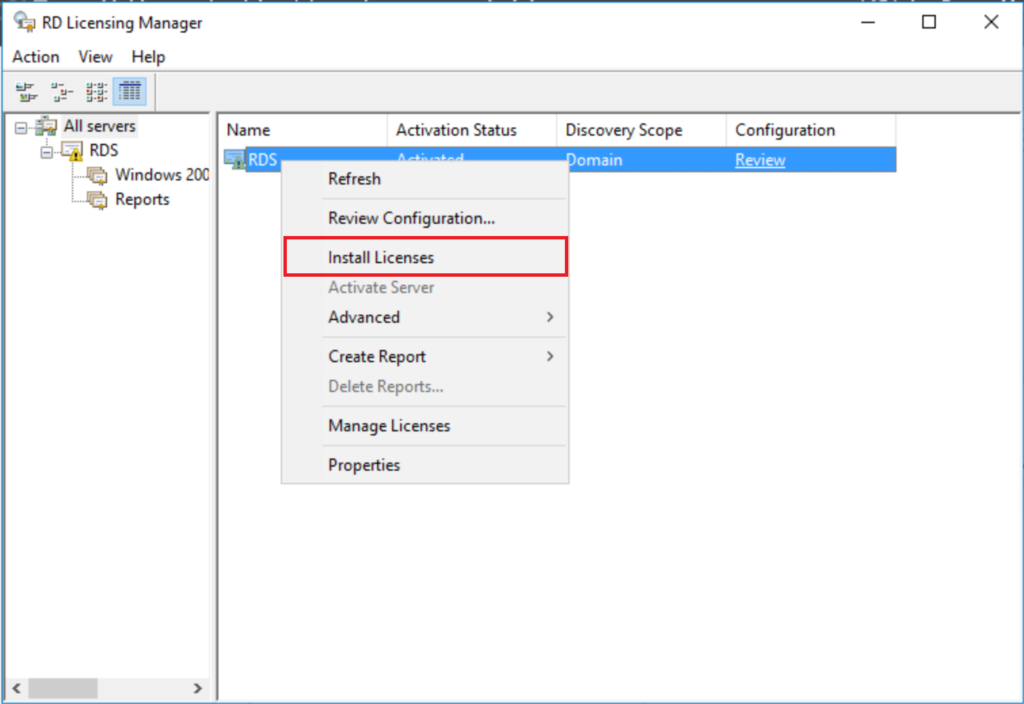
Next, you have to install the licenses. To do that, right-click on the server again, and go to Install Licenses. Complete this wizard using your unique licensing information from Microsoft. For open licenses, you generally have to provide the Authorization number as well as the License number.
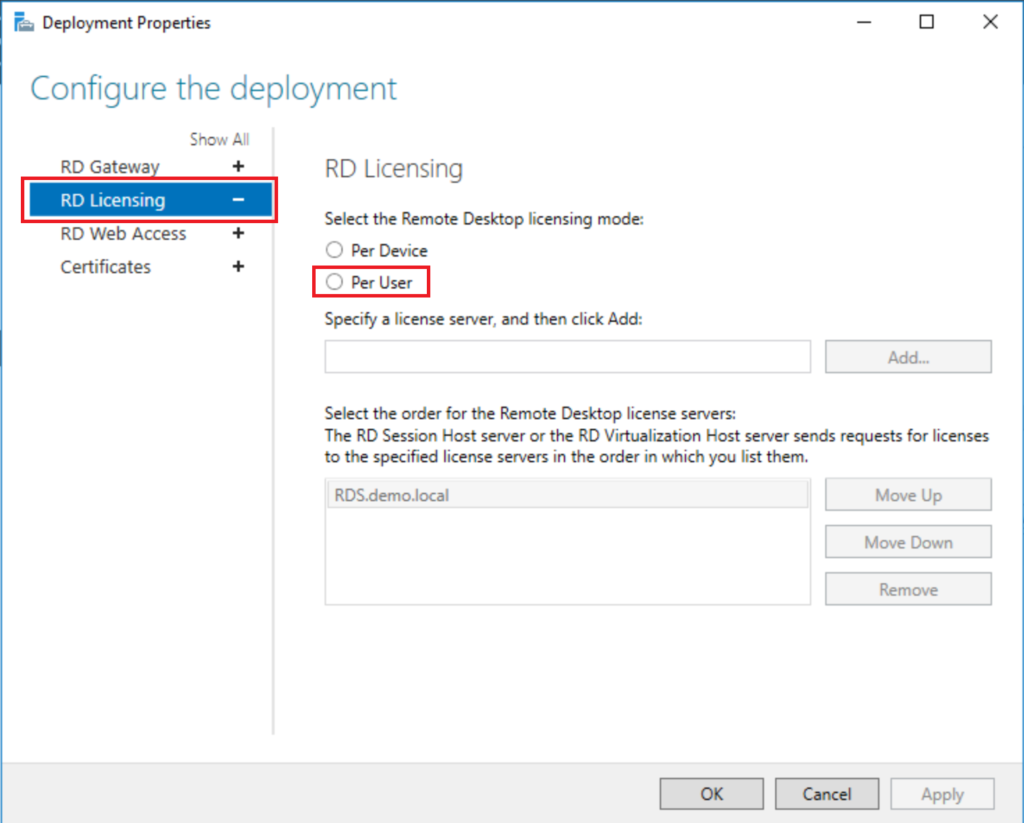
Last, you need to configure the Deployment to look toward this license server. Back in Server Manager > Remote Desktop Services, go to Tasks > Edit Deployment Properties.
You will select RD Licensing on the left, then Per User or Per Device, whichever type of CAL you purchased. (I generally recommend Per User.)
5. Test functionality of the system
There are a couple of different access methods available here to you. The first is the Web Access role. Using the Web Access page, you can publish applications (some will be published by default) that will be launched via RemoteApp (these apps run from the Remote Desktop server, but do not require a full Desktop to be presented).
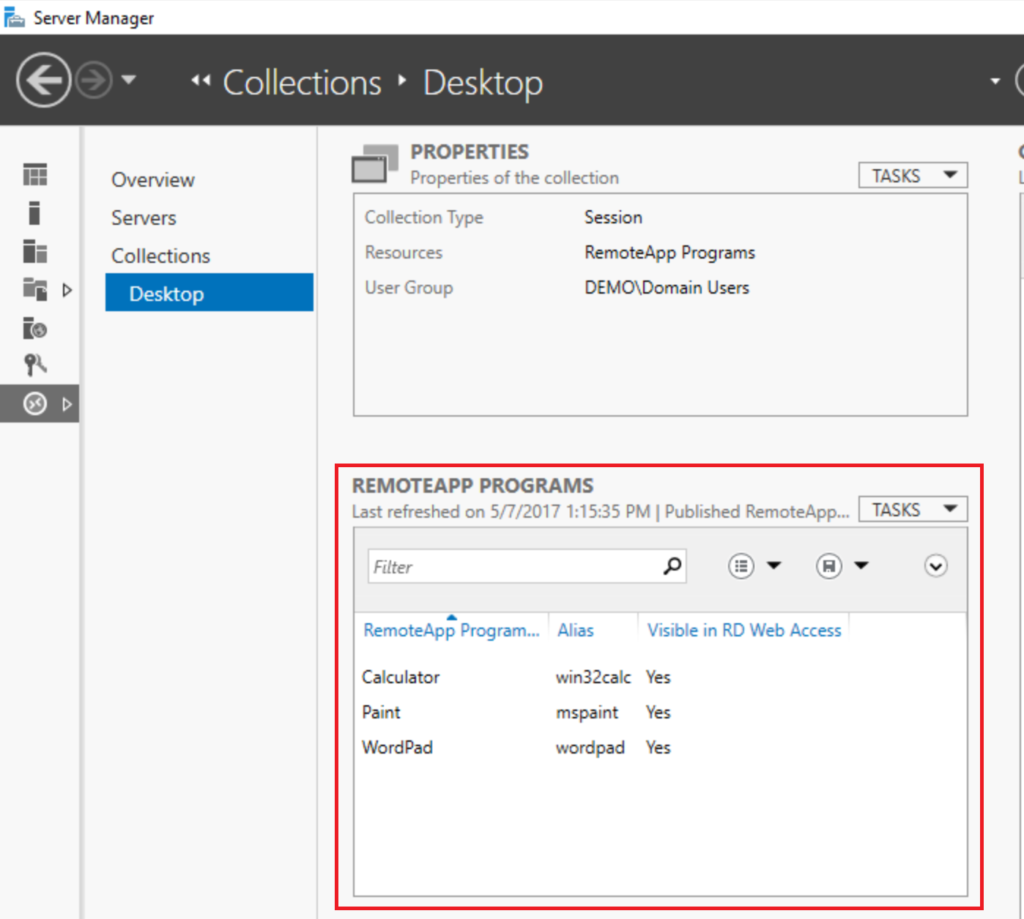
You can see which apps are published in Server Manager > Remote Desktop Services. Find your collection name on the left, and check out RemoteApp Programs. When users browse to https://desktop.domainname.com/rdweb, they will be able to see these applications, and launch them via the links in the Web Access page. You can also RDP onto the desktop of any PC that has remote desktop enabled using Connect to a remote PC.
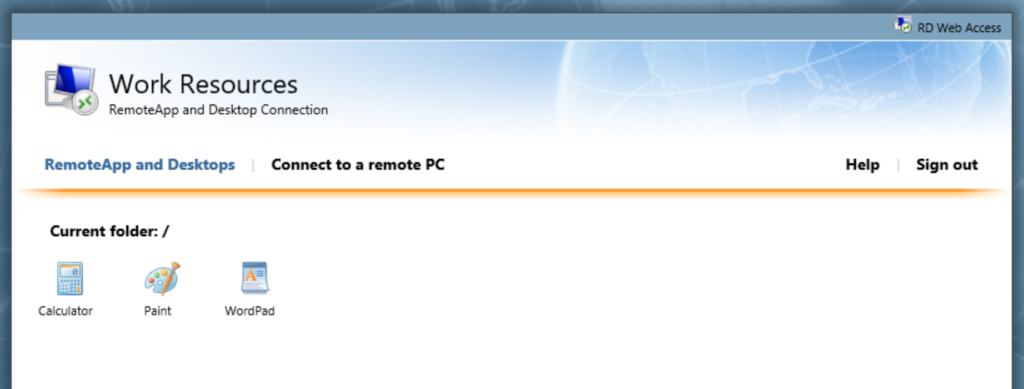
If you choose to publish the server’s desktop instead of apps, just remove these RemoteApp programs (RemoteApp Programs > Tasks > Unpublish…), and you will see that the desktop is published automatically.
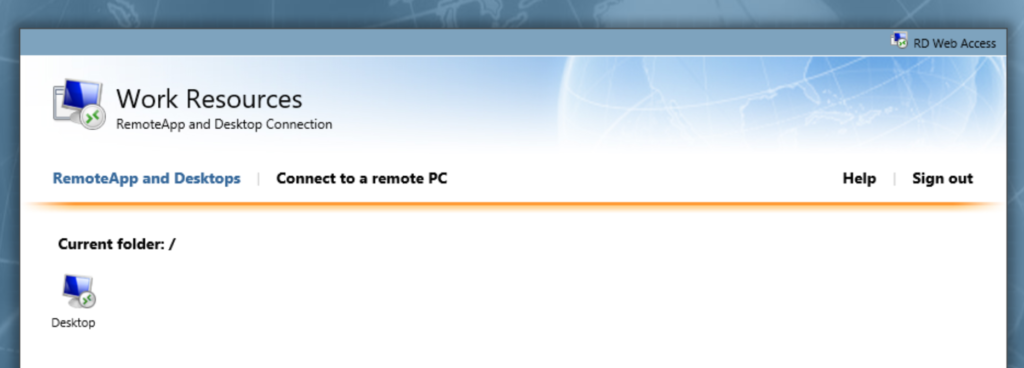
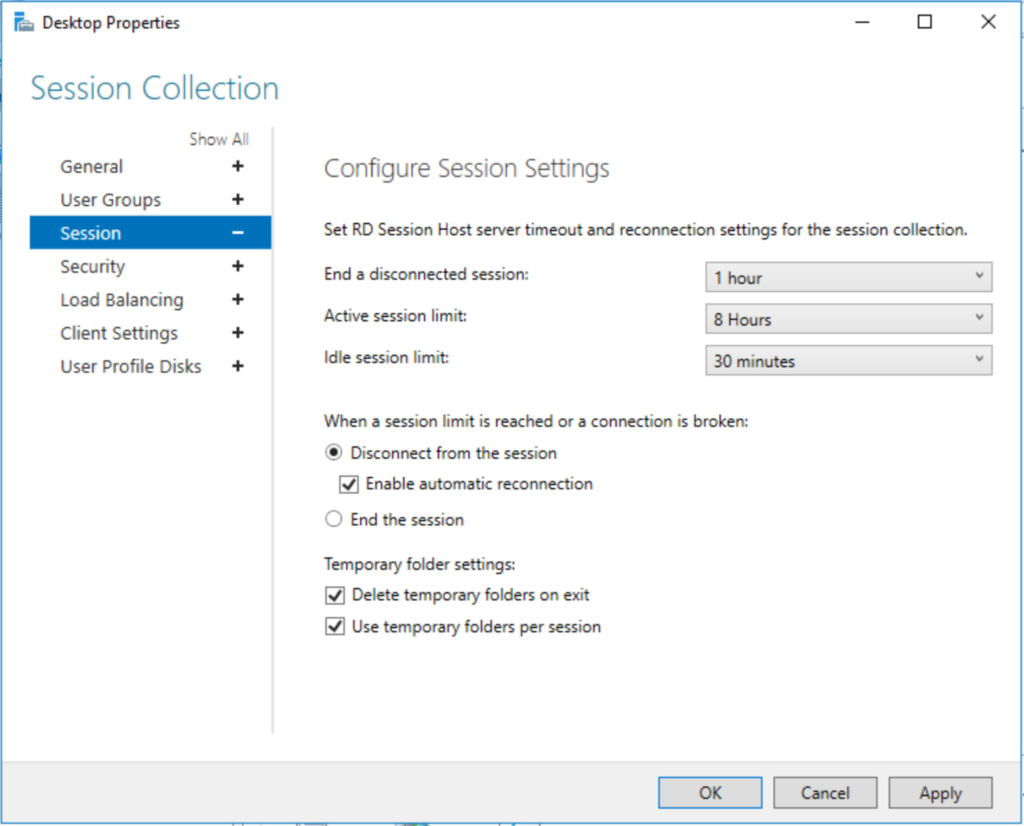
Typically the link in the Remote Web Access page will take on the name of your collection, so I usually rename my collection to something like “Desktop” (Properties > Tasks > Edit Properties). If you do go into that Edit Properties area, you will have an opportunity to configure a bunch of other options such as Idle session limits, and others.
Another way for client computers to access the desktop is simply by using the Remote Desktop client, but they will need to configure the gateway settings. For example, they can open Remote Desktop (mstsc) and go to Show Options > Advanced > Settings… > Use these RD Gateway server settings, specifying the remote desktop FQDN address. These settings can also be configured by an administrator, and saved into a file named “Remote.rdp” or similar, for distribution to client comptuers.

It is also possible to leave the RemoteApps published, publish additional apps, and also maintain full desktop access using this method. Tweak all the session collection settings, install whatever RemoteApps you need, and test everything out before releasing to the end-users.
Option 2: Configure SSL VPN (if available)
The other option, which I also cited above, is to only allow clients SSL VPN access using your firewall (again this service is listening on port 443). I highly recommend this approach, in certain use cases where you are granting access to managed workstations (i.e. on the domain) that also need to check in periodically for Group Policy updates, and remain up to date with other internal systems and settings. SSL VPN with WatchGuard for example, is great for this purpose. Using the WatchGuard, we can even tie authentication into Active Directory so that clients can use their existing network login credentials, just as they would with RDS.
Furthermore, we have the ability to restrict clients to specific network resources, or even specify different resources by group memberships. When clients connect, they receive an IP address in a specified range, and that range can be treated a lot like a DMZ, with very specific access granted/denied to the internal (trusted) network.

If using SSL VPN on your firewall appliance, just be sure that you have all of the updates for OS/firmware, and be sure your subscription services are active & up to date. Furthermore, I like to enable logging so that events can be reviewed. I find the logging more detailed/informative on the WatchGuard (with the use of their Dimension product) than on Windows Server. Just some food for thought.
Typically the workflow looks like this: the end-user would launch their SSL VPN connection, and once connected, launch the RDP client, or visit the Remote Desktop web access page in order to connect to their resources.
*Footnote: Contrary to some misinformation I’ve read on popular forums from confused IT Admins, a “DMZ” does NOT have to imply a network that is completely exposed outside of the firewall, or a network that is “less secure” than your internal network. A DMZ’s purpose is simply to restrict the traffic that is allowed to travel between web-facing services and non-web-facing / internal networks. I’ve even witnessed hilarious conversations online where people say things like “Never place a Windows Server in a DMZ–that’s a terrible idea since DMZ’s are not secure!” False. A DMZ is as secure as you make it to be.
Comments (19)
Thank You… this is the most concise description of installing RDS that I have found.
Agreed. This is great.
Thanks!
Great. I’m a Unix sysadmin and yesterday I had to deploy a similar RDS environment for the first time. Hard to find something clear and concise about the objects involved and the correct setup to be implemented (TCP/443 as the only exposed port). I deployed this on vCloud Director with 3 VM plus firewall and HAProxy as reverse proxy. Working great, thanks.
I have setup the Server Farm similar as you have described above. The Web Access works perfectly inside the network and outside using the HTTPS Proxy and wildcard Certs. However, using the HTTPs proxy opens up traffic to the Gateway Server (also my WebAccess, Broker & License roles), which in my case is inside my local network. I want to use Watchguard SSL VPN to restrict traffic coming in to my network. Therefore i have removed the HTTPS policy and I get an error using the Web Access over the VPN. Although, I can modify the firewall to “forcing all client traffic through the tunnel” and then it works fine. However, I don’t want to force all traffic for security and performance reasons. The error I get is “The computer can’t verify the identity of the RD Gateway”. Have you gotten this to work through a Watchguard VPN without having to enable HTTPS on the outside to the world?
I do not have this issue, but I am thinking on what could cause it. Perhaps, you are connecting to the RDS server by a DNS name which has a different IP inside than outside? Also, you do not need to the use the RD Gateway once you are connected via VPN. At that point, you are basically on the internal network like any other machine in the four walls. So the WG does the 443/gateway piece for you. Therefore, do not connect to RD Gateway, but to the Session host directly. If this is configured right, you should be able to ping the DNS name of your session host when connected over SSL VPN, and get the internal IP reply. Therefore, connection via RDP client should not be impeded.
I do get a Web Portal Logon and I am able to authenticate to the Portal successfully. Then when I select the Published Desktop icon it redirects to the Public DNS Server for Access to the Gateway Server. So unless I am willing to open a port to the world this will continue to fail. You are correct that I can access the TS Host directly (W/O gateway) while connected to the VPN. The issue with that is the connection still know it is part of a RDS farm and it redirects me to a specific server. As an example, I attempt to go to TS01 and I get a new prompt redirecting me to go to TS02. Only problem with that, besides having to go through 2 prompts, is if TS02 is offline it errors out and will not connect to TS01. Also, I want to provide a little more background in case you have another suggestion. 2/3 of the users will enter without a VPN connection. For those individuals a Firewall Policy will be setup that will restrict access to those with Static Public IPs. The VPN is really only necessary for those folks that have Dynamic Public IPs.
I would pick one or the other option–either open port 443 to the gateway RDS server, or, do not use the gateway service at all, and just combine SSL VPN with RDS directly.
Also, if you have it setup right, you should not get both prompts, even if it redirects you. Make sure the cert is good to go, and that the farm is working. If you want to use the gateway service internally (instead of externally) you have to make sure that the DNS name for the gateway server resolves to the internal IP when connected on VPN, and that the record is not available on the public internet.
Azure now have an 2019 RDS deployment available in their marketplace, allows you to deploy between 1 – 50 RDS hosts & creates a new 2019 AD Domain with load balanced RDS Host VMs – https://azuremarketplace.microsoft.com/en-us/marketplace/apps/cloud-infrastructure-services.rds-2019-basic-deployment-farm?tab=Overview
Post deployment steps: https://cloudinfrastructureservices.co.uk/how-to-setup-remote-desktop-services-rds-2019-farm-on-azure/
This is awesome, thank you!
RDS installation has been a pain for me.Thank you for the article
WOW just what I was searching for. Came here by searching
for best hosting
What goes on the Computer field under the General tab on the RDP client when also using a gateway server?
The target computer you’re trying to connect to, behind the gateway
Great to see someone is using watchguard. :)
I have a question about the rdp. When i have a tunnel from the the client to my datacenter for use of the printers, but they also connected to the internet.
I use a an external RDP connection while we see also the internal address.
Now we have a problem that the terminal servers slows down a lot. When they type it takes 2 to 3 seconds before it is vissible. I see the traffic going up extreemly.
My question, can it be that the traffic is going thru the tunnel in and thru the internet out and vice versa?
Also thought maybe the printers are generating traffic.
Thanks in advance,
John.
In the scenario you describe I would expect more latency. The gateway role is going to have the best performance, but when you’re also doing printing across the same WAN, etc. then yes you will likely see more impact. In many implementations of VDI/RDS there are dedicated pipes for different functions. You may have a separate outbound internet connection for example, and host your inbound RDP on the lowest latency connection you can get, keeping other traffic off of it. All of this is legacy of course. If you can modernize your apps then you may find there is no longer a need for remote desktop. I think that’s the best path forward for most SMB’s looking to digitally transform.
Thanks Alex! This was very easy to understand article – straightforward, simple and to the point.
Hi,
Using 443, client not able to authenticate, it is keep on asking the password. In firewall 443 is enabled, how can I troubleshoot.
Well, you could start with this: https://docs.microsoft.com/en-us/windows-server/remote/remote-desktop-services/troubleshoot/rdp-error-general-troubleshooting
There may be other articles out there specific to the RDGateway role as well, which you can find using a Google search (as I did for the article above).
:)