How to create an Anonymous relay connector in Exchange 2016
Hey, somebody moved my cheese again…
If you configured an anonymous relay connector in Exchange 2013, for example to allow scan-to-email from an MFP device or other on-premise application, you probably remember that you needed to choose “Frontend Transport” and “Custom.” If you left it on Hub Transport, it would fail, since the binding on port 25 already exists in the default connectors for the hub transport role. So you had to associate it with the Frontend Transport, instead. This was a change from previous version of Exchange where an anonymous relay would have been configured as part of the hub transport.
Welldontchaknowit somebody went and changed things on us again. In Exchange Server 2016 CU2, we see the following:
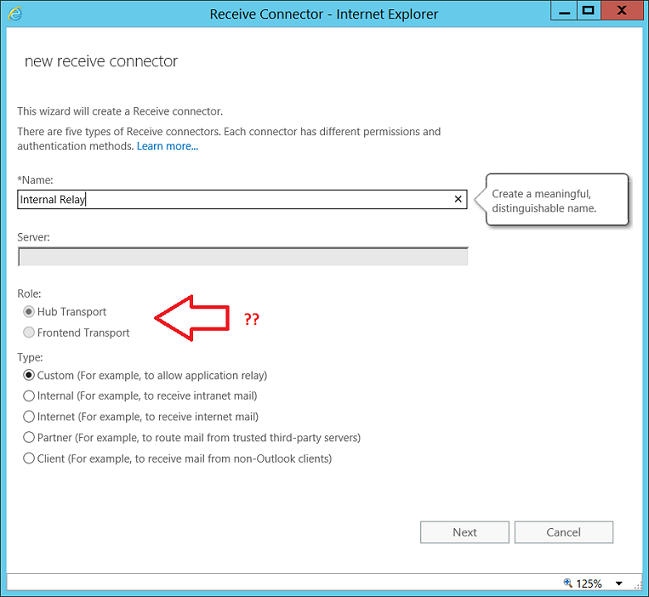
The Frontend Transport option is now greyed out. Simply picking Custom here and moving forward will just result in a failure, since port 25 already has a binding on the default connector, just as before. So here is what you have to do instead: open the Exchange Management Shell, and create the new connector like so:
New-ReceiveConnector -Name “Internal Relay” -Usage Custom -TransportRole FrontEnd -PermissionGroups AnonymousUsers,ExchangeServers -AuthMechanism Tls,ExternalAuthoritative -Bindings 10.0.0.21:25 -RemoteIPRanges 10.0.0.30-10.0.0.40,10.0.0.170,10.0.0.171
Obviously replacing the above IP information with values relevant to your own environment. Once the connector is created you will be able to open and edit it in the GUI just like always, but to get it going initially, you’ll have to use the New-ReceiveConnector cmdlet. I haven’t found any reasons for why this is the case, and maybe it’s just a quirk that will disappear again in a future CU, but until then, I hope this helps.
Comment (1)
Thanks for the share.
Just a note here as I ran into this issue trying to restrict Application Relay Internally when you have more than 1 network adapter as I have a second adapter for DAG replication.
I you have a second network adapter like I do you will need to specify the IP address of your MAPI adapter for your custom application relay receiver under “Network Adapter Bindings”. Install of using “All Available IPv4 Addresses” change it to “Specify an IPv4 address ….” and enter your IP specifically. Without this change I could not restrict internal relays.
Thanks,
Marc