Hyper-V Failover Cluster: Converged Network
In this post, we will look at a concept known as “Converged Networking” for setting up a simple two-node Hyper-V cluster (a great option for small businesses). The basic idea is that all of your physical network adapters will be brought together as a single NIC team, and thereby made interchangeable–it’s just connection tissue to the fabric of your network at that point.
This abstraction has many benefits. For example, it means that you can simply pass all network traffic from your physical switching into the Hyper-V virtual switch (via trunk ports), which allows a Windows Server admin to have full control over vlan assignments, QoS policies, etc.–without requiring specialized networking resources or switch configuration. In short, making changes in your virtual environment would not also require making changes on a physical switch.
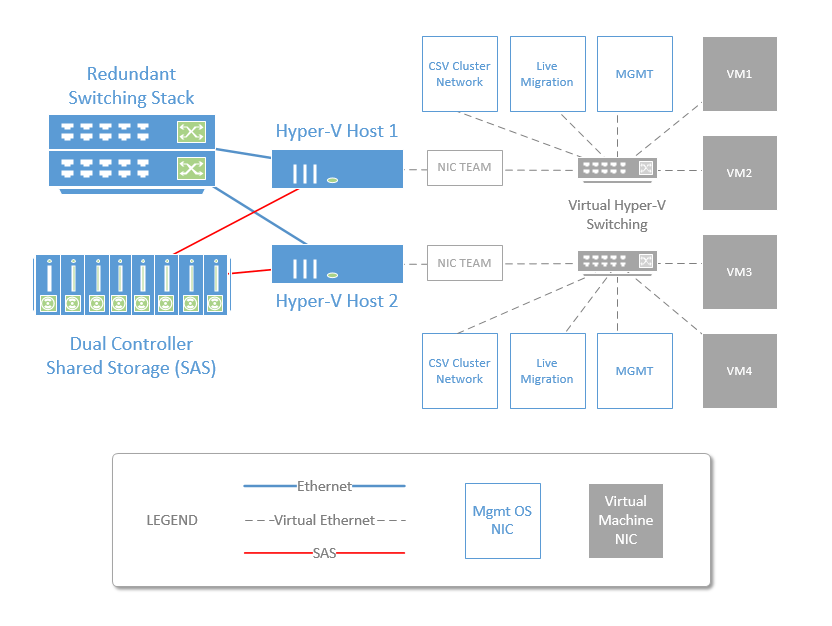
Image credit: itpromentor.com
We will ignore shared storage for now and focus primarily on the networking configuration required for building our cluster. We will address adding storage in an upcoming post. Here is a summary of the steps we will follow:
- Step 1: Setup Hyper-V Host Servers
- Step 2: Setup Physical Network Connections
- Step 3: Create the NIC Team
- Step 4: Create the Hyper-V Virtual Switch w/ QoS Policy
- Step 5: Create the Management & Cluster Adapters
- Step 6: Apply a QoS Policy
- Step 7: Join Hyper-V Hosts to the Domain
- Step 8: Create the Cluster
- Step 9: Optional Tuning
Step 1: Setup Hyper-V Host Servers
These are fairly straightforward PowerShell commands to add a name to your server, and install the components you need for Hyper-V & failover clustering.
#Setup your Hyper-V Host Servers
$ComputerName=”<NameYourHyperVHost>” # (e.g. “HVC-Node1”)
Rename-Computer -NewName $ComputerName -Confirm $False
Install-WindowsFeature –Name Hyper-V -IncludeManagementTools -NoRestart -Confirm:$False
Install-WindowsFeature -Name Failover-Clustering –IncludeManagementTools -Confirm:$False
Enable-WindowsOptionalFeature –Online –FeatureName MultiPathIO
Restart-Computer
Step 2: Setup Physical Network Connections
Let’s say you have four standard copper 1 Gb Ethernet network adapters in each physical server, which is pretty typical for a host server in the SMB. In the past, you would have taken each adapter and assigned a “role” to it individually:
- Management – For your Hyper-V Host OS
- Live Migration – Used by the Hyper-V OS to move VM’s from one host to another
- CSV Cluster Network – Used for cluster communication (heartbeat) and I/O redirect during failover
- Virtual Switch – Allows traffic to Hyper-V Virtual Machines
The problem here is that your throughput is limited on each adapter to 1 Gbps, or whatever the speed of your link is. Another issue is that you are not protected against the failure of any given physical NIC or physical switch. Enter NIC Teaming. Since Windows Server 2012, we’ve had the capability to team physical adapters, providing load balancing as well as failover capability.
In our example, this means we can connect two adapters from each host server to physical switch #1, and another two adapters to switch #2. All of these physical adapters will be treated identically–attached to trunk ports on your physical switching. Then we will build the virtual networking stack starting with a NIC Team, attach a Hyper-V Virtual Switch to that, which will then be our connection point for the management OS, and all of the cluster networking adapters.
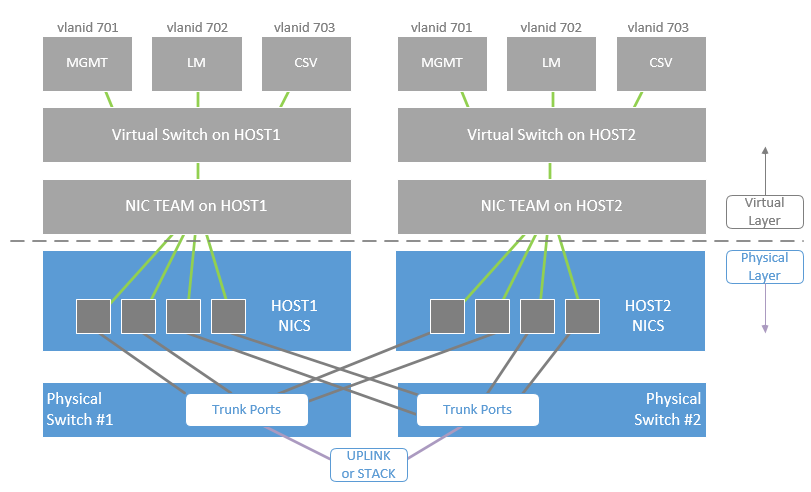
Image credit: itpromentor.com
Of course, the vlans that you intend to use should be added to the switch configs. Do not forget to enable trunking (pass all vlans) for these switchports, and enable jumbo frames on the switches as well. In Windows, you can find the jumbo frames settings by configuring the Properties of your physical network adapter–find the Advanced tab. As long as you’re in here, you might also want to scroll down and disable Virtual Machine Queues (VMQ). Another way to accomplish this across all adapters at once is by using PowerShell:
Get-NetAdapterVmq | Set-NetAdapterVmq -Enabled $False
Do not think that you should use VMQ because you read about how great it was in some TechNet article. It’s not necessary in 1 Gb adapters since you aren’t passing enough traffic through those NIC’s to realize any benefit, and in fact there are known issues with leaving it enabled on 1 Gb NIC’s–so save yourself the headache now and just disable it to start with.
Note: You should repeat Jumbo frame configuration on the virtual network adapters for Live Migration and CSV, as well, once they exist.
Step 3: Create the NIC Team
Again, the PowerShell here is fairly easy. You can create a NIC team with the New-NetLbfoTeam command, specifying SwitchIndependent for TeamingMode & HyperVPort for LoadBalancingAlgorithm (this is optimized for most small business Hyper-V deployments). You can input an asterisk (*) for the TeamMembers property to automatically add all Ethernet adapters to the team. Otherwise, if you are trying to use a pair of 10 Gb NICs that were installed separately, instead of the onboard 1 Gb NICs, you would need to specify those by name (e.g. “Ethernet 5″,”Ethernet 6”).
#Setup NIC Teaming
$TeamName=”HVTeam”
New-NetLbfoTeam -Name $TeamName -TeamMembers * -Confirm $False -LoadBalancingAlgorithm HyperVPort -TeamingMode SwitchIndependent
Step 4: Create the Hyper-V Virtual Switch w/ QoS Policy
Continue working in the same PowerShell session so you can retain your stored variables, or run together as a continuous script. In the following, we create a Hyper-V switch, and at the same time, we specify a default QoS policy type (I use “Weight” to determine how we reserve bandwidth for various NIC’s–this is best practice for most small business setups). For now, we will not allow the Management OS to share this switch, because we will add our management adapters in the next step.
#Configure the Hyper-V Switch
$SwitchName= “HVSwitch”
New-VMSwitch -Name $SwitchName -NetAdapterName $TeamName -AllowManagementOS $False -Confirm:$False -MinimumBandwidthMode Weight
Step 5: Create the Management & Cluster Adapters
Next, we will add new virtual network adapters to the Hyper-V switch, and assign them to the Management OS. We will also place each of them into a vlanid of your choice (I will use 701, 702 and 703 in my examples below).
#Configure the Management Network
$MgmtAlias=”<NetworkAdapterNameForMgmt>” # (e.g. “Management”)
$MgmtVlan=”<VlanIDforMgmt>” # (.e.g. “701”)
$MgmtIP=”<ManagementIPAddress>” # (e.g. “10.10.71.10”)
$MgmtGateway=”<GatewayIPAddress>” # (e.g. “10.10.71.1”)
$DNS=”<ADDNSServerIPAddress>” # (e.g. “10.10.1.4”)
Add-VMNetworkAdapter -ManagementOS -Name $MgmtAlias -SwitchName $SwitchName
Set-VMNetworkAdapterVLAN –ManagementOS –VMNetworkAdapterName $MgmtAlias -Access -VlanId $MgmtVlan
New-NetIPAddress -InterfaceAlias $MgmtAlias -IPAddress $MgmtIP -PrefixLength 24 -DefaultGateway $MgmtGateway
Set-DnsClientServerAddress -InterfaceAlias $MgmtAlias -ServerAddresses $DNS#Configure the Live Migration Network
$LMAlias=”<NetworkAdapterNameForLM>” # (e.g. “Live Migration”)
$LMVlan=”<VlanIDforLM>” # (e.g. “702”)
$LMIP=”<LMIPAddress>” # (e.g. “10.10.72.10”)
Add-VMNetworkAdapter -ManagementOS -Name $LMAlias -SwitchName $SwitchName
Set-VMNetworkAdapterVLAN –ManagementOS –VMNetworkAdapterName $LMAlias -Access -VlanId $LMVlan
New-NetIPAddress -InterfaceAlias $LMAlias -IPAddress $LMIP -PrefixLength 24#Configure the CSV Cluster Network
$CSVAlias=”<NetworkAdapterNameForCSV>” # (e.g. “CSV Cluster”)
$CSVVlan=”<VlanIDforCSV>” # (e.g. “703”)
$CSVIP=”<CSVIPAddress>” # (e.g. “10.10.73.10”)
Add-VMNetworkAdapter -ManagementOS -Name $CSVAlias -SwitchName $SwitchName
Set-VMNetworkAdapterVLAN –ManagementOS –VMNetworkAdapterName $CSVAlias -Access -VlanId $CSVVlan
New-NetIPAddress -InterfaceAlias $CSVAlias -IPAddress $CSVIP -PrefixLength 24
You do not need to specify a gateway or DNS configuration information for Live Migration & CSV networks–this traffic never really leaves its own subnet in most SMB environments.
Step 6: Apply a QoS Policy
In order to prevent cluster traffic from stealing too much bandwidth away from production VM’s, we can specify a QoS policy by assigning weights to the various network adapters. Best practices states that we should get these values to add up to 100 (so that your weights can be thought of in terms of percentages).
#Apply QoS Policy
Set-VMSwitch -Name $SwitchName -DefaultFlowMinimumBandwidthWeight 50
Set-VMNetworkAdapter -ManagementOS -Name $MgmtAlias -MinimumBandwidthWeight 10
Set-VMNetworkAdapter -ManagementOS -Name $LMAlias -MinimumBandwidthWeight 20
Set-VMNetworkAdapter -ManagementOS -Name $CSVAlias -MinimumBandwidthWeight 20
The “DefaultFlowMinimumBandwidthWeight” property is what you are reserving for your VM traffic. I recommend keeping this value to at least 50%, and splitting the others 10/20/20 (Mgmt/LM/CSV).
Step 7: Join Hyper-V Hosts to the Domain
Since you have your networking all setup at this point and (presumably) attached to your network, you will need to join the local domain before you can create your cluster.
#Join the Domain
$Domain=”<DomainName>” # (e.g. “Company.local”)
$User=”<UserName>” # (e.g. “hvadmin”)
$OUPath=”<OUPath>” # (e.g. “OU=HyperVHosts,DC=Company,DC=local”)
Add-Computer -Credential $Domain\$User -DomainName $Domain -OUPath $OUPath
Restart-Computer
Step 8: Create the Cluster
Again, for now we are going to ignore storage, so I will leave that out on purpose with the “-NoStorage” switch–it can be added later (and we will see this in a future post).*
#Setup the Cluster
$ClusterName=”<ClusterName>” # (e.g. “HVCluster”)
$ClusterIP=”<ClusterIPAddress>” # (e.g. “10.10.71.15”)
$Node1=”<HostName1>” # (e.g. “HVC-Node1″)
$Node2=”<HostName2>” # (e.g. “HVC-Node2”)
New-Cluster -Name $ClusterName -Node $Node1,$Node2 -StaticAddress $ClusterIP -NoStorage
Pretty slick, right? Remember the days when creating a cluster would take several hours to get right? If you combine these elements into a single script, your cluster will be ready in just a few minutes.
Step 9: Optional Tuning
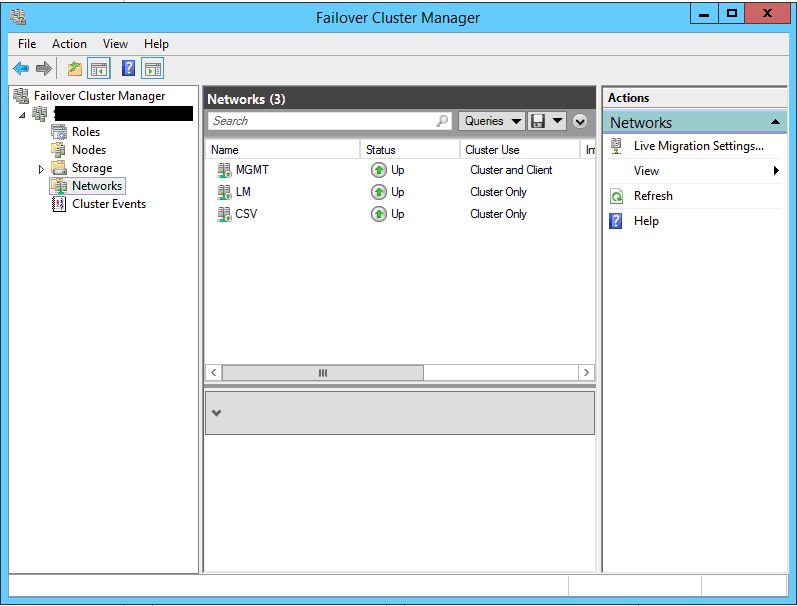
I also like to give my Cluster Networks “friendly names” so they aren’t generically called “Cluster Network 1” or “Cluster Network 2”, etc. in the Failover Cluster Manager. It is optional to do so, but is accomplished as follows:
#Friendly Rename of Cluster Networks
$MgmtNet=”<MgmtSubnet>” # (e.g. “10.10.71.0”)
$LMNet=”<LMSubnet>” # (e.g. “10.10.72.0”)
$CSVNet=”<CSVSubnet>” # (e.g. “10.10.73.0”)
(Get-ClusterNetwork | where-object {$_.Address -eq $MgmtNet}).Name = “MGMT”
(Get-ClusterNetwork | where-object {$_.Address -eq $LMNet}).Name = “LM”
(Get-ClusterNetwork | where-object {$_.Address -eq $CSVNet}).Name = “CSV”
Now look in the Failover Cluster Manager under Networks. Sweet!
Last, we can set priority for the Cluster (CSV) network traffic. The lowest metric will be favored for cluster communications, so I like to make sure the CSV network has the lowest possible metric. Most of the metrics will be assigned automatically with values in the thousands, so I just use “900” here to ensure we get beneath that.
#Set the cluster network priority
(Get-ClusterNetwork CSV).Metric = 900
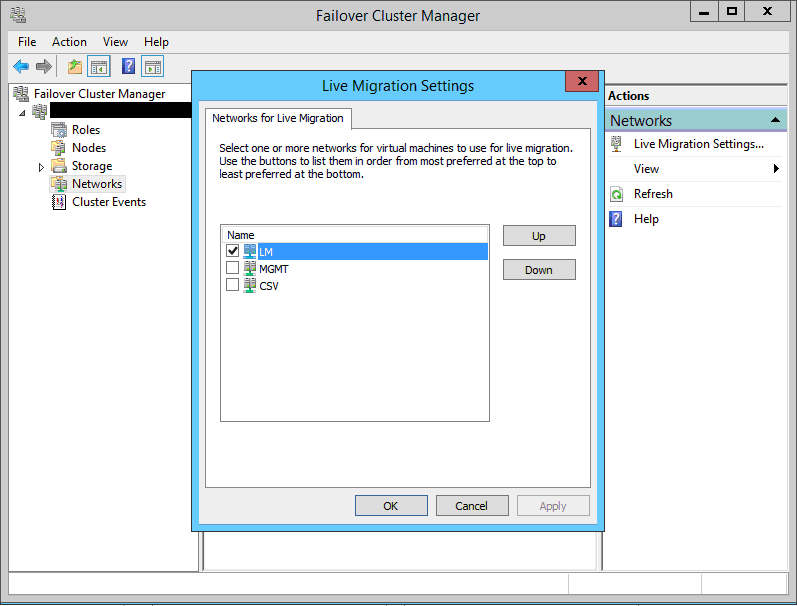
If you also want to restrict Live Migration traffic to only the LM Cluster network, then you can do the following:
#Configure Live Migration
$ClusterNetworkMGMT = Get-Clusternetwork MGMT
$ClusterNetworkLM = Get-Clusternetwork LM
$ClusterNetworkCSV = Get-Clusternetwork CSV
$includeIDs = $ClusterNetworkLM.id
$excludeIDs = $ClusterNetworkMGMT.id + “;” + $ClusterNetworkCSV.id
Set-ItemProperty -Path “HKLM:\Cluster\ResourceTypes\Virtual Machine\Parameters” -Name MigrationExcludeNetworks -Value $excludeIDs
Set-ItemProperty -Path “HKLM:\Cluster\ResourceTypes\Virtual Machine\Parameters” -Name MigrationNetworkOrder -Value $includeIDs
Right-click on Networks and check the Live Migrations Settings in Failover Cluster Manager to verify.
That’s a wrap for today. Next time we will add some CSV shared storage to this cluster.
*Footnote: You will probably also want to run validation on your cluster, after storage is configured.

Comments (9)
For a new cluster that will host the future domain controller. Should I create a new domain controller on one of the newly created hosts, then add each host to the new DC, then create the cluster? It’s a bit of a chicken and egg situation…
Correct. Technically the best way to accomplish this is to host the domain controllers on LOCAL storage (not on cluster storage)–so they just run in Hyper-V, not on top of the cluster. This is good for numerous reasons. For example if they are set as autostart they will be able to come online even if there is a problem with the cluster after something like a power outage event.
Hi
I have followed your article but I am having problem get vNICs with VLAN ids to communicate between hosts. I have configured them the same way you suggested above but when I set the VLANs I can’t get them to communicate with other hosts on the same VLAN.
PS I am still at the networking part I haven’t yet done the cluster yet
Make sure your physical switches have the same VLAN’s available and that those VLANs are tagged on the ports leading to your host’s physical NICs.
Having an issue with this setup. I’m testing this out and I have 2 HV (VMs) on a single VMware vCenter host. I created a NIC Team with 2 adapters. Then I made an External vSwitch and linked it to the NIC Team. After creating the vNICs and assigning IPs to them, I’m unable to ping anything from the HV host even if its on the same subnet.
Hi Alex,
Recently i configured fresh cluster by your article. Thanks for very useful information.
But i stumbled when look to log “Microsoft\Windows\SMBClient Connectivity log” and see that managment interface sends SMB trafic every 10 minutes to CSV and LM. I tried restrict this by New-SmbMultichannelConstraint cmdlet, but this probles remains, so i could not find another resolution besides disable SMB multipath at nodes (Set-SmbClientConfiguration -EnableMultiChannel $true).
Maybe there are more good solution of this problem?
EDIT Set-SmbClientConfiguration -EnableMultiChannel $false
Hello Alex,
Thanks for the great article
I need your advice and your recommendation for building a clustered Hyper-V environment for VDI
we’ve 4 nodes, each node has 8 NIC 10 GB
our plan is to use a converged network and create Nic teaming ( 3.5.3 Switch Independent configuration / Dynamic distribution) on 6 Physical Network Card and the remaining 2 nic will be used for ISCSI traffic (MPIO)
– and then create virtual switches for ( Live Migration – Cluster – Management – VMs Traffic).
should I use Switch Embedded Teaming (SET)
also, should I disable VMQ
Thanks
Hey sir! I don’t work with on-prem Hyper-V anymore, so unfortunately I can’t be of help here.