Protect messages and documents in Microsoft 365 Business with AIP, part 2: AIP labels
Azure Information Protection (AIP) uses “labels” to classify and protect data. Labels are published to end users for eventual consumption and use through a “policy.”
In the olden days, applying permissions and restricting access to files was more rudimentary—again, it was based on the concept of the “four walls.” We would erect digital boundaries that simply mimicked familiar physical boundaries. The idea, which seems silly now, is that you could protect your files inside a file server much in the same way you would protect physical files that were locked up in a file cabinet somewhere, inside an office building. A file server is a container, protected by an access control list (ACL), exactly like a building or cabinet is a container, protected by lock & key. With the right credentials (or the right key) you get to enter the container, and get your files.
But these sloppy old structures are just no longer adequate in a world where so much of our data has become mobile and slippery—moving easily from one device to another, one file system to another, one cloud to another.
Therefore, Azure Information Protection (built on its predecessor Azure AD RMS), allows us to stamp permissions and encryption right onto individual files themselves—so that an ACL is applied, and the access is controlled no matter where that file travels during its lifetime.
For the purposes of covering basics here, we are just going to work mostly within the default labels and the Global policy that is provided with AIP out of the box. But you must understand that preceding any actual implementation of AIP labels and policies, is data classification.
Planning for data classification
Data classification is a formal exercise that must be completed with the key decision makers and stakeholders in the business. Before you can begin to actually classify and protect data, you must first define what your “labels” or “classifications” are going to be:
- What will they be called?
- How will they be described to end-users?
- What will they do to a document?
- Label it with header, footer, watermark?
- Protect and apply encryption?
- Apply specific permissions or restrictions?
- Who has access to apply which labels?
It will be easier for you to complete this planning exercise if you first understand what your capabilities are. To that end, we will review the basics of both labels and policies, and finally move onto Office 365 “Sensitivity labels,” an extremely similar technology which you can now use in conjunction with AIP labels (so you do not have to re-create any labels moving between the two).
Note: Office 365 Sensitivity labels are in fact a distinct and separate technology, even though you can now “marry” your labels, there remain some crucial differences, and we’ll be sure to cover them.
AIP Client and basic end-user experience
Today, if you want users to be able to access and apply labels from AIP, they will need to have the AIP client installed on their devices, so that the labels are available via the various applications. When you install the client, it shows up on the Office ribbon (it says Protect and looks like a blue lock—see the image below).
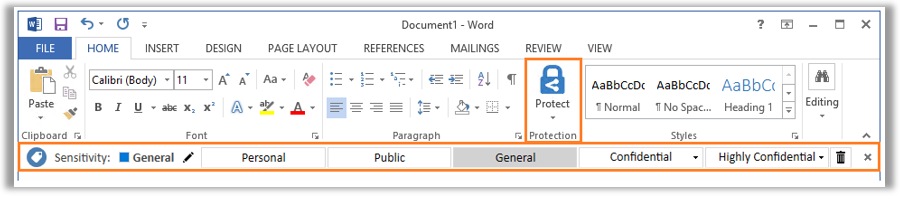
From the end-user perspective they are just classifying documents according to these labels, but behind the scenes there is quite a bit of technological magic happening, in some cases applying encryption to the document with embedded permissions—think of it as an access control list (ACL) that travels with the file, wherever it goes.
Whenever this protection is enabled, a yellow bar with the label’s description and permissions is displayed above the document, and the user will also have the ability to track and revoke any access that has previously been granted.

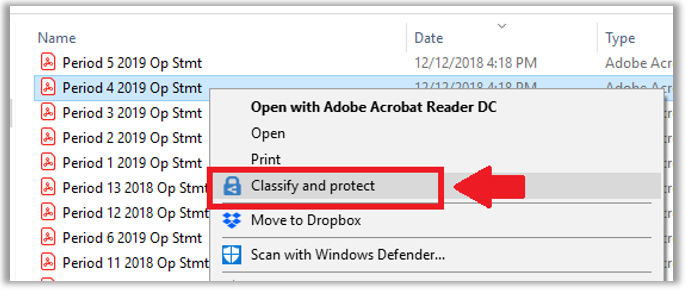
Users with the AIP client installed will also get the ability to classify and protect documents right within the native File Explorer for Windows.
A simple but powerful tool. However, before you throw it out there to users, you should work on your data classification and building your labels, and then publishing them with a policy.
Configure AIP labels
Labels are managed and accessed via the Azure Portal, on the Azure Information Protection > Labels blade. To begin exploring, check out the already existing Confidential / All Employees sublabel.

You will notice that all labels allow you to display the label in the AIP client, or not. This one is set to Enabled > On. So we expect to see it in the AIP client (and we do).

The name and description of the label shows up in a yellow bar at the top of the content, when end users open a classified document. The bar also gives them the option to View Permission where they can look at any restrictions imposed for them.

Scrolling down further on the Label: All Employees blade, we find the settings for Protection (that is, encryption). Confidential / All employees are indeed encrypted documents by default. Click the Protection button to open a new blade, which allows us to review the access list and the permissions assigned.

Protection blade
Focusing just on the first section here, we have controls for adding groups of users and assigning permissions. We can see that all users of my tenant are given Co-Owner permissions, using the default Azure (cloud key)—as opposed to using a key that you bring from an on-premises deployment of AD RMS. Using the Microsoft 365 Business SKU, we will always just use the Azure cloud key. Hold your own key (HYOK) requires Azure Info Protection P2, which is bundled in the E5 subscription.

Notice the toggle to either Set permissions explicitly, or to Set user-defined permissions.
User-defined permissions
Selecting the Set user-defined permissions radio button exposes two more options—the first one specific to sending email messages in Outlook—it will apply the Do Not Forward permissions, which I previously described. The second option allows the user to apply their own permissions ad-hoc in Word, Excel, PowerPoint and File Explorer.

Set permissions > Add permissions
Back to assigning explicit permissions: Set permissions, let’s take a closer look at the options there. When you select the option to Add permissions, you have a few options:
- Add <tenantname> – All members – Adds everyone in the organization to the access control list. This is the default selection for the All employees sublabel
- Add any authenticated users – This option does not specify anyone in particular, and so allows you to share the content with anyone (who has a Microsoft account) to access the content, while still giving you the option to restrict permission (and revoke access if needed). Microsoft has some additional notes about this option, which we will discuss later.
- Browse directory – Here you can enter your own selection of individuals or security groups from your organization to the ACL
- Enter details tab – Go here to add external email addresses or domain names to the ACL

Once you have specified a user or group, you can then assign a permission from: Co-Owner, Co-Author, Reviewer, Viewer or Custom. Each selection will display for you below what permissions are granted on the content. Custom of course, means you can make your own selections.

You can exit the blade without saving your changes. Back on the Protection blade, you can also find Content expiration and Allow offline access. What is pictured is the defaults for the All employees sub-label.

In the case of Content expiration, this just means that access can be scheduled to expire. Either on a specific date, or a certain number of days after the content is initially shared.
Allow offline access is a setting which enables a recipient to authenticate to gain their access and unlock the encrypted file, but then be able to continue opening the file without re-authenticating again for a certain number of days (or indefinitely). Obviously you would want to use this option with caution—especially for content that is able to be shared externally.
Exit this blade without saving any changes.
Label blade
On the label blade, scrolling down further we see that it is possible to configure headers, footers and watermarks. All pretty self-explanatory.

And last, we find an option to classify documents based on conditions. Click Add a new condition.

This option allows you to give the user a prompt in the AIP client, to recommend this label for classifying the document, if a specific type of information is detected within the document (e.g. a credit card number or similar). This would require the P2 subscription (found in E5), and is therefore not applicable to the Microsoft 365 Business subscription.
Exit the Condition blade. Exit the All Employees label blade.
Default label templates in AIP
Below is a summary of the default labels that are included with AIP out of the box. Most of them are not applying any kind of encryption or marking, and therefore are not distinguishable except by label name (honor system). Anything with protection applied is enforcing a permissions list (ACL).

Perhaps you would want to modify these defaults, for example it would be possible to add encryption even to General documents. Or add a watermark and tighten the permissions on Confidential and Highly Confidential a bit further. Or, you may want to abandon the defaults and create completely different labels depending on the environment and requirements.
When planning your own classifications, content markings are usually easy decisions to make. But people tend to have trouble with protection. Think of the protection features this way:
- Some content is okay to share freely outside
the organization with no encryption (e.g. Public)
- No need to enable protection
- Some content is okay to share outside the
organization, but you still want the ability to restrict permissions or
revoke access to the content (e.g. Private, Privileged or Restricted)
- Use either: User-defined permissions (custom/ad-hoc) or
- Add any authenticated user (to define the permissions globally) or
- Add specific outside email addresses and domains with permissions selections for each
- Some content should not leave the
organization (e.g. Confidential, Highly Confidential)
- Add all tenant members and choose permission levels
- Some content may not even leave a specific
department or group (e.g. Finance or Management)
- These can be sub-labels under something like Confidential or Highly Confidential
- Add specific groups or individuals and apply permissions to each accordingly
This can be a good kick-start to thinking through the data classification exercise, but there are so many iterations/variations to this, it would be impossible to cover them all—every organization is different, and some will surely surprise you with their requests.
Default global policy
All the default labels are published via a default label policy called Global. Find it on the Policies blade.

The purpose of a policy is basically to assign a certain set of labels to a certain group of users. So beyond a name and description, that’s the majority of what you see in the first section of this blade. At the bottom, we have options which can customize the experience that end-users have, who interface with the AIP client in the Office apps, and Windows Explorer.

Most of these are “off” by default. But it is common for SMB’s to want to require users to provide justifications for “downgrading” or removing a label, as well as the option to enable the Do Not Forward button in Outlook (which we previously covered), if nothing else.

The other settings like whether users MUST classify a document, or whether there is a “default” classification on new documents, etc.—those selections can be all over the place, and should also be discussed with the business stakeholders when implementing document classification.
And that’s about all there is to it–Once you have your policy selections made, you can scope the policy globally, or to a specific group, adding and subtracting labels to your heart’s content.

In the next article we will pivot this conversation a bit, toward Office 365 Sensitivity labels. They accomplish similar things (marking & encrypting documents), but as we will see there are still some differences, even though the two label sets can now be “tied together” and managed centrally.

Comments (2)
“Allow offline access” doesn’t work on emails, only on documents, right?
I believe that is correct. This is certainly a bit dated now, but the same would still apply in Sensitivity labels.