How to Setup and Configure Azure Backup for File, Folder and System State Protection
Until very recently, the Azure Backup agent only supported file and folder backup from an on-premises server to the cloud. We now have support for System State protection added to this list, so we will cover how to configure that today. Azure Backup also offers other ways to protect your on-premises application workloads, as well as virtual machines, but we will cover those topics in future posts.
The steps in this tutorial are:
- Create an Azure Recovery Services vault
- Download the MARS Agent and your vault credentials
- Install the agent and provide your credentials
- a. Enable System State Backup
b. Configure the MARS Agent Backup Schedule - Setup Notifications
1. Create an Azure Recovery Services vault
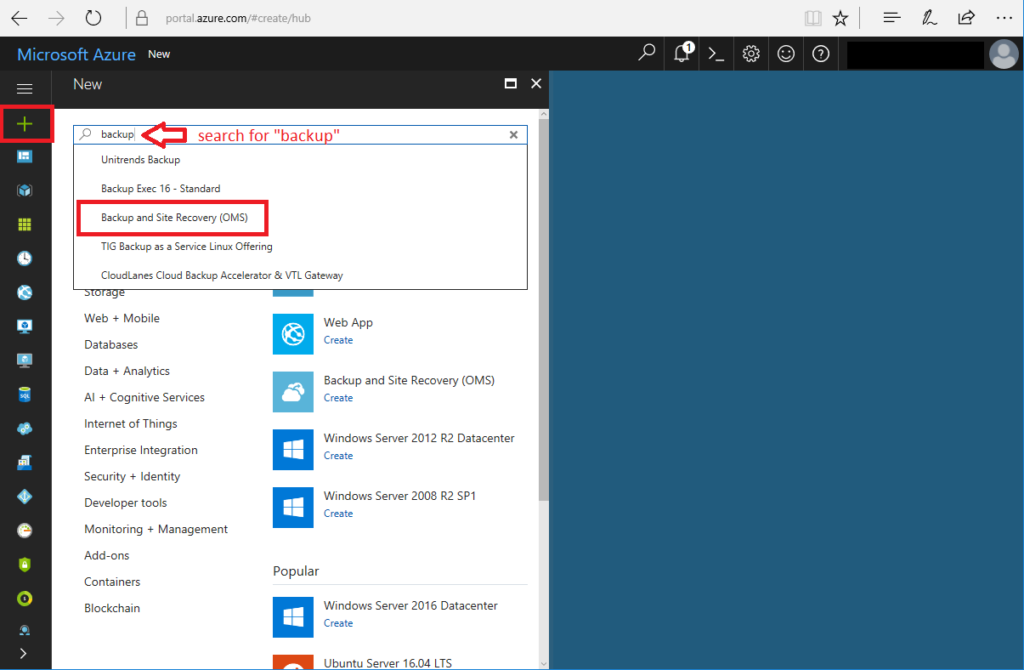
Before you install the MARS agent, you will need to sign into your Azure portal and create a Recovery Services Vault (which they have apparently renamed again). Click New (+) then start typing “Backup” to find Backup and Site Recovery (OMS) in the list–or some other name by the time you read this, perhaps.
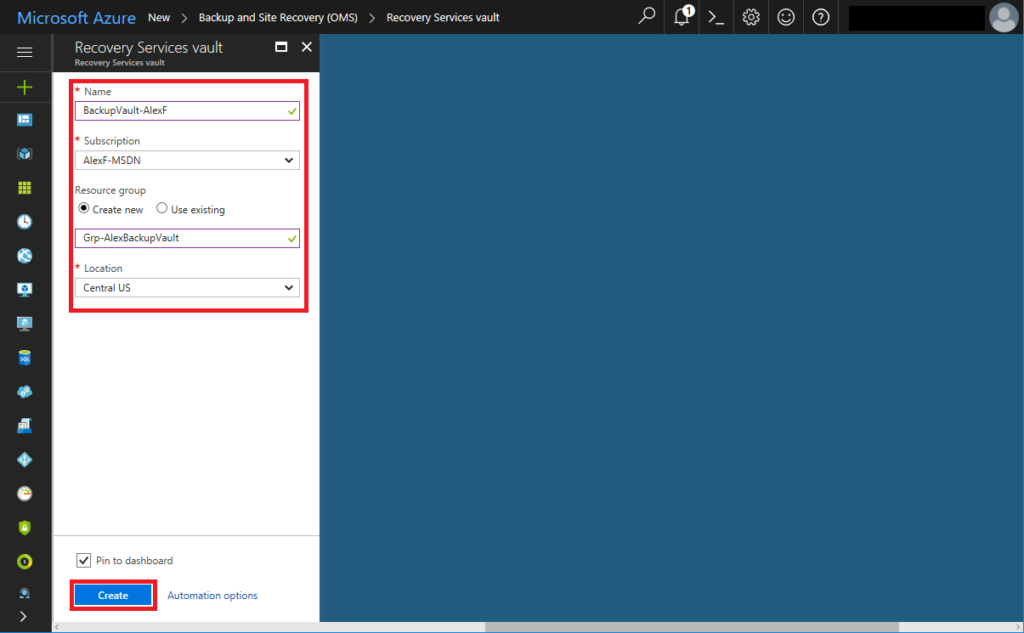
Next, click on Create. Then you need to fill out some options, like naming the vault, choosing a region and so on. Click Create again when you’re done.
2. Download the MARS agent and your vault credentials
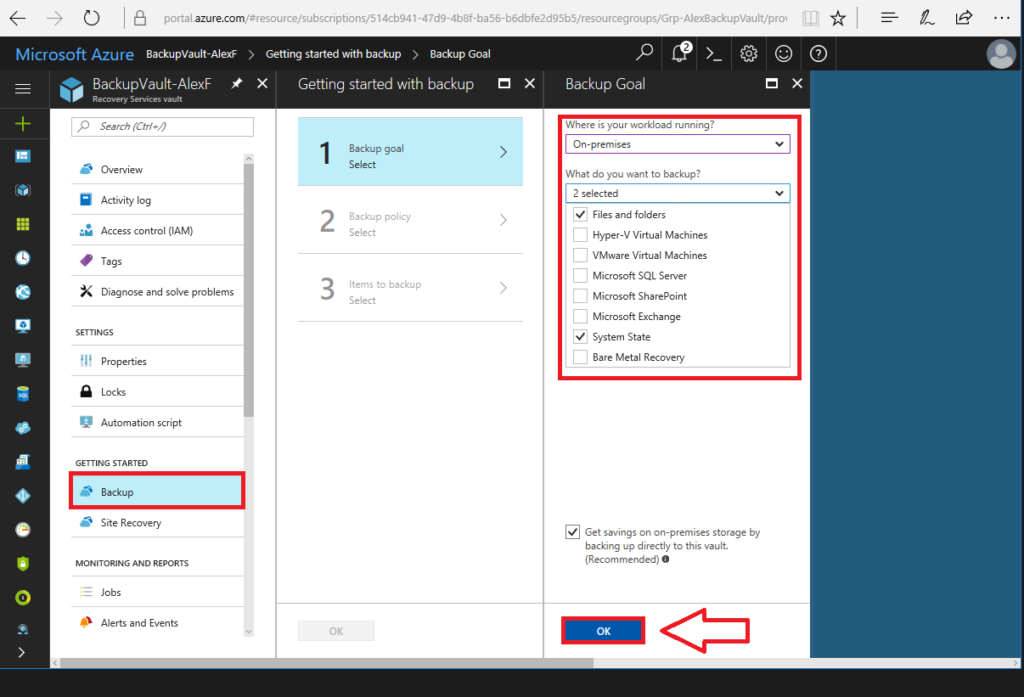
Once Azure is finished provisioning your resources, you can click through to your vault, and go to Backup under Getting Started. Based on the selections you make here, it will recommend one of the various Azure Backup solutions. Choose On-premises, and then Files and folders and/or System State. Click OK.
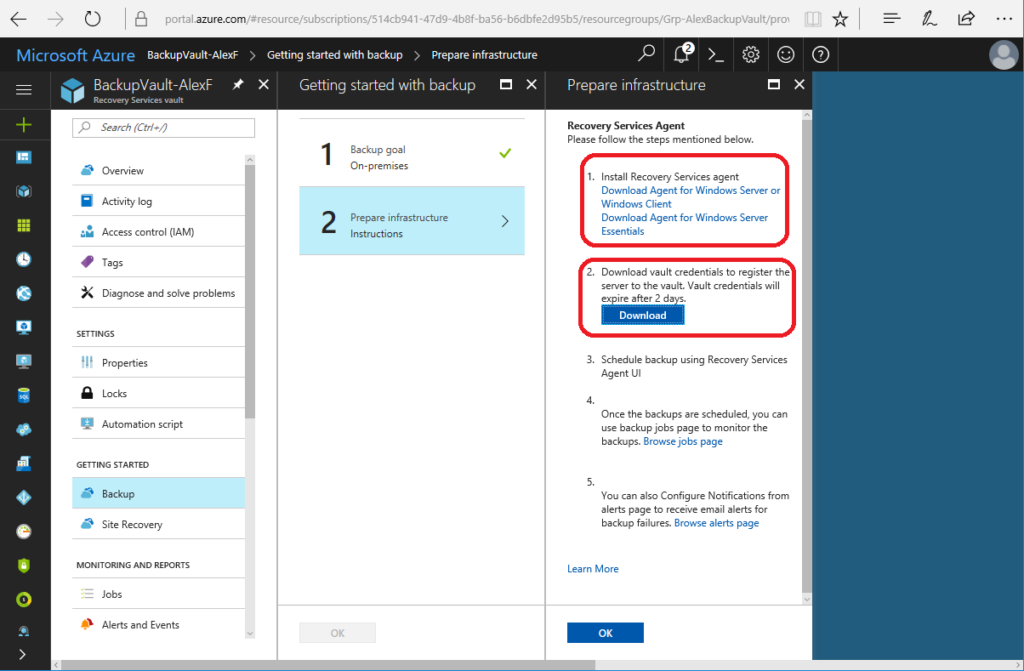
The big downside to this process is, there isn’t really an “automatic way” to deploy this solution. It’s a manual install per machine, and you’ll need both of these downloads to complete the setup. Use the links for Download Agent for Windows Server or Windows Client, as well as the Download button for vault credentials.
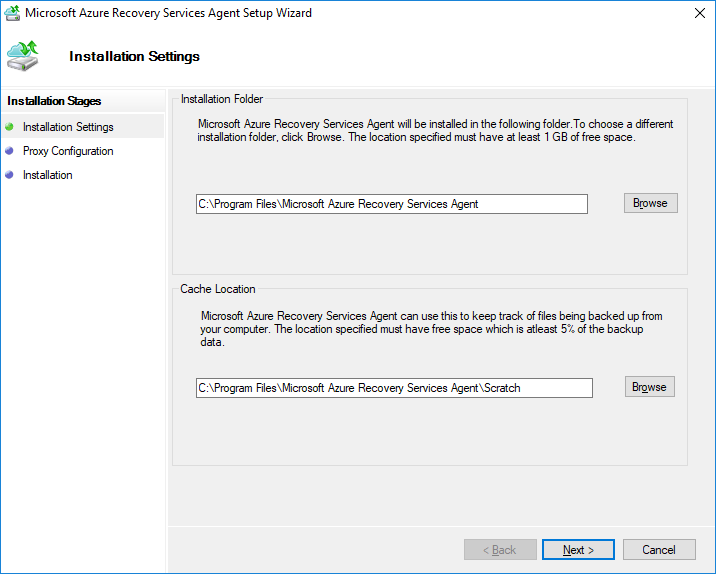
3. Install the agent and provide credentials
Step through the setup wizard one screen at a time. Next, Next click Install.
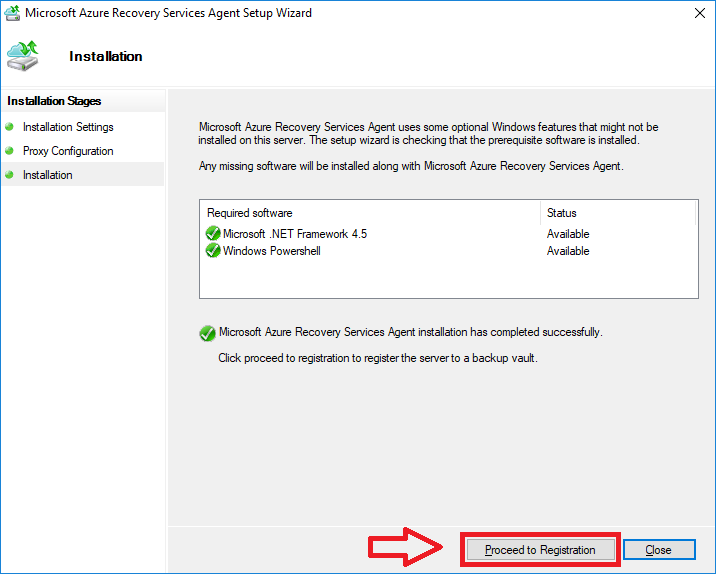
When it has finished the agent installation, click Proceed to Registration.
And here you will Browse to find and select the credentials you downloaded earlier from Azure.
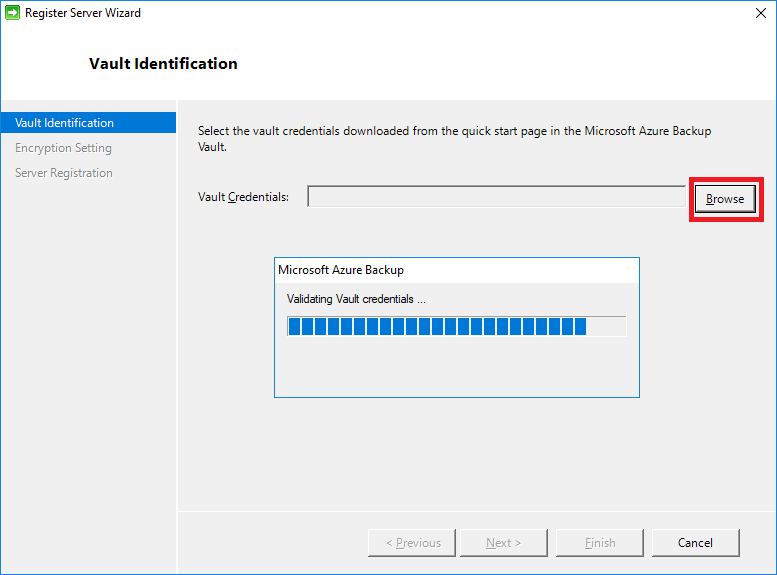
Note: if you just downloaded your credentials but the wizard rejects them, suggesting that you should download them again and use within two days, check your system clock–and be sure you are syncing to a proper time authority.
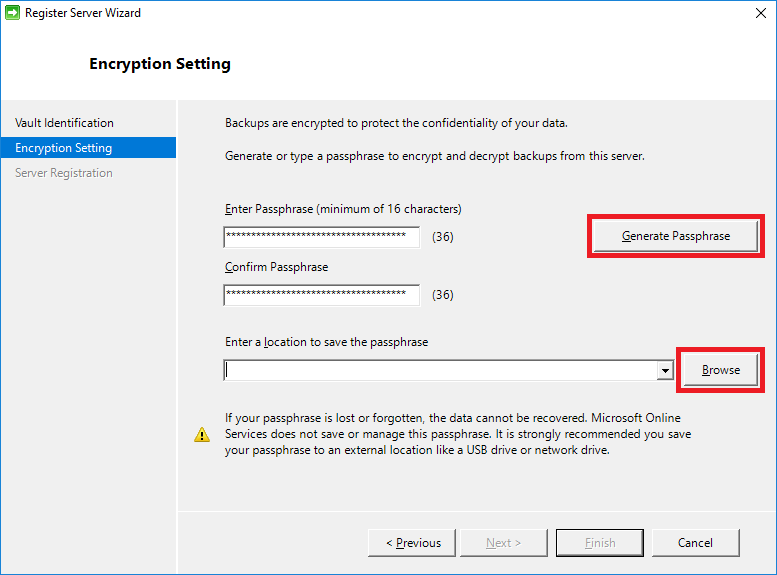
After your credentials are validated, you will choose or generate an encryption passphrase, and save it to a file (store this somewhere safe for your customers, not on the local machine).
After you complete this wizard, you will be given the option to launch the Azure Recovery Services Agent. Click Close to proceed.
4a. Enable System State Backup (recommended)
NOTE: If you want to include the System State (critical for Domain Controllers), then at the time of this writing you will need to create a new registry key as follows:
Create a new REG_DWORD value called TurnOffSSBFeature in HKEY_LOCAL_MACHINE\SOFTWARE\Microsoft\Windows Azure Backup\Config\CloudBackupProvider and set the value to 2.
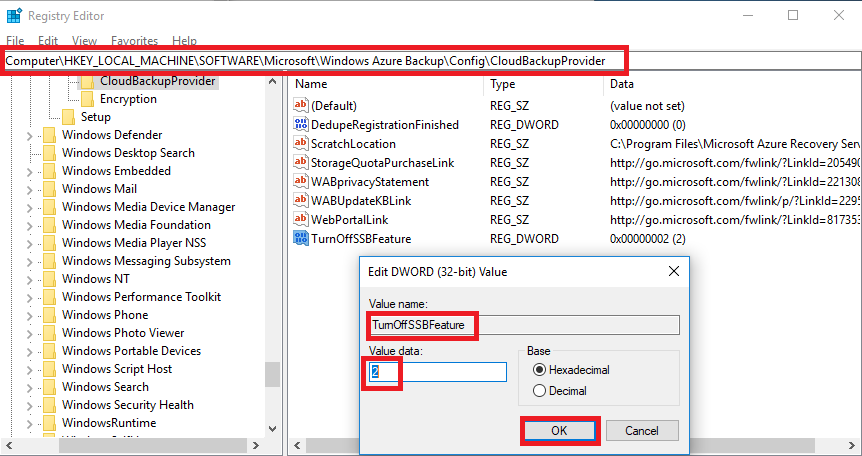
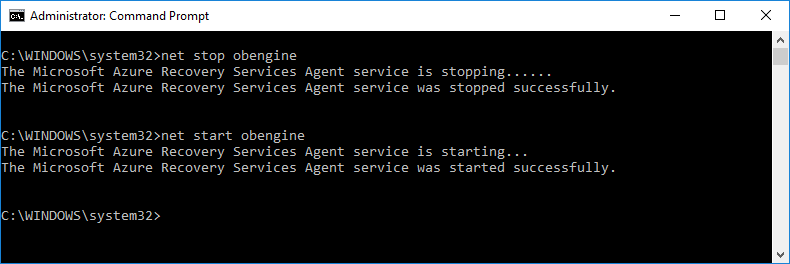
Be sure to restart the Microsoft Azure Recovery Services Agent (obengine) service before configuring your backup.
4b. Configure the MARS Agent Backup Schedule
The Microsoft Azure Backup console will look very familiar to most Windows Admins (it has an uncanny resemblance to Windows Server Backup. Click Schedule Backup to begin.
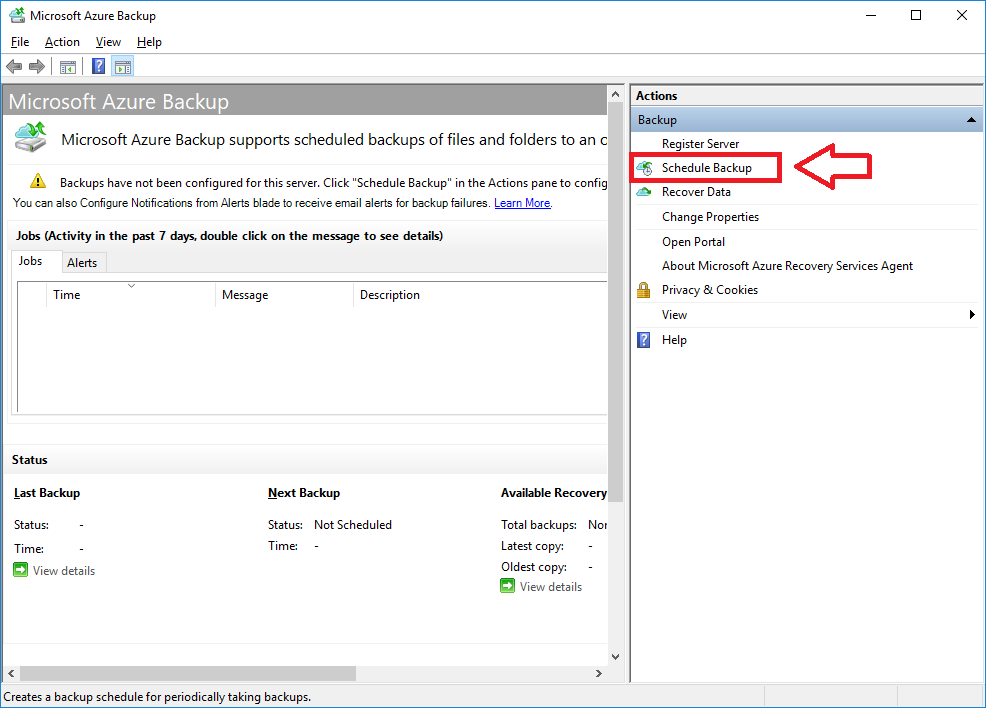
Step through the wizard adding the items you need to protect. You will notice that there is an option for System State now!

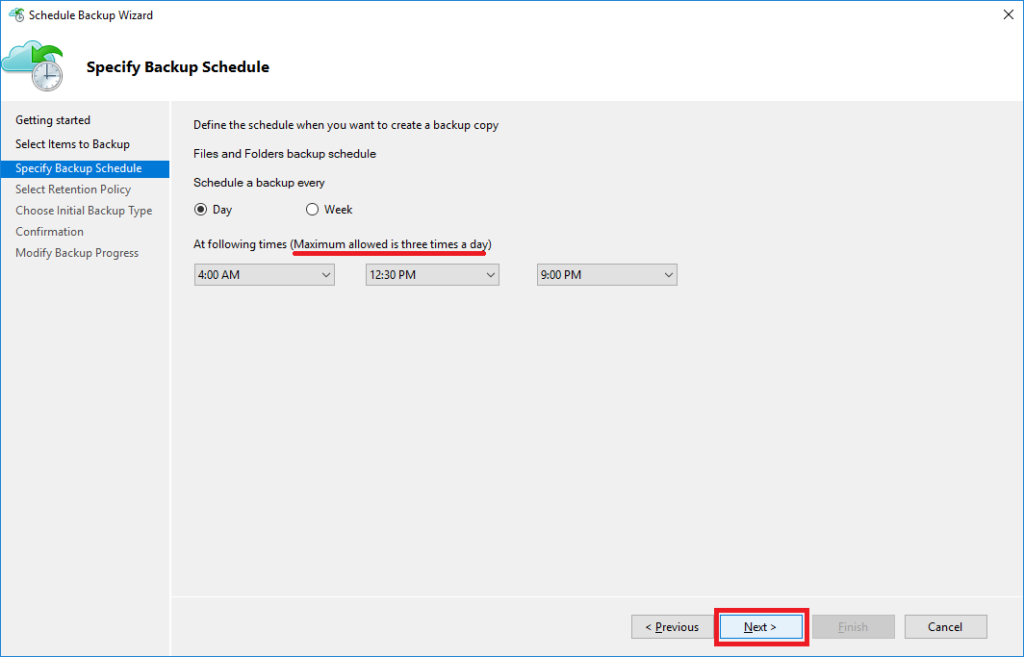
Although many small businesses will be okay with one backup per day, it is always a good idea to go through a downtime tolerance exercise with your clients, to ensure that you are on the same page about RPO and RTO when designing a backup & disaster recovery solution. We can configure a maximum of three backups per day here. Click Next.
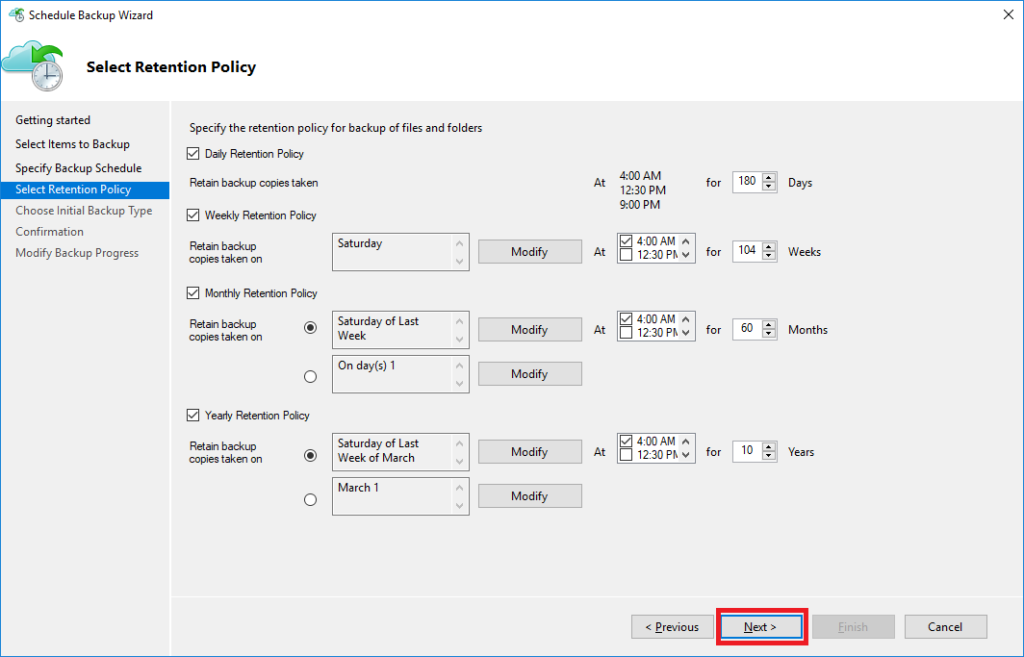
As I mentioned, retention options have grown substantially and is one of the reasons we are seeing more adoption of this service in the SMB / SME space. Modify the default values as needed, then click Next.
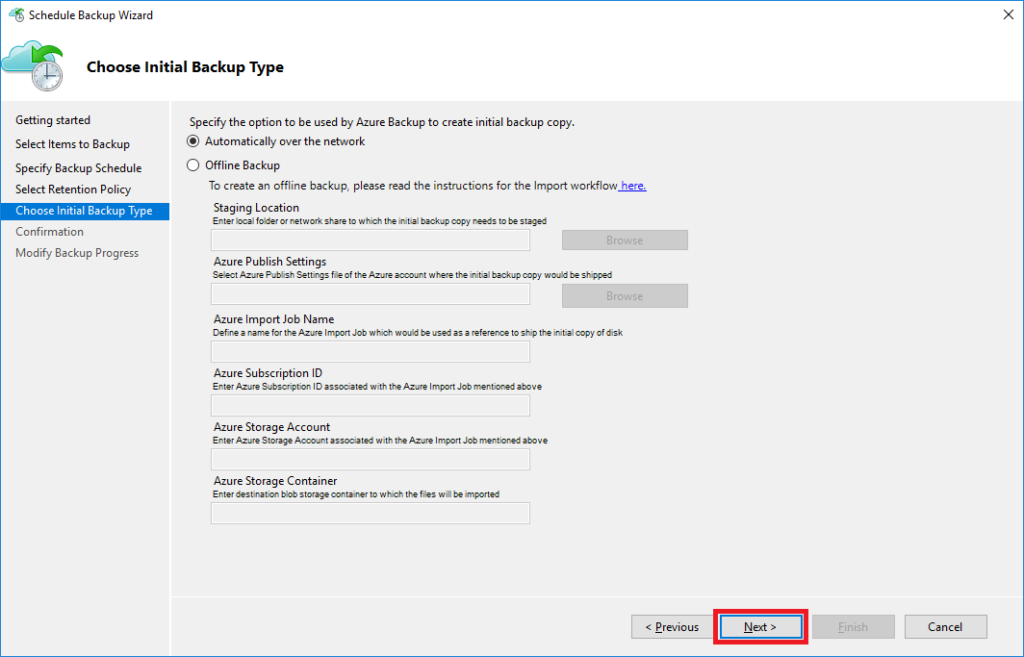
Most of us will just choose to upload the backup directly from the server into the Azure cloud, however, some folks may choose to pre-seed the data in Azure by sending physical media (so that you only have to upload incremental changes over the wire). There is an offline option here with a link to further instructions, but otherwise just accept the default: Automatically over the network. Next.
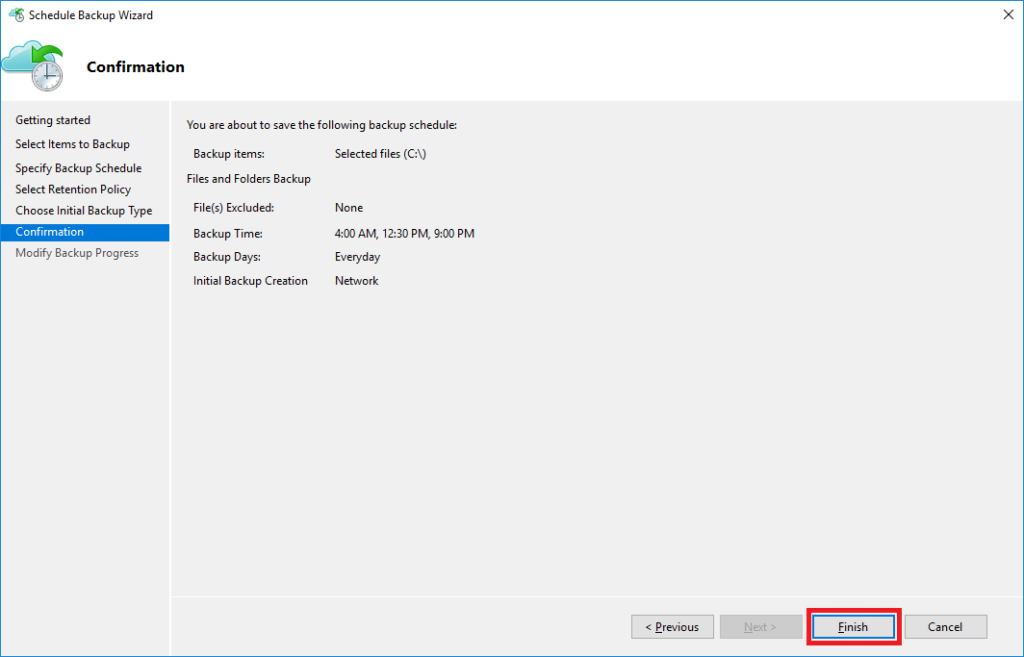
And just like that, you’re done. Review your selections and click Finish.
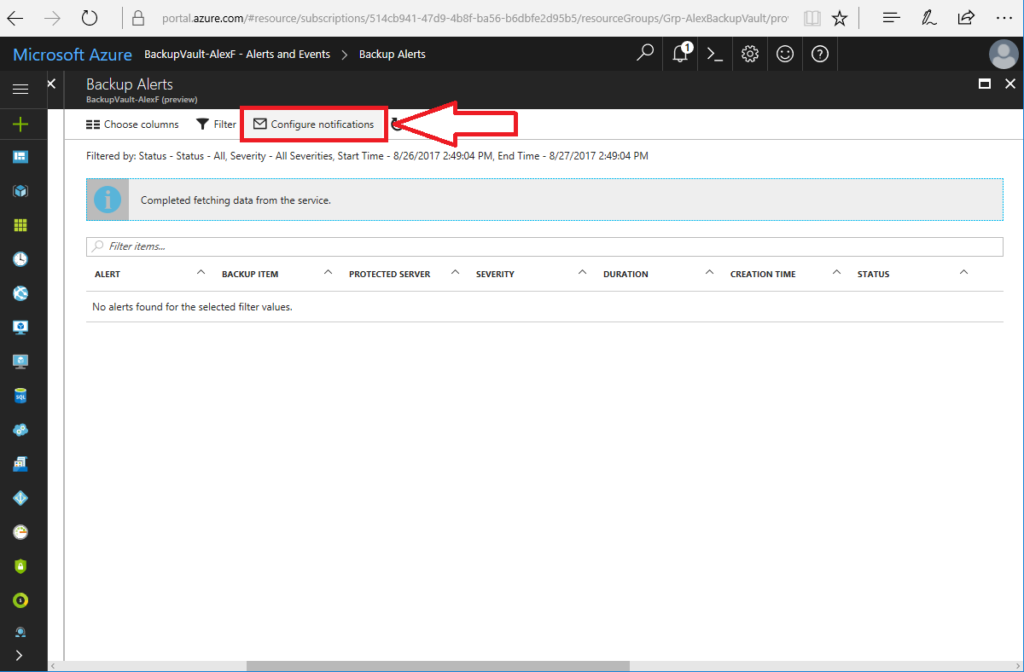
5. Setup Notifications
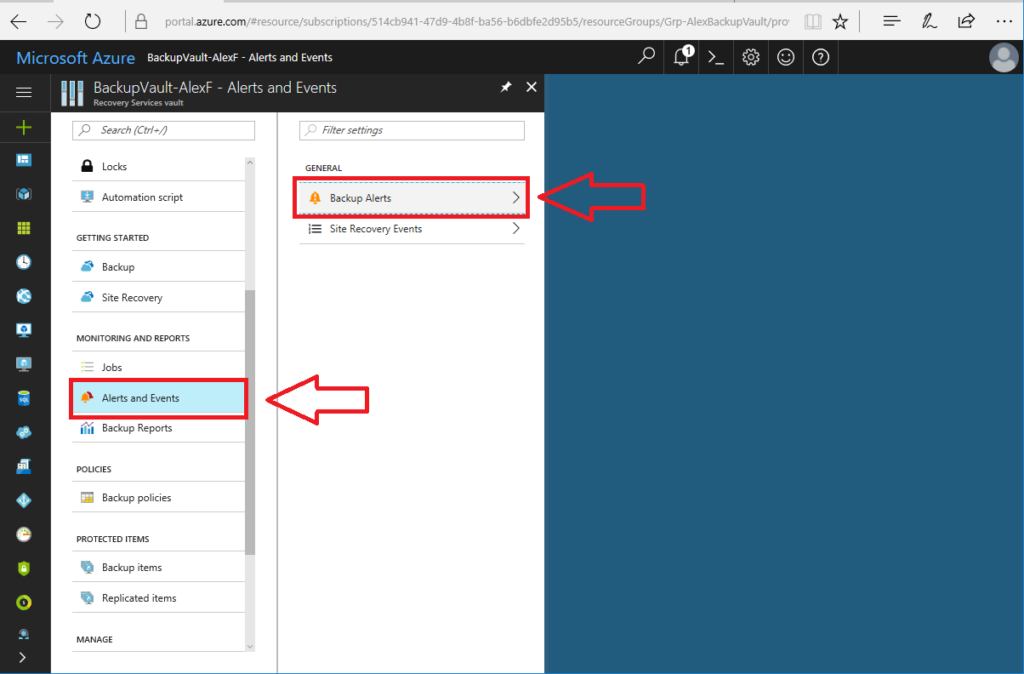
You might want to setup notifications on your backup jobs. Return to your Azure Recovery Vault in the Azure Portal. Scroll down to find Alerts and Events. Then click on Backup Alerts.
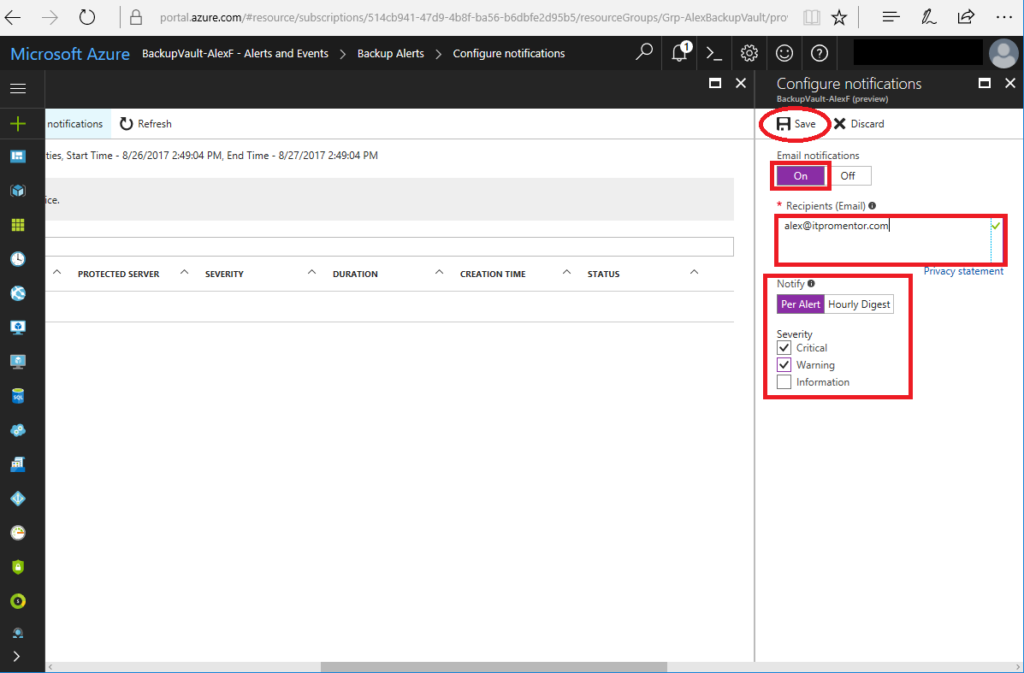
On this next page, just click Configure Notifications.
Now pick the settings appropriate to your need, and Save at the top.
All done. See below for an example of a notification alert which I have received on this backup agent.

Upcoming Azure Backup & DR Series
In this tutorial we have covered how to setup and configure the Azure Backup Agent for file, folder and System State data. I will have another blog series that describes the differences between this solution and two other options in Azure that we can use for backup & disaster recovery. Stay tuned.
Comments (16)
And again an excellent post Alex, thx!
Hi!
I am very new at Azure. You wrote an excellent how to. Nevertheless, I tried that out and need to stop after vault creation at item 2. I do not have the points “get started” in my vault overview and therefore I cannot download the credential file. Is there something I need to enable first?
Nothing you should need to do. If you created a Recovery Services Vault, then you should have the options for either Backup or Site Recovery. Click Backup in this case, which will open a new blade for you, and continue from there.
It is working now as you described. No clue, why it was not working on my first try. Thanks for you help.
Hello Alex, Great job describing everything in such detail. Would you please let me know if there is an advantage to use the Backup and Site Recovery (OMS) vs. the Recovery Services Vault? FYI, we have 2 physical on-prem servers just for the sake of Domain authentication (no data), and the rest of the VMs in Azure. We would like to backup all Azure VMs using the native Azure backup in Recovery Services vault, and via MARS agent to make backups of the physical servers with system state to Azure. Since this is new, we have not yet started making backups of the on-prem physical servers. I am a bit unsure if the Backup and Site Recovery (OMS) is the proper Azure backup or the one I am using; Recovery Services vault. I prefer to continue with what we started (Recovery Services Vault) to minimize complexity, unless the OMS is a much better way to make backups. We have no MS management servers since this is a small environment. Please advise. Thanks.
Sorry for the delayed response. So it sounds like you already have a vault setup from before, which probably works to continue using, just the same. If you go to create a new object today, they have renamed it in the portal, but it should be the same type of object in principle. I’m not sure if technically behind the scenes there is anything different, as is the case with “classic” vs. “ARM” virtual machines, but if you are able to register these servers with the existing vault, why not, especially if you can’t see any difference in retention points, etc.
Hi, This is really good, one question though, I only receive alerts if a backup fails, is this normal? I would have thought that by selecting the ‘information’ check box i would receive success notifications too?
Hm, good point, I only ever use notification for failure, but I could see wanting confirmation of successes also. I’ll have to try it out myself and see!
Thank you for the info about the Azure Backup.
I want to deploy it on more than 3k computers, is there any way to do it via GPO / config file?
I’ve tried the Azure Backup Server too, but it needs a lot of disk Storage, and I ONLY want to use the Azure backup Online storage (but I can’t only select the Online Storage without provisioning a disk).
Which will be the best option to deploy for more than 3k computers and only for the Online Backup (vault) option?
Many thanks! :D
Sigh, yes the only complaint is that this isn’t really that great for deploying en masse, like DPM for example, where you can push agents and configure jobs centrally. You kinda have to go one-by-one. If you find a way to automate it, though, let us know!
Correct me if I’m wrong. I’m afraid the backup notification > configure notification will only work if you are using Azure Backup to backup Azure VM. Microsoft Azure Backup Services (MARS) Agent will not work with this.
Well, it has been working for me since I set it up last year–I am protecting system state using MARS agent on a server hosted on my Intel NUC lab…and I received an alert when there was a failure event in October.
How do you backup multiple servers? Install Azure backup on each and every server? Use DPM? I see that it also caches the files locally?
Yes when you use the MARS agent to backup to Azure Backup, you have to install the agent on every system you want to backup. You can also use MABS (DPM) to deploy DPM agents to the systems you want to backup, then the MARS agent really only lives on the MABS server (and the others you are backing up use the DPM agent).
Hi,
great work.
It’s possible backup a network shared folder mapped on the windows Server?
When i’m going through SELECT BACKUP ITEMS i cannot find the mapped devices…..what’s wrong?
Thank you
You would want to configure the backup agent on the server where the shared drive is located, rather than another computer on the network.