Tutorial: How to Setup a Site-to-Site VPN between an Azure Virtual Network and WatchGuard Firewall, part 1
Using a Site-to-Site VPN tunnel into an Azure Virtual Network is the most common way for small businesses to begin extending the capabilities of their local network, and leveraging additional compute power and availability features in the cloud.
There are many reasons one might need to add new virtual machines to a small business network without investing in any additional hardware on-premises:
- Adding a cloud-hosted replica Domain Controller and DFS file shares can add fault tolerance and high availability to an existing small business infrastructure
- Acquiring a new Line of Business app that will be cloud-hosted rather than premises-based
- Preparing for a DR-scenario where on-premises servers could be recovered/restored into the Azure Virtual Network
- Migrating on-premises workloads into the cloud completely
It all starts with getting that Azure Virtual Network and Site-to-Site VPN working.
Summary of steps
In the first part of this series, we configure the Azure Virtual Network and other related objects in the Azure Portal. In part 2 of the series, we will connect it up with a WatchGuard firewall. For a list of other supported firewall vendors with links to instructions, go here.
Here are the steps for setting up Azure resources which we will cover in this article:
- Step 1. Create the Azure Virtual Network
- Step 2. Create the Gateway Subnet
- Step 3. Define the DNS server(s)
- Step 4. Create the Virtual Network Gateway
- Step 5. Create the Local Network Gateway
- Step 6. Create the Connection
Let’s go step-by-step.
Step 1. Create the Azure Virtual Network
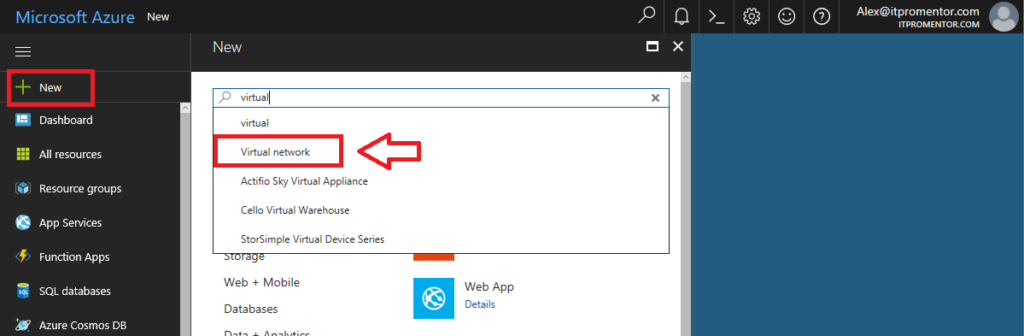
From the Azure portal, click New and start typing Virtual network into the search field, then click on Virtual network.
The selection on this first blade should say Resource Manager. Click Create. Then you will have a series of fields to define.
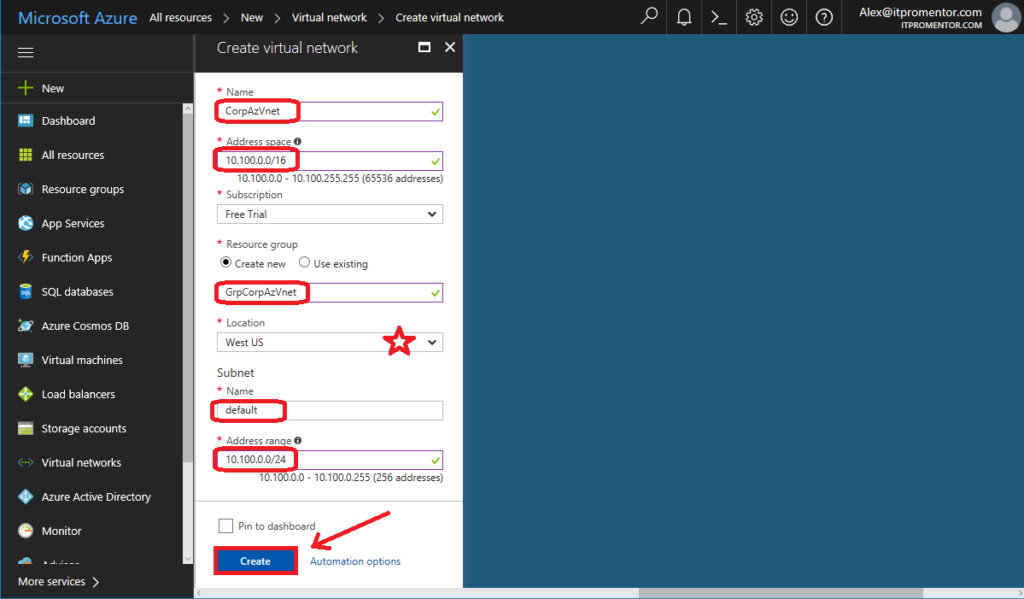
Name: This is just a name for the Virtual Network object in Azure
Address space: You can make this subnet anything that does not overlap with your on-premises IP address space (so if you have 10.10.10.0/24 locally, don’t make your subnet 10.0.0.0/8). Pick something that is outside the range of your local subnets. In this example I picked 10.100.0.0/16 (which is a huge address space that most of us will never use, but why not?)
Resource group: This will create an object in Azure called a Resource group, which is just a way of grouping together resources in Azure–think of it as a container where you can put items that are related to one another.
Location: This will place your network into a particular Microsoft datacenter. This is important: remember this location; you cannot connect a virtual machine from a different datacenter to this virtual network.
Subnet: Give it a Name (anything is fine) and an Address range, which can be the same as the space defined above, but often it is defined as a sub-set of the address range above (saving additional space for later use). I am going to use 10.100.0.0/24.
Once all filled out, click Create to complete the setup.
Step 2. Create the Gateway Subnet
We need an internal gateway in this network that Azure can use to route traffic back to your on-premises environment (as opposed to the default gateway which just provides Internet access for this network).
Select your virtual network from All resources once it is done building. On the left menu blade, pick Subnets. Then click the option to add a Gateway subnet in the blade to the right.
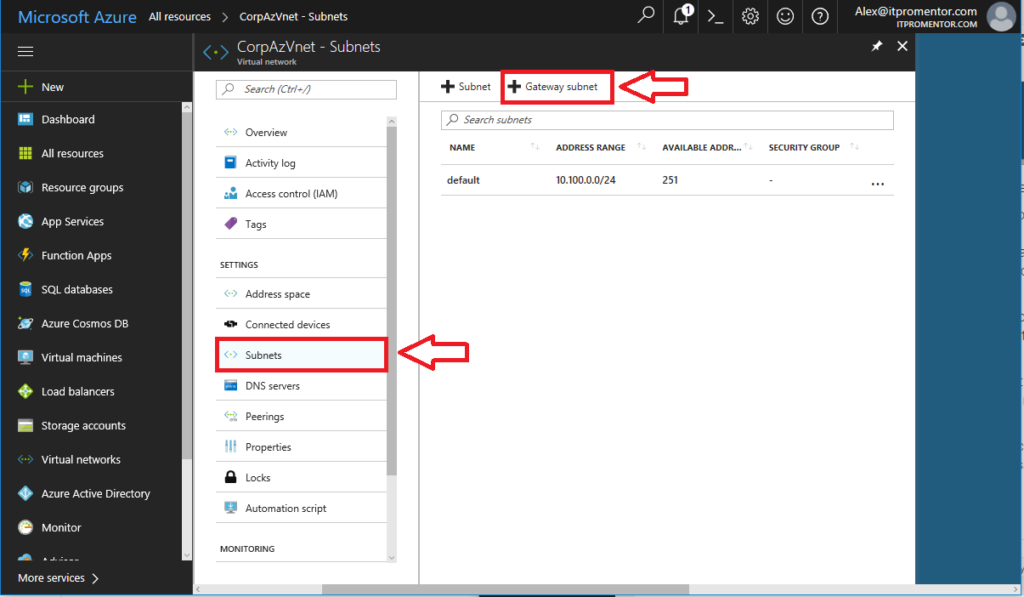
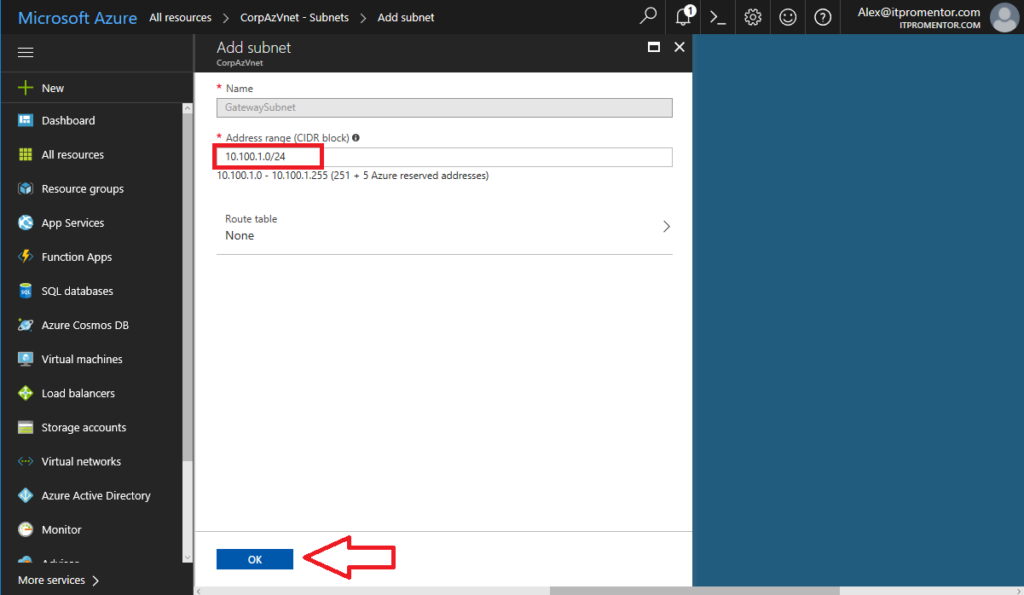
Azure will pick an address range within the space you previously defined. In my case it will use 10.100.1.0/24 as the GatewaySubnet (you cannot pick a different name than this–it is how Azure knows what this subnet is for). Click OK.
Step 3. Define DNS server(s) for this network
Most often, you are using this network as an extension of your own datacenter, and if you want the virtual machines that are deployed here to be able to lookup and locate local addresses, you have to tell them where your AD/DNS servers live.
Again from your virtual network, click on DNS servers.
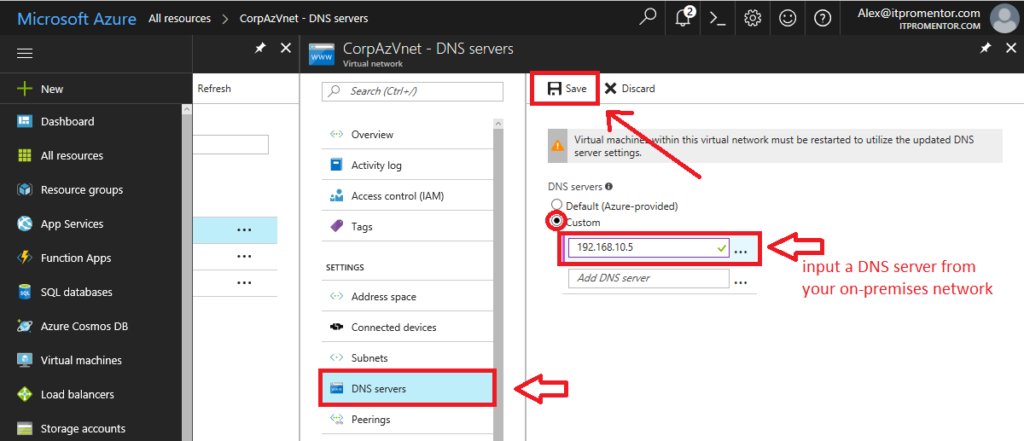
Pick Custom, and input the IP address of a AD/DNS server on your local network. Click Save.
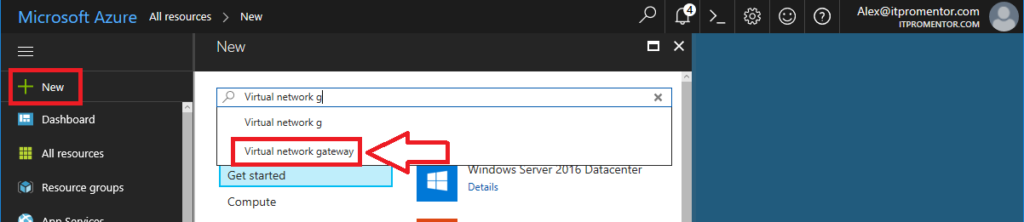
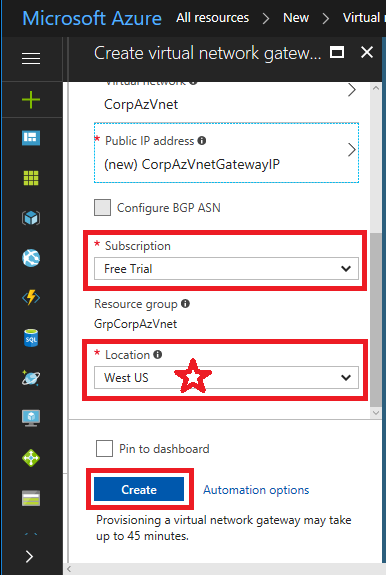
Step 4. Create the Virtual network gateway object
You also need a software VPN appliance, that will become the endpoint to which your firewall connects. This is called a Virtual network gateway in Azure.
Go to New, start typing Virtual network gateway, and select it to begin configuring.
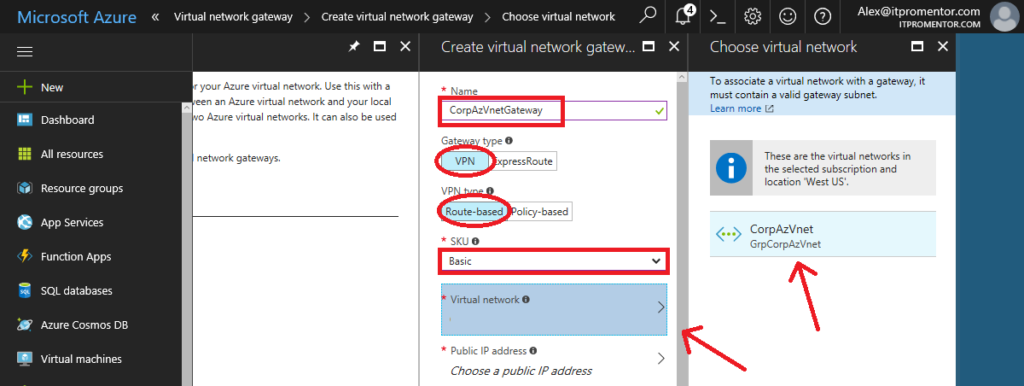
Click Create.
Now make the following selections:
- Name: Give it a name that closely matches your virtual network
- Gateway type: pick VPN (we aren’t using ExpressRoute)
- VPN type: pick Route-based VPN rather than Policy-based
- SKU: pick Basic (most SMB’s won’t require more than this)
- Virtual network: you will choose the Virtual Network you already created
- Public IP address: You will click on this, and Create new, then give it a name, I usually append IP to the name which matches the gateway object we’re creating. Click OK.
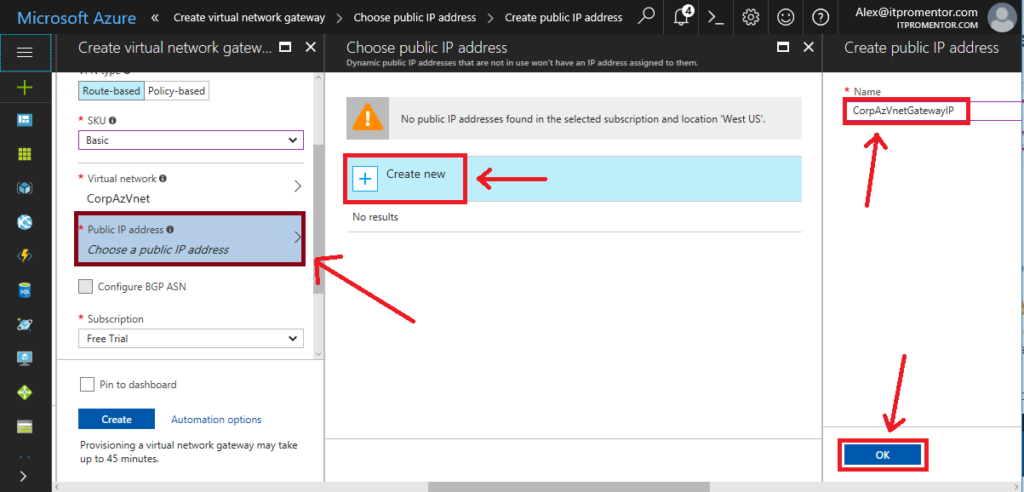
Choose your Subscription, and your Location (remember to match it up with your other resources), and click Create.
This will take some time to complete, so not a bad time for a break.
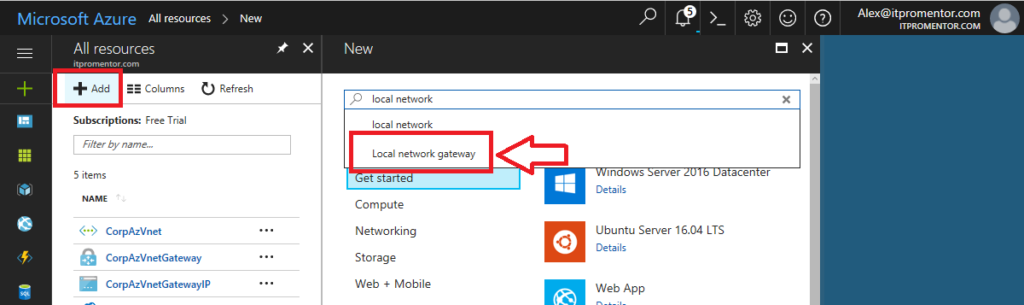
Step 5. Create the Local network gateway object
Now you need another object to represent your local on-premises network–so that Azure knows where you are in the world, and what is behind your firewall. This is basically defining your on-premises IP address space, as well as an endpoint/gateway (the public IP assigned to your firewall).
New > Type in Local network gateway. Click Create to begin configuring.
Make your selections, and fill in the appropriate information.
- Name: Give it a name that is distinct from the Azure Gateway.
- IP address: this is your firewall’s primary public IP address
- Address space: here you can add all of the internal subnets that exist behind your firewall, to which the Azure virtual network requires routes. You don’t have to include subnets that do not require communication to the Azure virtual network.
- Subscription: pick your subscription
- Resource group: Choose your resource group, I usually pair it up with the resource group for the Azure virtual network.
- Location: choose the same location as before
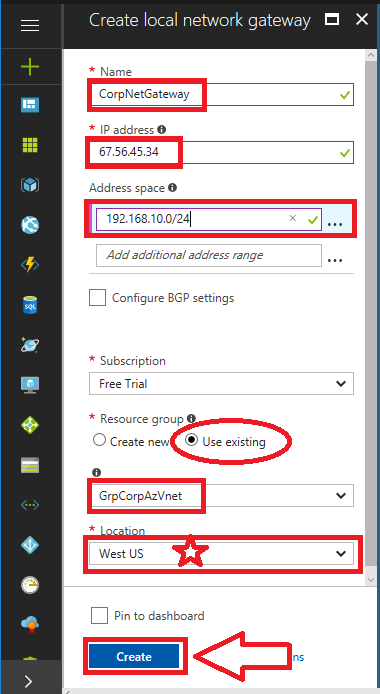
Click Create.
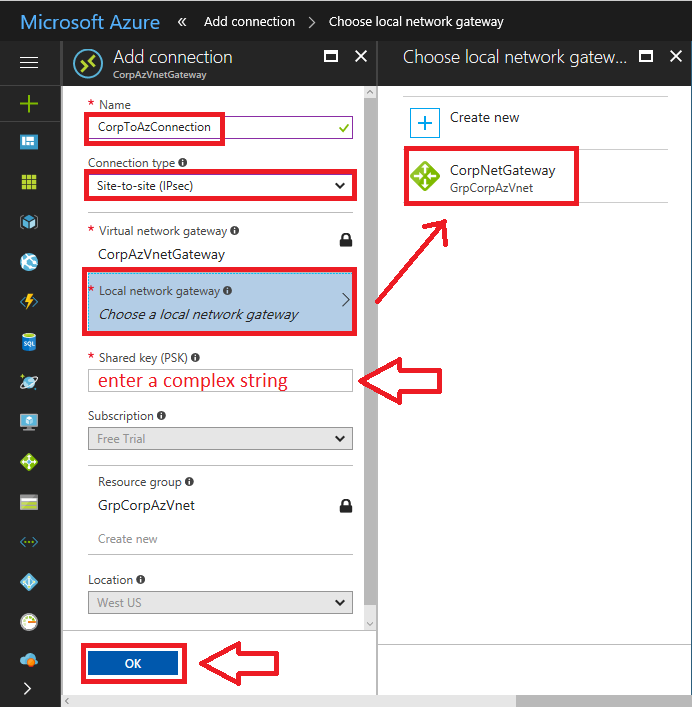
Step 6. Create the Connection object
We have so far defined a virtual network space in the cloud, and created internal & external gateways for it to use. We have also defined the local network and its gateway endpoint. Finally, we need to be able to bring these two worlds together. So Azure has something creatively called a Connection to represent this.
Return to All resources, and select your Virtual network gateway object, which we created in Step 4 above. Click on Connections > Add.
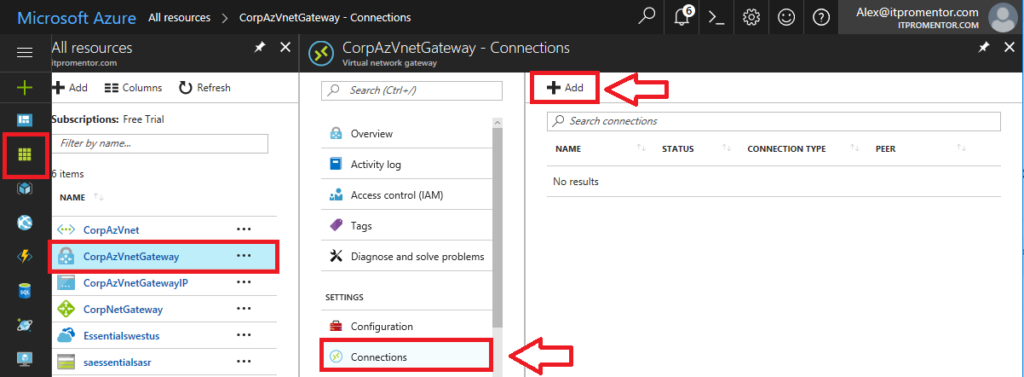
On this next blade, you have a few selections to make, which are mostly obvious, but I will go through them anyway.
- Name: Give the connection a descriptive name that identifies it as related to the Azure Virtual network we’re creating.
- Connection type: From the drop-down, be sure to select Site-to-Site (IPSec).
- Local network gateway: click on this, and pick the one we created in Step 5, above.
- Shared key (PSK): pick a nice long complex string, which you will also need to save somewhere secure, so we can enter it on your firewall, later.
The other selections are made for you. Click OK.
Summary
In this first part of the series, we have created all of the essential objects in Azure that are required to prepare your on-premises WatchGuard firewall to connect to the Azure Virtual Network:
- Azure Virtual Network (including the GatewaySubnet and DNS server): the “internal” network in which virtual machines will be deployed in the Azure cloud
- Virtual network gateway: The public IP address that will be defined in Azure, and used by your firewall as an endpoint for the VPN tunnel
- Local network gateway: The public IP address that belongs to your firewall, and the routed/interesting traffic that is behind your firewall, which Azure will communicate with to build the tunnel
- Connection: Definition in Azure, and the pre-shared key, describing how to connect the Virtual network gateway and the Local network gateway.
In the second part of the series, we will configure a WatchGuard firewall to complete this connection.
Comments (2)
Good one Alex. You read the system administrators mind :-)
Will try this one and ping you if facing any difficulty. Thanks in advance!
Thanks for this, helped us greatly!