Automate the deployment of a standalone Hyper-V host server using PowerShell
In this article, I wanted to document a standard, standalone Hyper-V server deployment for a small business using nothing but PowerShell. The best practices for Hyper-V state that the role should be enabled on a server without the GUI (e.g. Core or Nano–although I rarely see this done in a small business setting).
Best practices aside, I still enjoy using PowerShell for Hyper-V deployments, simply because it saves me a ton of time, and takes all the guesswork out–if I used my scripts, I know I didn’t forget anything! As a service provider, PowerShell is indispensable. I have also scripted a two-node failover cluster for Hyper-V, which I will share in a future post. For now, we will demonstrate how to automate the following actions on a single, standalone server:
- Configure the host server OS roles
- Configure host storage
- Configure host networking
Then, in my next post I will demonstrate how to automate deployment of multiple guest virtual machines as well as explore a new feature in Windows Server 2016 called PowerShell Direct–further enabling host-level management of your VM’s.
Pre-configuration checklist
Before you begin Hyper-V configuration, you will need to:
- Configure your RAID arrays, I recommend:
- RAID-1 mirror for OS
- RAID-5, 6 or 10 for Hyper-V data
- Alternatively use Storage Spaces, parity
- Install Windows Server from media & activate
- Update all firmware & drivers*
- Enable Remote Management / access
- Run Windows Updates
- Disable Virtual Machine Queue for 1 GB NICs
*See your hardware vendor’s documentation for more details.
Configure the Host Server OS
I built the following scripts with the assistance of PowerShell ISE. This first one will do the following:
- Set the time zone (set the variable $TimeZone)
- Rename the server (set the variable $HostName)
- Install Hyper-V role w/ tools
- Restart
#Set time zone & rename computer
$TimeZone= “Central Standard Time”
$HostName= “HVHOST”#Configure the host server
TZUtil /s $TimeZone
Rename-Computer -NewName $HostName -Confirm:$False
Install-WindowsFeature –Name Hyper-V -IncludeManagementTools -Confirm:$False Restart-Computer
Configure Host Server Storage
To configure a single data disk/LUN for storing VM’s on a newly installed host server, this script will do the following:
- Create a mount path at “C:\Production” (or whatever you decide to name it)
- Online & initialize the disk
- Create an NTFS partition with label “VHDStorage” at the above mount path
- Set the default VM & VHD storage locations for Hyper-V to this path
#Set the variables to define default VM storage paths
$Label=”VHDStorage”
$MountPath=”C:\Production”
New-Item -ItemType Directory -Path $MountPath#Prepare the new disk
Get-Disk | Where-Object IsOffline -EQ $True | Set-Disk -IsOffline $False
$NewDisk= Get-Disk | Where-Object PartitionStyle -Eq RAW
$NewDisk | Initialize-Disk -PartitionStyle GPT#Prepare the new partition
$Partition = $NewDisk | New-Partition -UseMaximumSize
$Partition | Format-Volume -FileSystem NTFS -NewFileSystemLabel $Label
$Partition | Add-PartitionAccessPath -AccessPath $MountPath#Configure the VM storage paths
set-vmhost -VirtualHardDiskPath $MountPath -VirtualMachinePath $MountPath
If you have plans to add more than one data partition on your Hyper-V host (e.g. individual partitions for each VM), you can modify the following function. (Note: you would still online/initialize the disks first.)
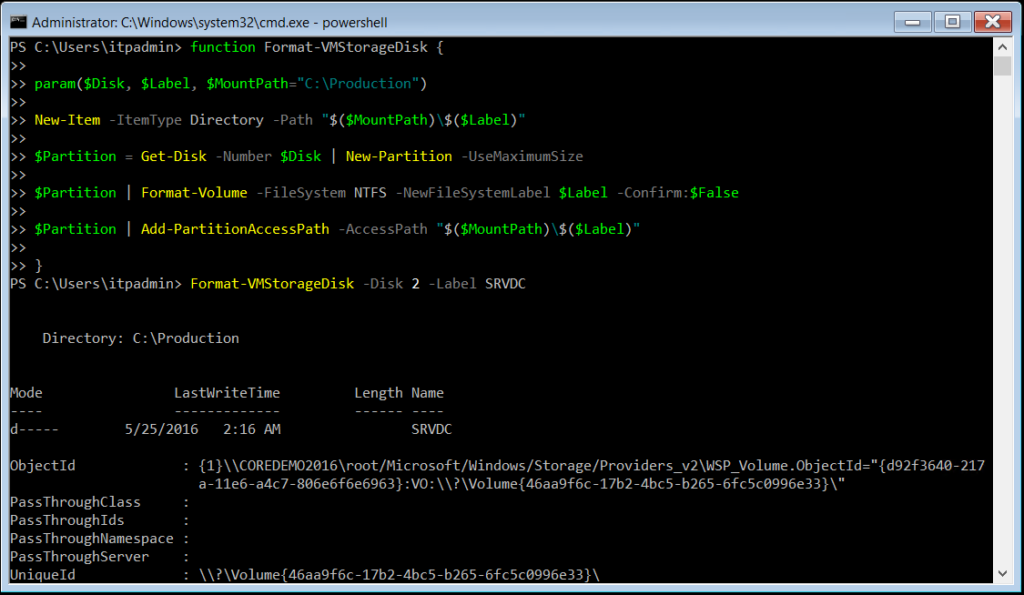
function Format-VMStorageDisk {
param($Disk, $Label, $MountPath=”C:\Production”)
New-Item -ItemType Directory -Path “$($MountPath)\$($Label)”
$Partition = Get-Disk -Number $Disk | New-Partition -UseMaximumSize
$Partition | Format-Volume -FileSystem NTFS -NewFileSystemLabel $Label -Confirm:$False
$Partition | Add-PartitionAccessPath -AccessPath “$($MountPath)\$($Label)”}
To use the above function, you would start by entering Get-Disk to see a list of available disks. Based on that output, you can run this function. For example, assume you had to deploy three virtual servers to separate partitions–a small Domain Controller, a File Server, and an SQL Server.
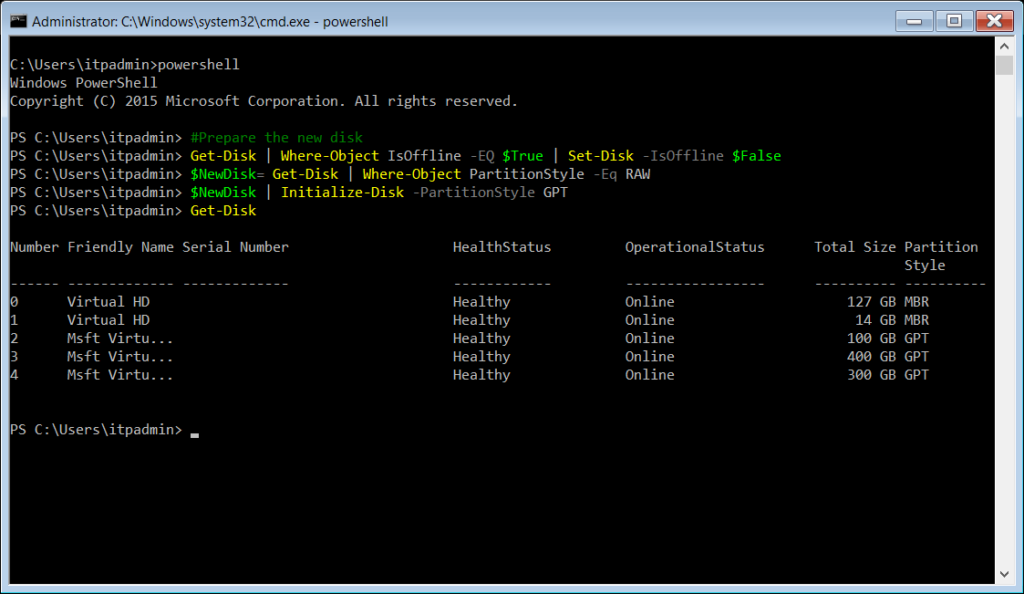
Your Get-Disk output shows three available disks (2, 3, 4), each of them with different sizes–100 GB for the DC, 400 GB for the file server, and 300 GB for the SQL server, respectively. You could run the function as follows:
Format-VMStorageDisk -Disk 2 -Label SRVDC
Format-VMStorageDisk -Disk 3 -Label SRVFILE
Format-VMStorageDisk -Disk 4 -Label SRVSQL
What this function does is format each partition with its maximum size, then mount that partition at a corresponding file path; e.g. C:\Production\SRVDC, C:\Production\SRVFILE, C:\Production\SRVSQL. In this case, you would proceed to deploy each VM into its own storage path–on individually isolated LUNs/partitions mounted at C:\Production.
Configure Host Server Networking
To configure host networking, the following PowerShell snippets will:
- Enable NIC teaming on all Ethernet adapters (named HVTeam)
- Attach a virtual switch called HVSwitch
- Configure the management NIC (fill in variables)
- Join the domain (requires variables & credentials)
- Restart the server
Note: you can optionally specify a VLAN for the management NIC by removing the hash tags from the VLAN lines:
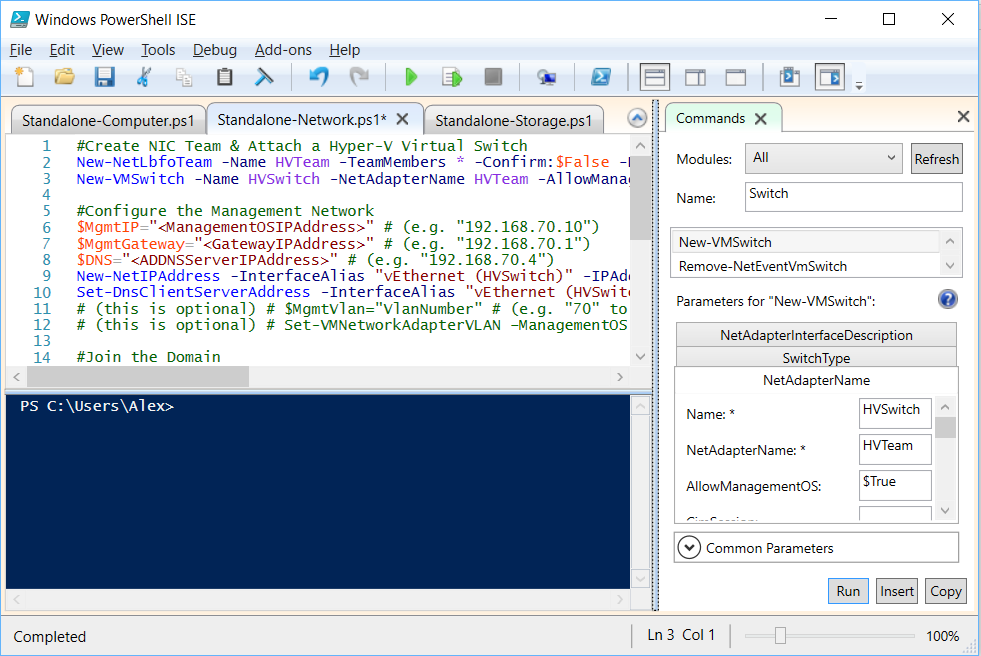
#Create NIC Team with all available Ethernet adapters
New-NetLbfoTeam -Name HVTeam -TeamMembers * -Confirm:$False -LoadBalancingAlgorithm HyperVPort -TeamingMode SwitchIndependent#Attach a Hyper-V Virtual Switch to the NIC Team
New-VMSwitch -Name HVSwitch -NetAdapterName HVTeam -AllowManagementOS $True -Confirm:$False#Set the variables to define the Management Network
$MgmtIP=”192.168.70.10″ # (e.g. “192.168.70.10”)
$MgmtGateway=”192.168.70.1″ # (e.g. “192.168.70.1”)
$DNS=”192.168.70.4″ # (e.g. “192.168.70.4”)
# (this is optional) # $MgmtVlan=”70″ # (e.g. to set host on vlan 70)
#Configure the Management Network
New-NetIPAddress -InterfaceAlias “vEthernet (HVSwitch)” -IPAddress $MgmtIP -PrefixLength 24 -DefaultGateway $MgmtGateway
Set-DnsClientServerAddress -InterfaceAlias “vEthernet (HVSwitch)” -ServerAddresses $DNS
# (this is optional) # Set-VMNetworkAdapterVLAN –ManagementOS –VMNetworkAdapterName “vEthernet (HVSwitch)” -Access -VlanId $MgmtVlan#Set variables to join the domain
$Domain=”Company.local”
$User=”hvadmin”
$OUPath=”OU=Servers,DC=Company,DC=local”#Join the domain & restart the host server
Add-Computer -Credential $Domain\$User -DomainName $Domain -OUPath $OUPath
Restart-Computer
Next steps
In the next post, we will discuss how to script deployment of guest virtual machines, further saving setup time when migrating from legacy servers. In Windows Server 2016, it will even be possible to execute PowerShell commands against the guest VM’s from the host itself using a feature called PowerShell Direct–which is totally awesome–an excellent management enhancement that I look forward to using with my customers. Stay tuned for part 2 of this post!

Comments (2)
Alex,
Are there any advantages to installing the Hyper-V server by itself (not as a role on a Core installation) aside from it not requiring a license? Or for that matter are there disadvantages to deploying it that way? I’m coming from a mostly VMware shop, so I felt like the leanest installation of Hyper-V would be preferred, but I’d like to know how it differs.
Thank You
In my opinion, most SMB admins benefit greatly from just deploying the full GUI rather than core. I can’t tell you the number of times I’ve been brought in to fix an issue simply because when it came down to it, an admin just didn’t know how to troubleshoot a downed VM or Hyper-V host using PoSH alone. With a GUI, most issues are more easily identified & resolved by admins of all skill levels. Yes, I know–securitywise core = less attack surface… but there are other mitigation techniques that help bring that risk down without removing the GUI. As regards license: are you deploying Hyper-V and Linux VM’s only? In that case you can save $ on licensing using Hyper-V free, but if you are going to have even 1 Windows Server virtual machine, then you’re going to require a Standard (or Essentials) license anyway.