Hyper-V Failover Cluster: Basic Setup
I have previously shared a slightly more complex method for configuring a simple 2-node failover cluster, involving a converged Hyper-V virtual switch, with QoS policies and so forth to manage traffic on the Management, CSV and Live Migration networks.
However, there is another config I wanted to share, which in some cases is preferable in an SMB environment. Reason being: not every SMB administrator / generalist is going to have (or want to learn) about PowerShell, applying VLAN and QoS settings to their servers’ virtual NIC’s, and so forth. Especially where it may not be necessary to do so, like if they only have a few 1 Gb connections anyway.
Therefore the question is: what is the “easiest” config that will take us from zero to clustered? We can accomplish this pretty easily within the GUI, and by using simple cross-over cabling for the cluster networking:
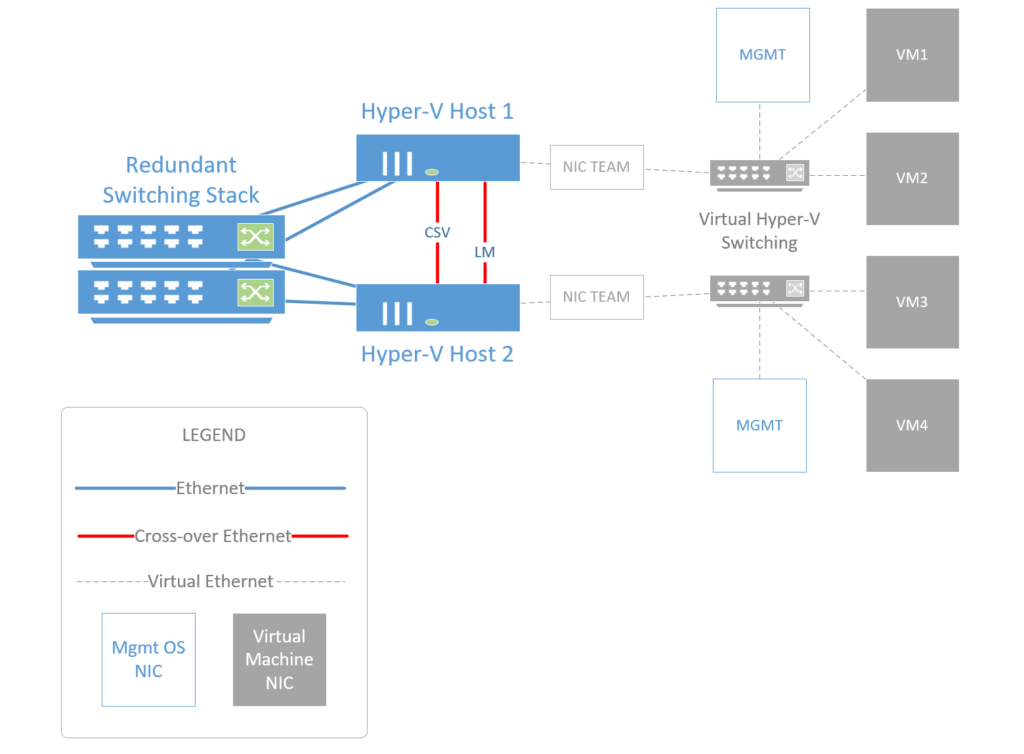
In the diagram above, we can see two physical Hyper-V hosts connected to each other, and to two independent physical switches (switches do not necessarily need to be stacked unless that is a requirement in your environment). As well, we have a dual controller shared storage device (SAS-connected). You can use any shared storage for your cluster–I tend to recommend SAS to my clients for its affordability and ease of setup. Again, we will not configure storage in the following steps.
- Step 1: Install Hyper-V Role without a Virtual Switch
- Step 2: Setup Physical Network Connections
- Step 3: Create the NIC Team
- Step 4: Create Hyper-V Switch
- Step 5: Join the Domain
- Step 6: Create the Cluster
- Step 7: Optional Tuning
- Summary of PowerShell cmdlets (script it!)
Step 1: Install Hyper-V Role without a Virtual Switch
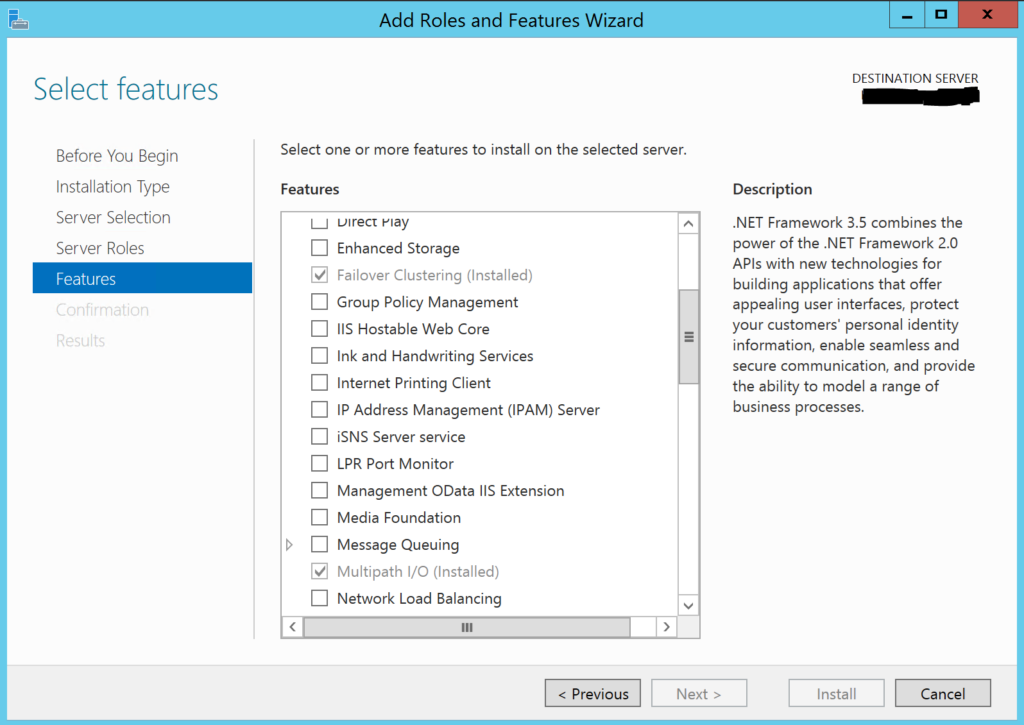
Hopefully you have already done the basic setup/install of Windows Server 2012 R2 or later. To add the necessary roles & features, go to Server Manager > Add Roles.
In addition to selecting the Hyper-V role, you’ll also want to install Failover Clustering and Multipath IO, which can be found on the Features page in the Wizard.
 Step 2: Setup Physical Network Connections
We want to have at minimum two, but preferably three or even four physical NIC’s available in each host server–this should not be a problem for most modern servers. Here is how you will connect them:
- String at least one cross-over cable between the hosts; this will be the CSV/heartbeat network for the cluster
- Optionally, a second crossover can be dedicated for Live migrations
- Connect two (or more) cables to each host; one going to each switch from each server
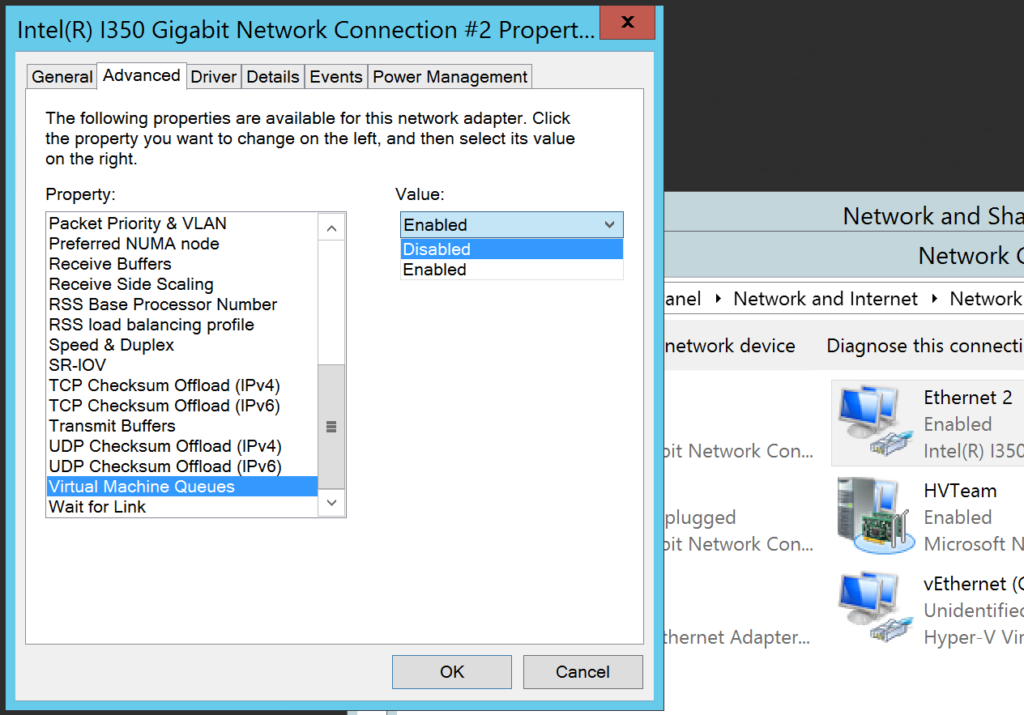
Open Control Panel > Network & Internet > Network Connections. To begin, on the Properties of each of the NICs, we need to make some adjustments by clicking on Configure.
First, we cannot have you using Virtual Machine Queues (or VMQ) on 1 Gb NIC’s–there is just no need for it, and on certain NIC’s, it is known to cause issues. So find this setting on the Advanced tab and disable it. Do this for all NICs.
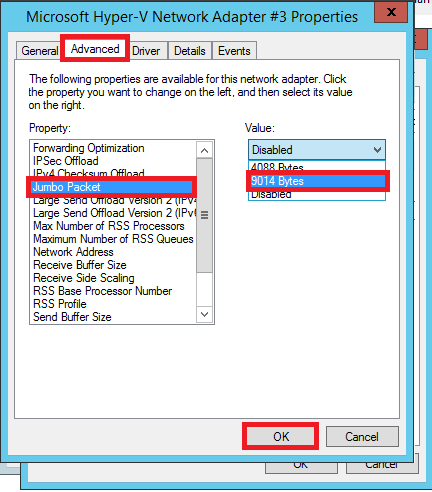
Next, on the NICs used for your crossover connections, enable Jumbo Packets (or Jumbo Frames–this description will vary by vendor). It will look something like the below. Sometimes the options are just “Enabled” or “Disabled” (choose Enabled), but it might also ask you to select a value such as 9000 or 9014 like we see here:
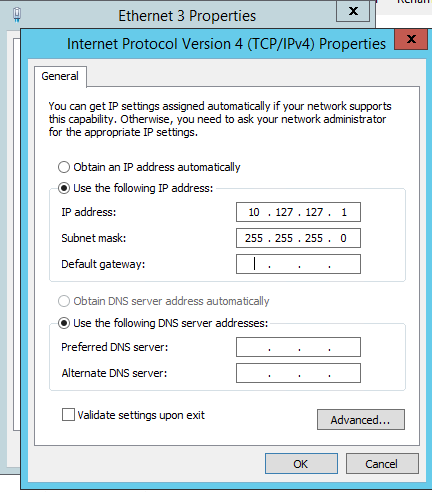
Next, for each host, assign the TCP/IP settings on the CSV network adapter. I usually choose a very unique IP scheme that will not be in use elsewhere in your network (e.g. here I chose 10.127.127.1 & 10.127.127.2 for HOST1 & HOST2 respectively). Optionally, you can also rename the adapter to something more user-friendly (e.g. “CSV” or “Heartbeat” instead of “Ethernet 3”
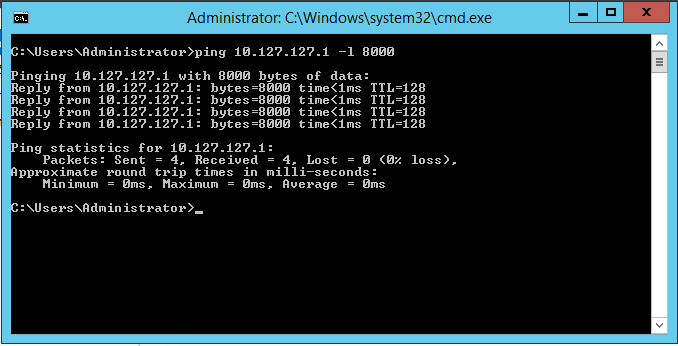
Test the result–you should be able to ping the opposite host with a large packet. Open a command prompt and use ping <ipaddress> -f -l 8000:
You may optionally repeat this step for another cross-over connected pair of NIC’s, assigning them IP’s in a different subnet such as 10.127.128.x.
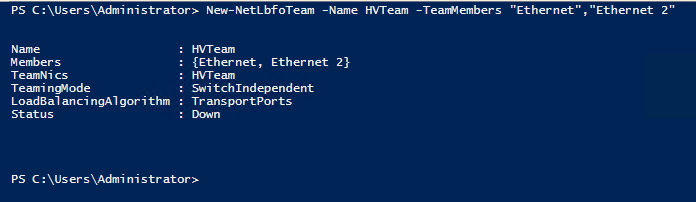
Step 3: Create the NIC Team for VM traffic
Go to Server Manager > Local Server and click where it says Disabled next to NIC Teaming. Find Tasks > New Team.
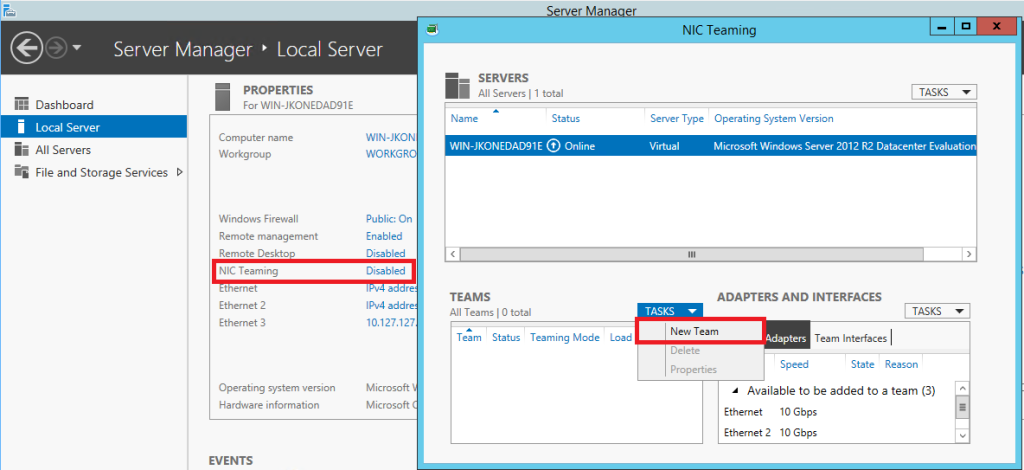
Just name the team something, select the adapters (not including the one used for CSV/heartbeat), click OK.
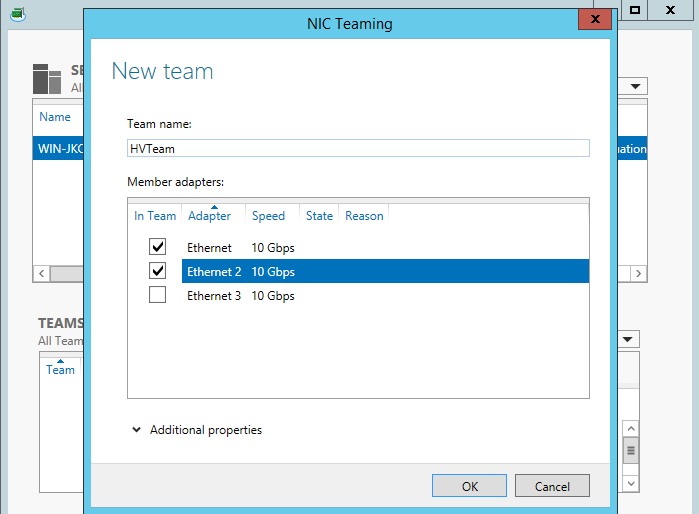
Now you have a switch-independent team, meaning there is no need to configure anything special on your switching–the Windows Server OS will do all the work for you.
In PowerShell, you could accomplish this same exact configuration by entering the following command:
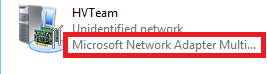
The next step is attaching a Hyper-V switch to this team. Before we proceed, take a peek in your Network Connections settings again. You will see a new object for the NIC Team. Notice its Device Name is Microsoft Network Adapter Multiplexor Driver. This is the name of the device we will attach our Hyper-V virtual switch to in the next step.
Step 4: Create Hyper-V Switch
Open Hyper-V Manager. From the right-hand side Action pane, find Virtual Switch Manager. Make sure you select External as the virtual switch type and click Create Virtual Switch. Name the switch and be sure to Allow management operating system to share this network adapter.
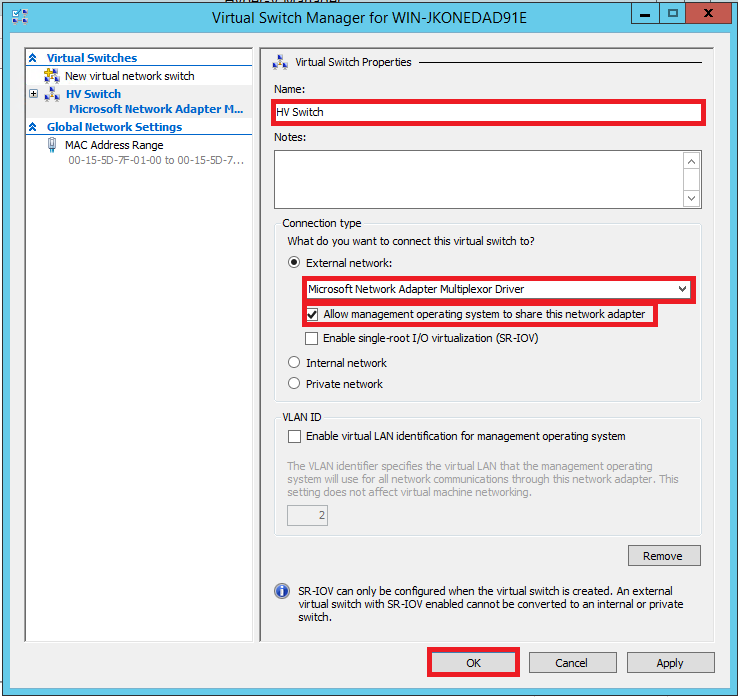
You can accomplish this same task in PowerShell with the following command:
New-VMSwitch -Name HVSwitch -NetAdapterName HVTeam
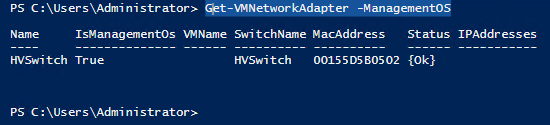
See? PowerShell isn’t so hard after all. Let’s go check out the results by returning to our Network Connections in the Control Panel.
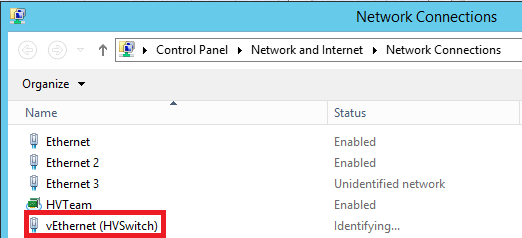
The new “vEthernet (HVSwitch)” adapter is a virtual Ethernet adapter assigned to the Management OS (that is, your Hyper-V host server). It is attached to the Hyper-V Switch, the same as any virtual machine will get their virtual Ethernet connection. You can also see this object in PowerShell:
Be sure to assign this virtual NIC a static IP on your data network if you haven’t yet already! Define the default gateway & DNS servers on the network also.
Step 5: Join the Domain
Now that we have our networking configured, with an IP on the network, we will be able to join the domain, which is a pre-requisite for creating a failover cluster. You can join the domain from Server Manager > Local server > click on the Computer Name.
Or in PowerShell:
#Join the Domain
$Domain="DomainName" # (e.g. "Company.local")
$User="UserName" # (e.g. "hvadmin")
Add-Computer -Credential $Domain\$User -DomainName $Domain
Restart-Computer
Step 6: Create the Cluster
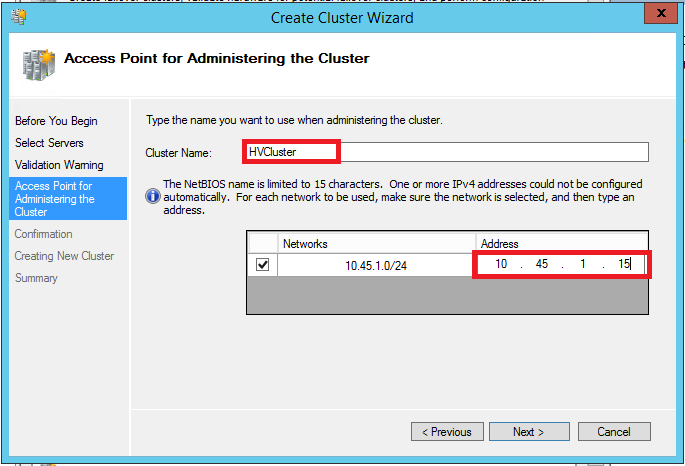
Our last step! Open the Failover Cluster Manager. From the Action pane on the right, click Create Cluster. Step through the wizard–you just have to add both host’s names, and skip validation for now (you will want to run it eventually in order to be eligible for MS support). Finally add a Cluster Name & IP address (pick an address that is not in use on your data network, and make sure it is excluded from the DHCP range).
In PowerShell, this is even easier:
New-Cluster -Name HVCluster -Node HostName1,HostName2 -StaticAddress "StaticIPAddress" -NoStorage
Here we have used the -NoStorage switch since we plan to add shared storage later. Otherwise, if your shared storage is connected properly and provisioned with multi-path IO enabled, in this case you would remove the “-NoStorage” switch, and your cluster should be ready to go.*
Step 7: Optional Tuning
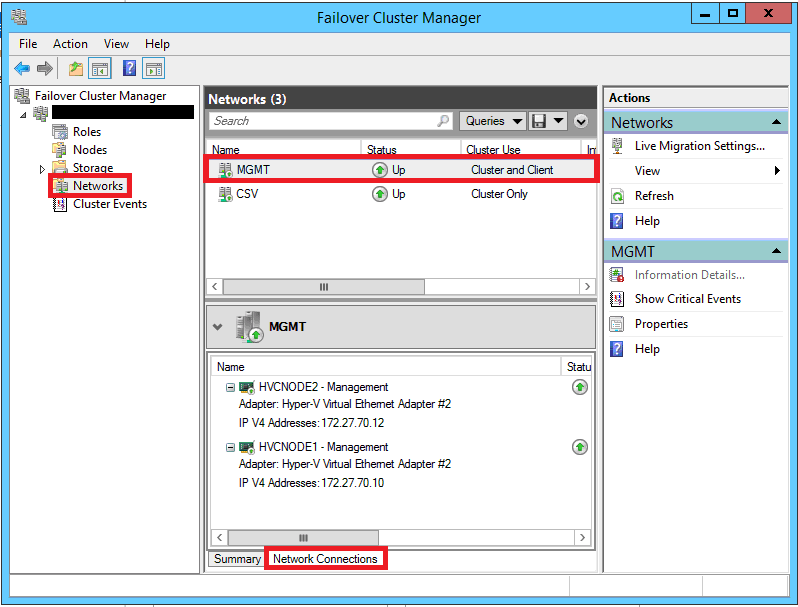
If you want to dial it in a little more, open the Failover Cluster Manager, and check out the Networks. You can edit the properties of each network to give it a “friendly” name as I have done here–you can see which IP scheme is which under Network Connections so that you name them properly.
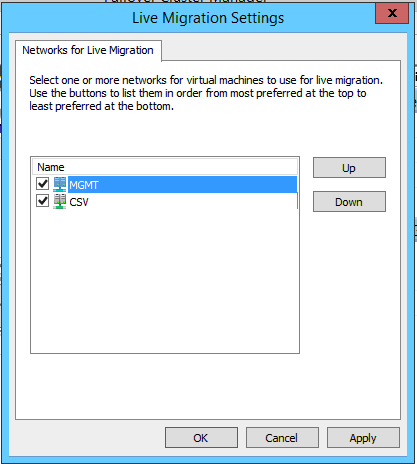
One more item to check is Live Migration settings. Right-click on Networks on the left, then Live Migration Settings… This shows you which order of preference will be used for Live Migration traffic (or whether a network will be included at all). I usually like to leave the CSV network deprioritized in here.
This configuration is perfectly reasonable for many SMB organizations with a small number of virtual machines (less than say one dozen, and often even less than half a dozen). These days, it is not uncommon to see only these roles in an SMB (one per virtual machine):
- DC (or maybe two)
- FILE
- RDS
- SQL
Basic rule of thumb: if you’d only require Windows Server Standard licensing (2x VM’s/Host/license), go with the basic solution. If you’d need Datacenter (unlimited VM’s/Host), go with the advanced (converged) solution.
Summary of PowerShell cmdlets
Consider scripting this to save time! In the following, you would edit the variables to suit your environment, then execute the script. That means anywhere you see $VariableName=”<Something>”, you would simply replace the <Something> that appears between quotes with what you’d like to name that something–I have examples/suggestions included behind the hashtags at the end of these lines.
#To begin setup of the server (modify and run for each server):
$ComputerName="NameYourHyperVHost" # (e.g. "HVC-Node1")
Rename-Computer -NewName $ComputerName -Confirm:$False
Install-WindowsFeature –Name Hyper-V -IncludeManagementTools -NoRestart -Confirm:$False
Install-WindowsFeature -Name Failover-Clustering –IncludeManagementTools -Confirm:$False
Enable-WindowsOptionalFeature –Online –FeatureName MultiPathIO
Restart-Computer
#For the CSV Network:
$CSVAlias="NetworkAdapterForCSV"  # (e.g. "Ethernet 3")
$CSVIP="CSVIPAddress" # (e.g. "10.127.127.1")
New-NetIPAddress -InterfaceAlias $CSVAlias -IPAddress $CSVIP -PrefixLength 24
#Setup the NIC Team & Virtual Switch:
$NIC1="Adapter1Name" # (e.g. "Ethernet")
$NIC2="Adapter2Name" # (e.g. "Ethernet 2")
$TeamName="NICTeamName" # (e.g. "HVTeam")
$SwitchName="VirtualSwitchName" # (e.g. "HVSwitch")
New-NetLbfoTeam -Name $TeamName -TeamMembers $NIC1,$NIC2 -Confirm:$false
New-VMSwitch -Name $SwitchName -NetAdapterName $TeamName
#Configure the Management Network:
$MgmtAlias="NetworkAdapterNameForMgmt" # (e.g. "vEthernet (HVSwitch)")
$MgmtIP="ManagementOSIPAddress" # (e.g. "192.168.1.10")
$Gateway="GatewayIPAddress" # (e.g. "192.168.1.1")
$DNS="ADDNSServerIPAddress" # (e.g. "192.168.1.4")
New-NetIPAddress -InterfaceAlias $MgmtAlias -IPAddress $MgmtIP -PrefixLength 24 -DefaultGateway $Gateway
Set-DnsClientServerAddress -InterfaceAlias $MgmtAlias -ServerAddresses $DNS
#Join the Domain:
$Domain="DomainName" # (e.g. "Company.local")
$User="UserName" # (e.g. "hvadmin")
Add-Computer -Credential $Domain\$User -DomainName $Domain
Restart-Computer
#Setup the cluster:
$ClusterName="<ClusterName>" # (e.g. "HVCluster")
$ClusterIP="<ClusterIPAddress>" # (e.g. "192.168.1.20")
$Node1="<HostName1>" # (e.g. "HVC-Node1")
$Node2="<HostName2>" # (e.g. "HVC-Node2")
New-Cluster -Name $ClusterName -Node $Node1,$Node2 -StaticAddress $ClusterIP -NoStorage
Comments (18)
Many thanks for preparing this – it’s very helpful. However I don’t understand where the cluster storage fits into this topology – the CSV cluster cable linking the two nodes suggests you are using local storage, but I thought it needs to be a shared storage resource.
Actually, the CSV cable does not suggest local disks. Cluster Shared Volume traffic is sometimes redirected over this link, but each host has a connection to some type of external storage which it uses normally–iSCSI, SAS, Fiber Channel, or whatever. The CSV link is only used to redirect I/O at certain events, such as during a failover event, or if a host loses its connection to storage–then it is able to communicate to the storage through this other path–using the other host over the CSV link. So yes you are correct–shared storage is a requirement of failover clusters. The CSV network is recommended as well, even though cluster traffic can also co-exist on the management subnet, it is best practice to dedicate a link (or two) for this purpose.
Of course, that makes sense. Many thanks for the prompt response.
You mentioned the PING command for testing jumbo packets:
“ping -l 8000”
Note that, without the -f switch, PING would fragment the packets to fit the default 1500 byte MTU. So, you need to add the -f (don’t fragment) switch to get a valid result.
Hello Alex,
I have get confused between Management Network and VMs Network. How do I separate these two networks?
Management network is just the network that you use to talk to the hyper-v host. Like the IP that would be associated to the host name HVHOST1 or HVHOST2–so when you hit that with RDP, etc. it is resolving to some IP address. You can have the management IP on the same network as the VM’s–that would not be an issue for most SMB’s. However, it would be possible to create a management VLAN that is separate, with a different IP scheme, then apply that VLAN tag to the management OS, and assign an IP in that VLAN to the host operating system. But only if that is a requirement for your environment.
This is great, I have so many clients that want some kind of an entry HA solution that is affordable and easy to manage.
Can this solution be implemented with local storage and use storage spaces?
i can think of like 20 clients that all have 2-4 vms serving 5-25 users, (dc/file/print/app/sql) and they already have a single host. They can’t seem to swallow the 2nd host and shared storage (sas or otherwise)
Could you share some thoughts on what you’d suggest?
These days, single instance Azure VM’s selecting premium storage (which gets you 99.95% up time SLA)
Hi and thanks for sharing this,
We are planning to create Hyper-v cluster on brand new dell servers, the physical server comes with 4 port network adapters, 2 ports comes with a gigabit network and the other 2 ports comes with 10 G but Unfortunately the 10 g adapter is not function due unsupportable from network team so my question is can i achieve the cluster with only two network adpater 1g
thanks so much and i’m waiting your reply
too bad those 10 Gb cards aren’t supported for teaming. maybe you could go the old school route and just use 1x port per function? Put a 10 Gb port on the hyper-v switch for VM’s, and use the 1 GB ports for hyper-v management and CSV/LM?
Hi Alex,
Thanks for your reply
What about if I used nic teaming on the two gigabit cards then using the converged network by creating 4 virtual switch for each network traffic (live migration – heartbeat – iscsi – management)
Is this doable and supported? Or not.
And what about the old school that you mentioned. The 10g cards is not working. I have only two network adapter 1g
Oh, I thought the 10 Gb NICs were working just not in a team. That’s a bummer. In that case, yes you can just team two 1 Gb NIC’s together for now, and that is a very common and supported config. Hopefully there will be an updated driver for those 10 Gb cards at some point.
I have a quick infrastructure question. We have 2 nodes, 8 gig nics in each and 2 10 gig nics in each. The 10G nics in each are used only for iSCSI traffic that we have going to our separate iSCSI switches. So take those out of the picture. Currently, in our cluster, I have 2 gig nics on each teamed, for our management network, and the other 6 on each are teamed using a logical switch in SCVMM. So, as failover cluster manager sees it, we only have 2 networks, hyperv-managment and iscsi network. I don’t have a CSV, Live Migration, or HB. We have a relatively small footprint. Is there any issue with all the cluster traffic and management going over that management team? If so, what is the best way to resolve this without causing downtime on our network?
You will probably be okay as-is. If they are properly teamed, you can usually eject one Nic at a time from each team if you need to re-provision those NIC’s for other purposes, without causing any interruptions. But, I’d leave it if everything is working okay, and it’s a small footprint like you said. I see all the time basically just a single management network for everything in the SMB. Not best practice, but it works.
Hello Alex! Thanks for Your Article! That was really helpful for me. Can you please provide me with advice. We have 2 identical servers with 6 tb RAID on each. Is it possible to somehow create a cluster with this two servers and configure failover for storage also. From My picture I configure cluster, as you describe in the article and somehow configure “Virtual storage drive” for the cluster and use this space for VMs. Under the hood this storage just mirroring on each server, some kind of Virtual RAID 1.
There is a feature that would do what you are describing, called Storage Spaces Direct, but there is a lot to it; read up before deploying.
Hello,
I read your articles with interest and a lot of things are organized with us in the way you describe.
We have a problem with the slow communication between the ISCSI server and the virtual machines in the cluster. In the interest of truth, the communication is not weak, just when disk operations are performed, the situation is tragic and I do not know where this comes from, given that I have 10G network NIC between them, but looking at ISCSI traffic communicate through 1G NIC, which I have on both ISCSI and node servers.
If you have an article on setting up a cluster with ISCSI I would be happy to read it to see where I’m wrong.
I think you will find some good resources with Aidan Finn–he used to be a Hyper-V MVP (he is mostly working with Azure now, but his Hyper-V material was excellent). I would suggest iSCSI should be on separate NICs (not shared with the client/data access network).