Tutorial: Enabling the “new” Office 365 Email Encryption
Previously we have covered Office 365 Message Encryption, as well as what used to be called Azure Rights Management (now Azure Information Protection). The name changes weren’t confusing enough for us, right? Well, awhile back they announced this big change to the email encryption experience. But it is a little bit misleading. That is, the “new” encryption technology isn’t really new at all.
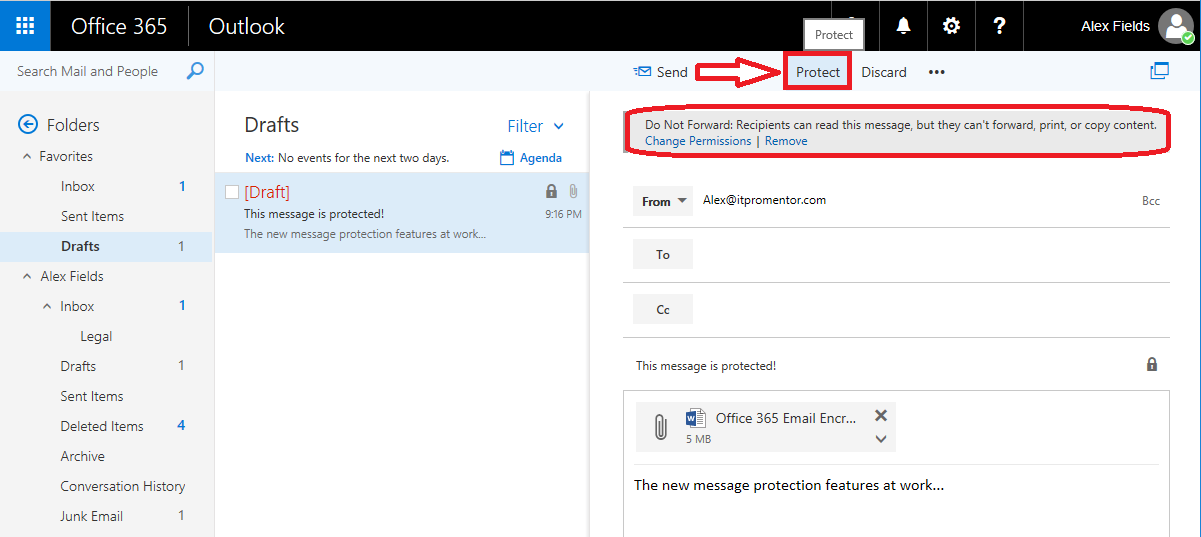
Take for example this shiny new button we get for “protecting” our messages in OWA. With the “protect” feature, you are really just getting a shortcut to apply the Do Not Forward permission to your messages. But we had that capability before. You can also setup transport rules for it, which again, was available previously.
What really changed?
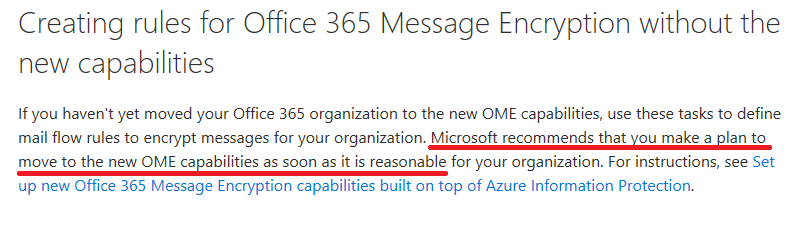
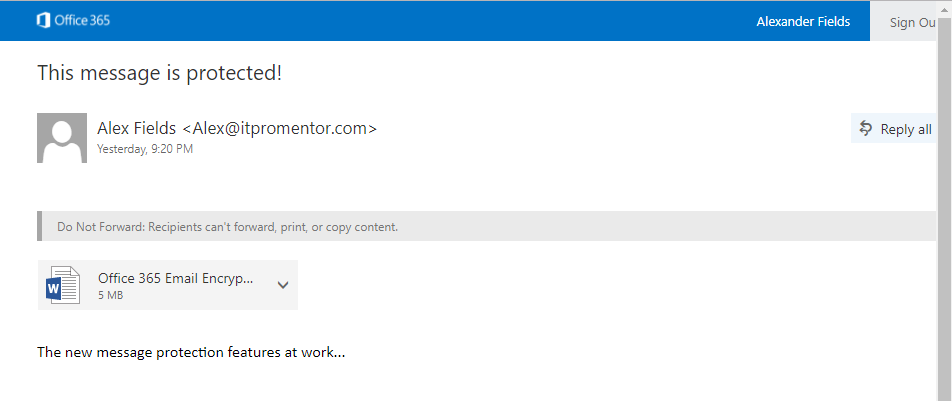
Using the original Office 365 message encryption feature, users would get an html attachment, and when they opened it, they would be asked to sign in (using a Microsoft account or a one-time passcode), which redirected the user to a website, where they could view the message online through a web browser. Now there is a new experience that makes things a little easier. Microsoft appears to be encouraging us to move away from the “old” experience of Office 365 message encryption, and toward the “message protection” features, from their website:
Here is how the experience looks for end-users, who are recipients of a protected message. If they have Outlook 2016, Outlook for iOS, Outlook for Android, or Outlook on the web, then they will be able to open these messages seamlessly in the Outlook client. If the recipient is signed into Outlook using their Microsoft account (and they have the latest updates), then they should be good to go.
On the other hand, if you don’t have the official Outlook client to open these messages, then users will have to click through to read their message on the web. Check out Gmail:
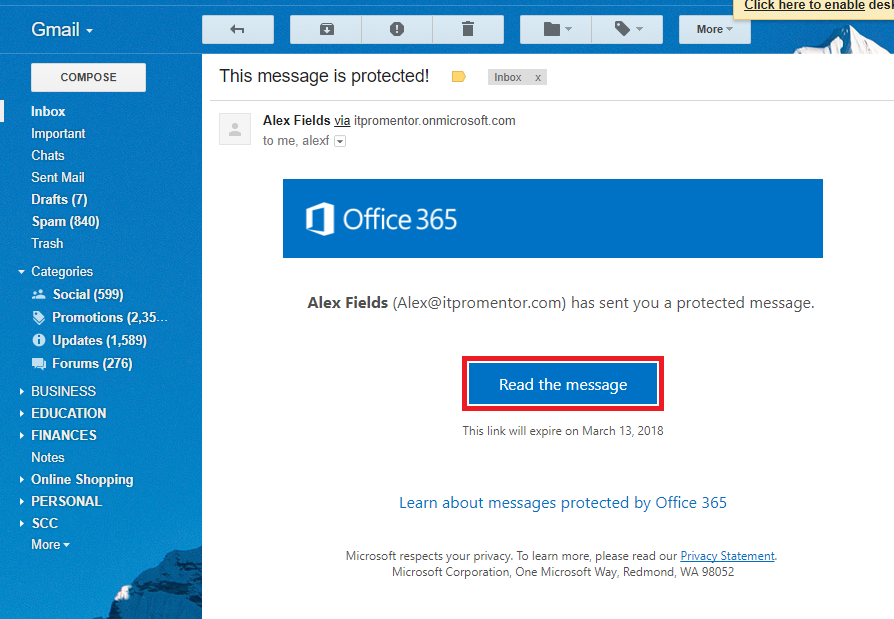
Notice, however, that the process is now a bit easier (no attachment) and I can even sign in using my Gmail account. One time passcode is still an option, also.
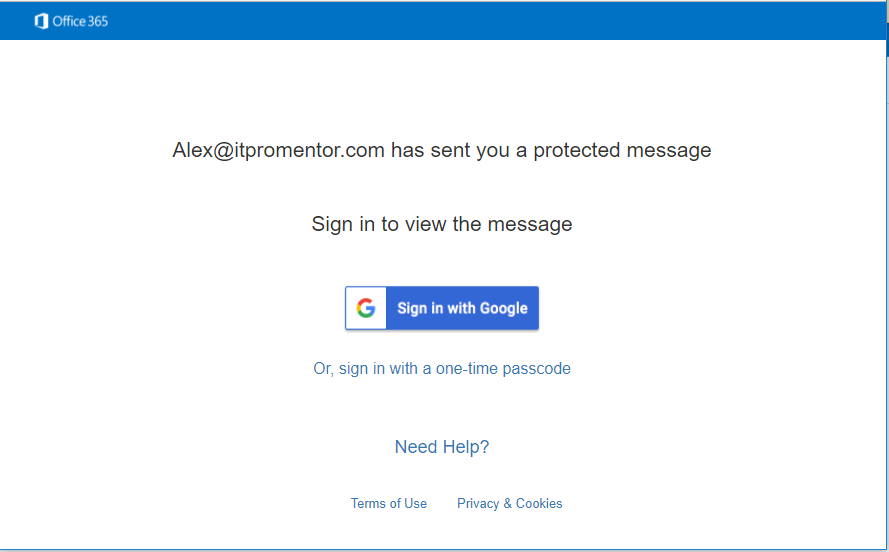
Just like that, I can retrieve my message via the browser:
Encrypt vs. Do Not Forward
Update: when this first came out, the Do Not Forward permission was the only option for encryption. But Microsoft has since released a new template called Encrypt which only encrypts the content, and does not apply the more “restrictive” Do Not Forward permissions. In both cases, if you are not the intended recipient, you will not be able to open and view the contents. You must be able to “sign in” as the intended user. Furthermore, when using Do Not Forward, the intended recipient will not be able to forward or copy the message contents out.
It is worth mentioning that the other permissions templates that are included–Confidential and Highly Confidential–still apply encryption and special permissions, but they only apply to internally sent messages (within the company). I think the vast majority of small businesses will be most interested in the Do Not Forward and most likely the Encrypt permission for that reason (with these it is possible to send external messages).
How to setup the new features
UPDATE: These features should be turned on and activated by default for new tenants with the correct licensing. See here. In a tenant who has not previously configured the Azure RMS or OME features, or if they have been deactivated, then you will need to confirm the following:
-
An Office 365 subscription that includes Azure Rights Management as well as Exchange Online or Exchange Online Protection (EOP).
- An Azure Information Protection subscription and an Office 365 subscription that includes Exchange Online or Exchange Online Protection (EOP).
Then it is all done through PowerShell. Note that the following is accepting all defaults, and we’re not doing any fancy Bring Your Own Key (BYOK) or custom templates or anything like that. See this page for the source of this script:
#Connect to the Azure Rights Management service.
$cred = Get-Credential
Get-Command -Module aadrm
Connect-AadrmService -Credential $cred
#Activate the service.
Enable-Aadrm
#Get the configuration information needed for message encryption.
$rmsConfig = Get-AadrmConfiguration
$licenseUri = $rmsConfig.LicensingIntranetDistributionPointUrl
#Disconnect from the service.
Disconnect-AadrmService
#Create a remote PowerShell session and connect to Exchange Online.
$session = New-PSSession -ConfigurationName Microsoft.Exchange -ConnectionUri https://outlook.office365.com/powershell-liveid/ -Credential $cred -Authentication Basic -AllowRedirection
Import-PSSession $session
#Collect IRM configuration for Office 365.
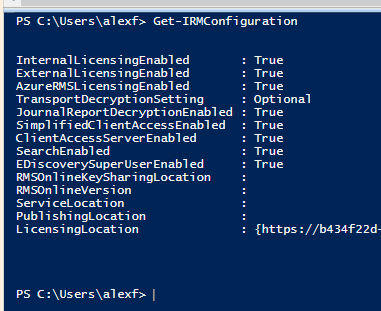
$irmConfig = Get-IRMConfiguration
$list = $irmConfig.LicensingLocation
if (!$list) { $list = @() }
if (!$list.Contains($licenseUri)) { $list += $licenseUri }
#Enable message encryption for Office 365.
Set-IRMConfiguration -LicensingLocation $list
Set-IRMConfiguration -AzureRMSLicensingEnabled $true -InternalLicensingEnabled $true
#Enable the Protect button in Outlook on the web (Optional).
Set-IRMConfiguration -SimplifiedClientAccessEnabled $true
#Enable server decryption for Outlook on the web, Outlook for iOS, and Outlook for Android.
Set-IRMConfiguration -ClientAccessServerEnabled $true
It can take awhile before all of this goes through, and if you just applied your licensing, you may be unable to proceed until the back-end service has caught up with you. But when you’re done, you can test it:
Test-IRMConfiguration -Sender [email protected]

Notice that if you get the IRM configuration, we no longer see the RMS publishing locations, etc.–those values are no longer needed with the new method.
Update: Decrypt Attachments
With regard to the new “Encrypt” template (which only encrypts and does not protect, or restrict, information), it is also possible to enable decryption of attachments, using this same cmdlet with a new toggle:
Set-IRMConfiguration -DecryptAttachmentFromPortal $true
For more details on how this changes attachments when using the “Encrypt” template, see this article.
If you are done with the configuration, you can exit your session:
Remove-PSSession $session
If you followed this procedure for a tenant where you had previously enabled the original Office 365 Message Encryption (probably with a transport rule), then following the above procedure, and simply replacing your transport rules will suffice to get you on the new hotness.
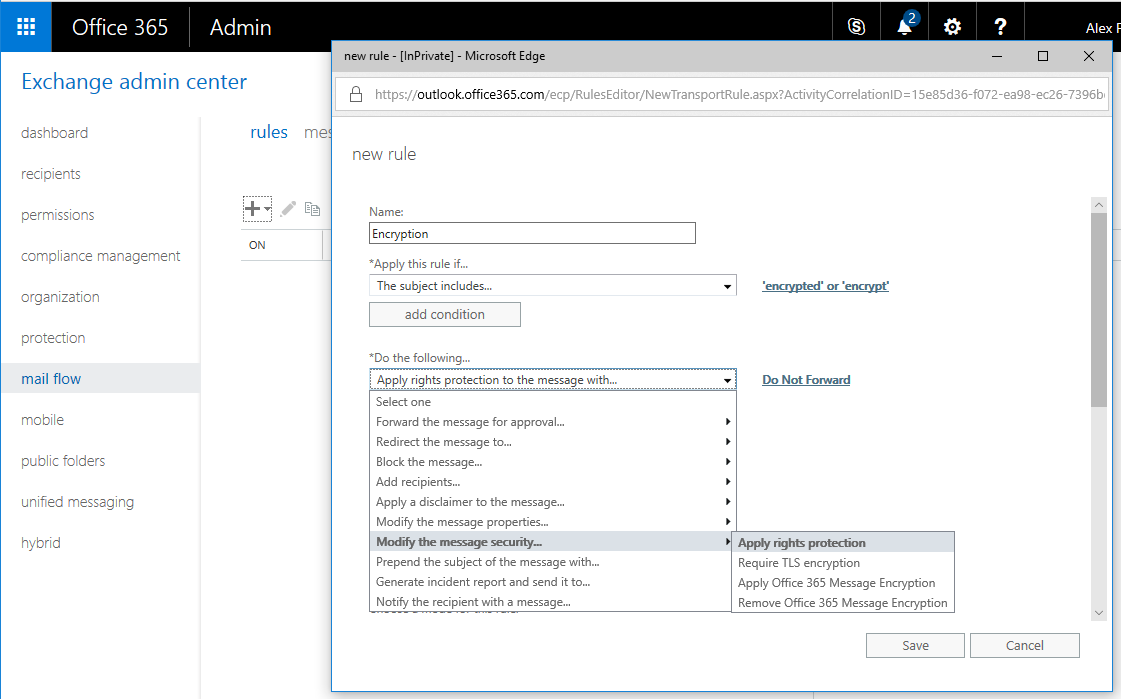
If setting up transport rules, you would not choose Apply Office 365 Message Encryption, as before, but instead, Apply rights protection.


Comments (21)
Thanks for this article. What don’t I understand is how do I find out if my organization has this?
How to setup the new features
In a new tenant, or a tenant who has not previously configured the old Azure RMS or OME features, you will need the following:
An Office 365 subscription that includes Azure Rights Management as well as Exchange Online or Exchange Online Protection (EOP).
An Azure Information Protection subscription and an Office 365 subscription that includes Exchange Online or Exchange Online Protection (EOP).
In order to use the features you need either Azure Information Protection as an add-on to some Exchange plan, or if you have the E3 plan for example, then it is already included.
Right, and how do I know what subscription do I have in both environments?
Check out your billing/subscriptions from the admin portal.
What if you don’t have that option that you are referring to that just says Apply Rights Protection? In the tenant I am working with we have the following options.
Apply Office 365 Message Encryption and rights protection
Require TLS encryption
Apply the previous version of OME
Remove the previous version of OME
Remove Office 365 Message Encryption and rights protection
In this instance I chose the first one Apply Office 365… and chose the Do Not Forward RMS template.
Yep, that sounds like you did it correctly.
We try Enabling the “new” Office 365 Email Encryption on our Tenant. But We have problems with external users, they can’t open the encrypted mail. Once they click on social auth or use the one time code, they have got “You are not allowed to see this message This message is protected and you are not allowed to view it.”
Any idea ? Thanks
Haven’t seen that message. I have seen the one where it basically tells you to wait 5 minutes and try again. So far that has been unresolved, and we just ended up rolling back to the old version.
Hi Alex,
Thanks for these instructions.
Do you need to install the Azure Information Protection Client on end-user machines to allow them to see the Protect button in Outlook Desktop?
It appears to work without on Mac machines but not Windows machines we’ve tested so far.
cheers,
Josh
The protect button is in OWA, but not in Outlook (yet). I hope they do add one to Outlook. On a new message, you can go to Options > Permission and find the templates for Do Not Forward, Confidential, etc., but it’s not as nice as a Protect button.
Thanks for the response! Yes, I was confused, I don’t see the protect button in Outlook Mac but the permission options. Strangely these are not showing up on Windows clients but I think that’s a bug and have opened a support request.
Are you sure Outlook 2016 desktop automatically decrypts encrypted emails from other internal users? It doesn’t do it for me and in one Microsoft website it says yiu need to be a Microsoft Insider in order to automatically decrypt with Outlook desktop.
It’s sort of odd actually. Has nothing to do with external/internal exchange of messages. Outlook 2016 has the ability to display the messages that are protected by IRM. So, the way it should look is that you will have a “Do not disturb” type of icon on a message that has IRM applied. This could come from internal or external, with IRM applied using Office 365 Message Encryption (version 2). Note that you do need to have the latest updates for the Office 365 apps for it to work.
Thanks for this – the Microsoft email encryption is welcome. However , does using OTP as a method of authenticating not undermine the whole idea of encrypting the email in the first place i.e. If the original email is compromised in transit then the OTP email could be similarly compromised ?
Thanks, I got old tenant which had had only Business Premium licenses and EMS E3 did not activate Exchange Online RMS features. After setting license uri and enabling licensing from exchange powershell it started to work.
Thank you Alex!!!!!!!!!! Microsoft Tech Support couldn’t figure out what the issue and I was going on week three when I REALLY started to dig deep and found this article. Followed the steps and viola!
Hi Alex,
Although your howto is a couple of years old, it’s still the best I can find. I do run into some problems though. My situation: Microsoft 365 Business standard & Azure Information Protection Premium P1 bought separately. I’ve tried this howto: https://davidatkin.com/blog/no-rms-templates-are-available-in-your-organization/ before yours (I think that is to configure ‘the old way’ which might be a problem as well (I don’t know how to revert to default before running your script).
Anyways when running your script all goes fine until it reaches:
Cmdlet Use-AadrmKeyVaultKey 2.13.1.0 aadrm
A connection to the Microsoft Azure AD Rights Management (AADRM) service was opened.
The Rights Management service has been successfully enabled although additional configuration of other services might be required. For more information, see http://go.microsoft.com/fwlink/?LinkId=251909.
Connection to the AADRM service closed.
WARNING: The names of some imported commands from the module ‘tmp_gf0jjvxr.xxp’ include unapproved verbs that might make them less discoverable. To find the commands
with unapproved verbs, run the Import-Module command again with the Verbose parameter. For a list of approved verbs, type Get-Verb.
Name : tmp_gf0jjvxr.xxp
Path : C:\Users\eugen\AppData\Local\Temp\tmp_gf0jjvxr.xxp\tmp_gf0jjvxr.xxp.psm1
Description : Implicit remoting for https://outlook.office365.com/powershell-liveid/
Guid : 3b5b61bd-a0b4-46a2-bc7f-3f8e93972024
Version : 1.0
ModuleBase : C:\Users\eugen\AppData\Local\Temp\tmp_gf0jjvxr.xxp
ModuleType : Script
PrivateData : {ImplicitRemoting}
AccessMode : ReadWrite
ExportedAliases : {}
ExportedCmdlets : {}
ExportedFunctions : {[Add-ATPEvaluation, Add-ATPEvaluation], [Add-AvailabilityAddressSpace, Add-AvailabilityAddressSpace], [Add-DistributionGroupMember, Add-Distribu
tionGroupMember], [Add-MailboxFolderPermission, Add-MailboxFolderPermission]…}
ExportedVariables : {}
NestedModules : {}
A parameter cannot be found that matches parameter name ‘ClientAccessServerEnabled’.
+ CategoryInfo : InvalidArgument: (:) [Set-IRMConfiguration], ParameterBindingException
+ FullyQualifiedErrorId : NamedParameterNotFound,Set-IRMConfiguration
+ PSComputerName : outlook.office365.com
Running the commands you mention to check results in :
Get-IRMConfiguration
InternalLicensingEnabled : True
ExternalLicensingEnabled : True
AzureRMSLicensingEnabled : True
TransportDecryptionSetting : Optional
JournalReportDecryptionEnabled : True
SimplifiedClientAccessEnabled : True
ClientAccessServerEnabled : True
SearchEnabled : True
EDiscoverySuperUserEnabled : True
DecryptAttachmentFromPortal : False
DecryptAttachmentForEncryptOnly : False
SystemCleanupPeriod : 0
SimplifiedClientAccessEncryptOnlyDisabled : False
SimplifiedClientAccessDoNotForwardDisabled : False
EnablePdfEncryption : False
AutomaticServiceUpdateEnabled : False
RMSOnlineKeySharingLocation : https://sp-rms.eu.aadrm.com/TenantManagement/ServicePartner.svc
RMSOnlineVersion :
ServiceLocation : https://f57cf538-e693-44e6-bf40-b0019661ae2c.rms.eu.aadrm.com/_wmcs/certification
PublishingLocation : https://f57cf538-e693-44e6-bf40-b0019661ae2c.rms.eu.aadrm.com/_wmcs/licensing/publish.asmx
LicensingLocation : {https://f57cf538-e693-44e6-bf40-b0019661ae2c.rms.eu.aadrm.com/_wmcs/licensing}
Which seems wrong. Any idea what I could try to get this to work?
Regards
These days if you add the license to the tenant it should automatically turn the stuff on that you need to use it. And the result of Get-IRMConfiguration looks like stuff is already set to $true… so, not sure you have to do anything else, unless you want to customize the branding, etc.
Any idea why an email from an outside source with an encrypted message would not show the outside source warning in the outlook desktop app, but it shows the warning in the web app?
Not sure… Are you referring to “Safety Tips?” https://petri.com/exchange-online-protection-safety-tips
This is by far the best article on the internet for this. Thank you!