How to Encrypt your Hyper-V Host Server using the GUI
Full disk encryption is becoming more important in the SMB. I recommend this for every Windows 10 Pro PC, and also for your Windows Servers. Small businesses often have a single physical Hyper-V host server, maybe two. And these are usually located in a network closet or mechanical room, in a small office space. These aren’t necessarily the most secure locations all the time. Having your at-rest data encrypted on disk is oftentimes your best insurance against loss or theft, and also against data leakage when you go to retire old systems, etc.
On Windows Server, BitLocker is the IT tool of choice. We’ve covered how to enable this on individual Windows 10 PC’s in the past. For Windows Server, the process can be a bit different, depending on what you’re trying to do. Admins have two options, really (or they can do both).
- Encrypt the Hyper-V Host Server (this post)
- Encrypt the Guest VMs (follow-up post)
Encrypt the Hyper-V Host Server
I would choose this option in most circumstances to meet compliance requirements in a small office / branch office. Why? Because you really just care about encrypting the physical disks, to protect against loss / theft in many cases. In Windows Server 2012 and 2012 R2, this is the only option I would suggest, unless you’re willing to input a startup PIN every time a VM reboots for updates. More on that later.
Enable BitLocker via the GUI
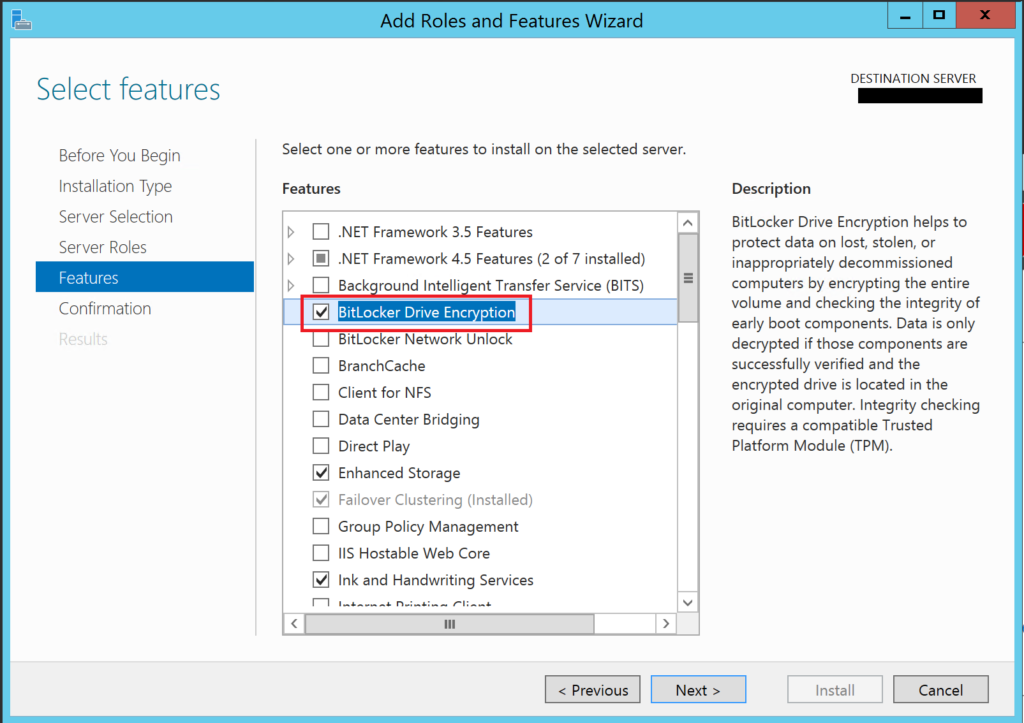
Most small office/branch offices have a single host server, maybe two, which are frequently just in a workgroup, separate from the domain. Therefore, you probably won’t be setting anything up in Group Policy for this in a small business scenario, just configuring it manually on the server. Further, admins of these deployments will probably be more comfortable accomplishing this task in the GUI than in the command line, so I wanted to cover that process here. From Server Manager, go to Add Roles & Features. Select BitLocker Drive Encryption.
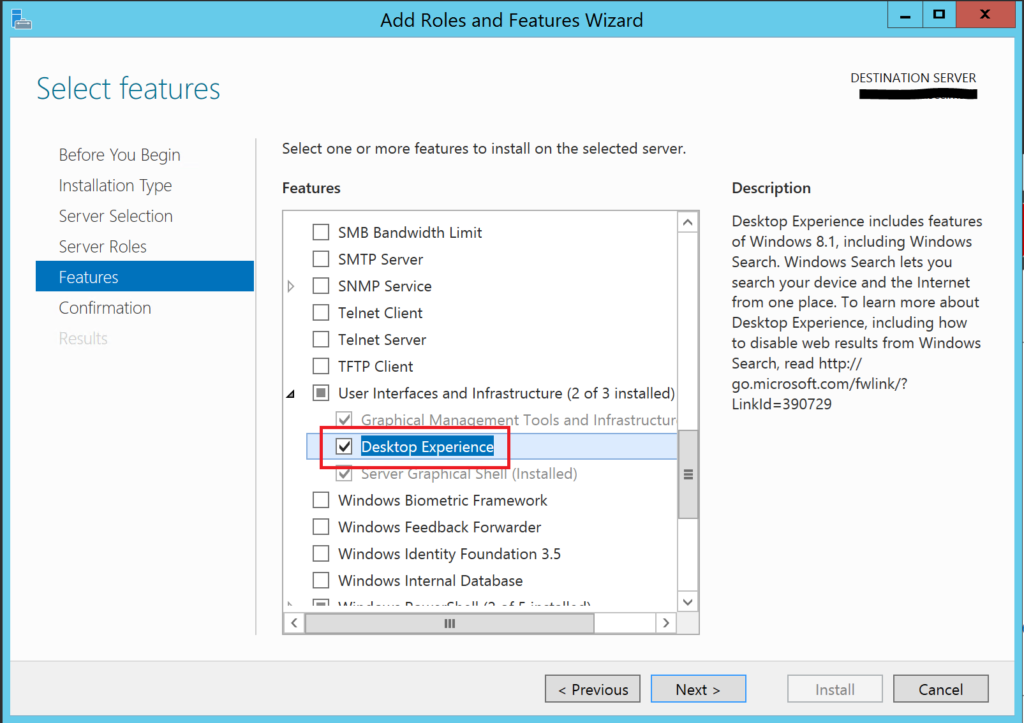
To enable the GUI features for BitLocker in Windows Server 2012 R2, you need to install two features. Scroll down further to find User Interfaces & Infrastructure > Desktop Experience. This will allow the BitLocker applet to show up in Control Panel. This is not required if you already installed Windows Server 2016 with the Desktop Experience (rather than Core or Nano).
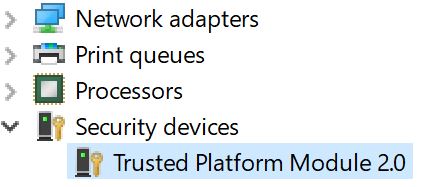
Next, check your computer for a TPM chip. The easiest way to do this is to right-click the start button and open Device Manager. Look for and expand Security Devices, if present. You would see it here. If you don’t see it, you don’t have it.
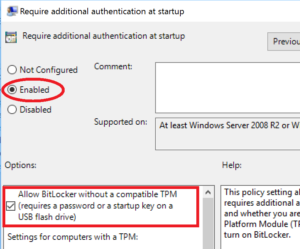
If you do not have a TPM 1.2 or 2.0 chip on your host, then you will need to enable this group policy setting:
- Computer Configuration > Administrative Templates > Windows Components > BitLocker Drive Encryption > Operating System Drives
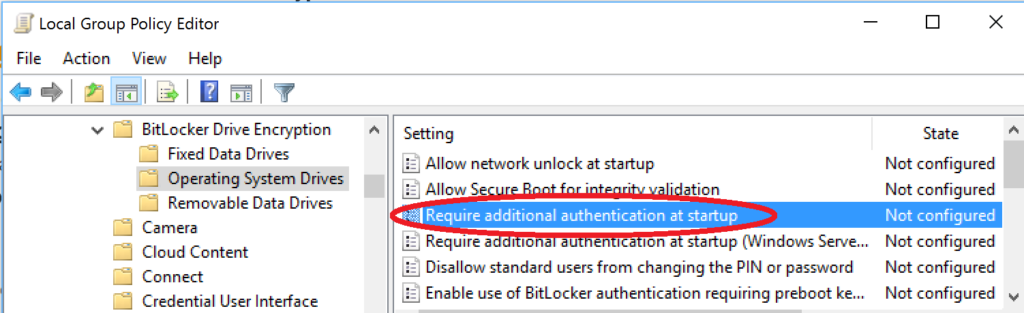
- Double-click the “Require additional authentication at startup” option in the right pane
- Select “Enabled” and be sure to select the check mark box for: Allow BitLocker without a compatible TPM (requires a password or a startup key on a USB flash drive). You can also choose to enforce a PIN in addition to TPM. Just be aware this means someone has to physically enter a PIN at startup (e.g. think about updates/ reboots).
After the requisite items are completed, reboot the server, and then open Control Panel > BitLocker Drive Encryption. You can Turn on BitLocker and follow the wizard to encrypt the server. You will start with the OS drive, which will require a reboot to begin encryption, after which you can then proceed to the fixed data partitions.
There are slight variations between 2012 R2 and 2016, but in general you should save or print your keys, storing them somewhere safe & secure (not on the same drive you are encrypting), and check the box for BitLocker System Check. You may see an option to encrypt used space only or the full drive in 2012 R2. I always choose to encrypt the whole thing–best not to leave question marks. In Server 2016, use the New encryption mode option.
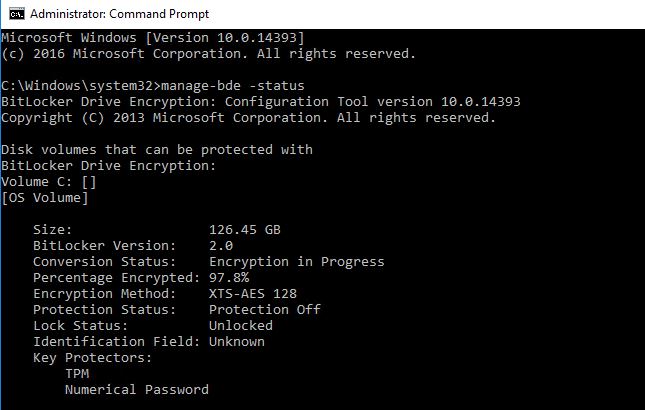
To check on the status of the encryption, open a command prompt and type:
manage-bde -status
Return to Control Panel > BitLocker Drive Encryption to proceed with encrypting any data disks; you will need to select a method to unlock the drive. I usually choose Automatic, otherwise there would be manual intervention required after each reboot to unlock this disk.

You will need to save a separate key for this drive. Just be aware of that. This should complete the process for you on your Hyper-V host.
Leave a Reply