How to perform an Unplanned Failover from Azure Site Recovery
In a previous series, I wrote about Azure Site Recovery, and the new integration tools available in Windows Server 2016, through the Essentials role (enabling some pretty cool new offerings, potentially, for service providers and consultants). ASR for Windows Server Essentials makes setting up Disaster Recovery into the Microsoft Azure cloud very easy to do from an on-premises Hyper-V server.
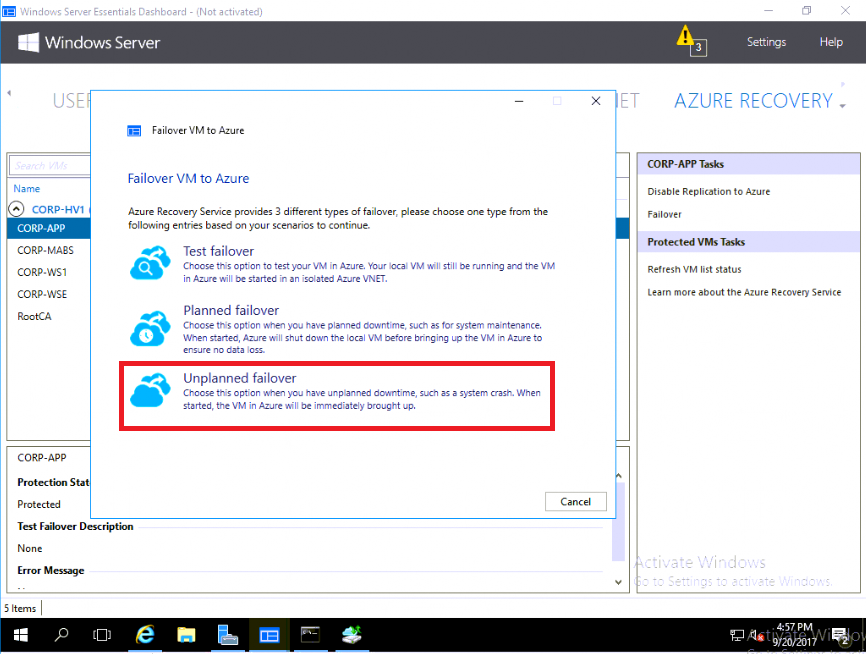
I made a comment in that series that it would be difficult to imagine someone actually choosing the “Unplanned failover” option in that wizard, since presumably your on-premises servers would be down in that scenario. But unplanned failovers are indeed a reality–such events can and do happen. So what should you do when it happens to you?
- Scenario # 1: Unplanned Failover from the Azure portal
- Scenario # 2: Essentials as a separate DR appliance: Unplanned failover from on-premises
If you designed your solution / offering with a separate “DR Management appliance,” then you could have the Essentials tools separate from the production environment, rather than part of it, making this possible to do after all–and the steps/experience is basically the same as choosing the Planned failover option, which I have covered previously
An example of scenario #2 is that you could have a small computer (maybe something like an Intel NUC) running Essentials (so this is an inexpensive appliance). This device is hosting a separate domain from your customer’s (e.g. you could call it management.local), and the Hyper-V host(s) would be joined to that domain, rather than the customer’s production domain.
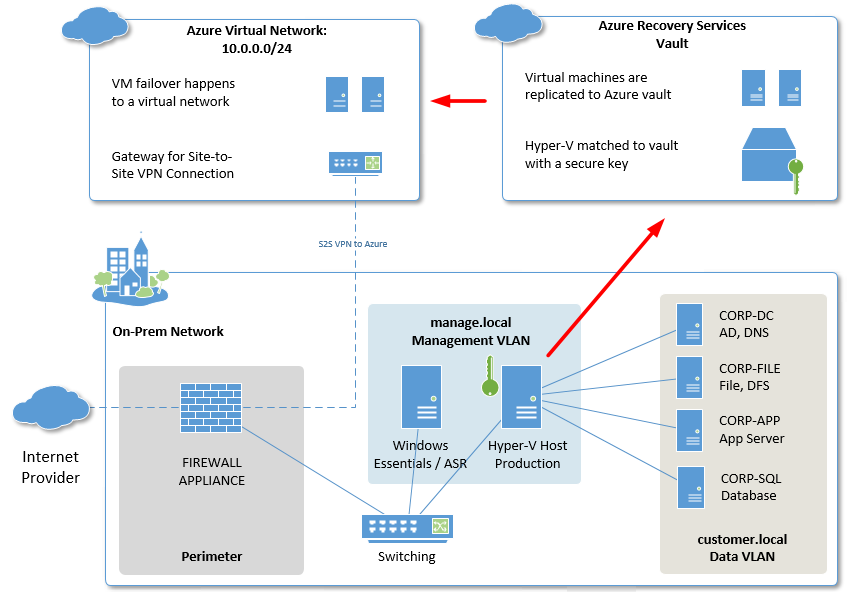
This has additional security benefits, as you can use credential isolation and even a separate management subnet, to keep the traffic completely off the regular LAN, and invisible to intruders and malware. Now you could manage your customer’s hardware, backup and DR completely independent of the local network.
How to initiate an Unplanned Failover from the Azure portal
If you aren’t lucky enough to have a separate management domain and recovery wizard handy on-premises, then you can also just rely on the Azure portal, and recover right from here, without need of the on-premises server at all.
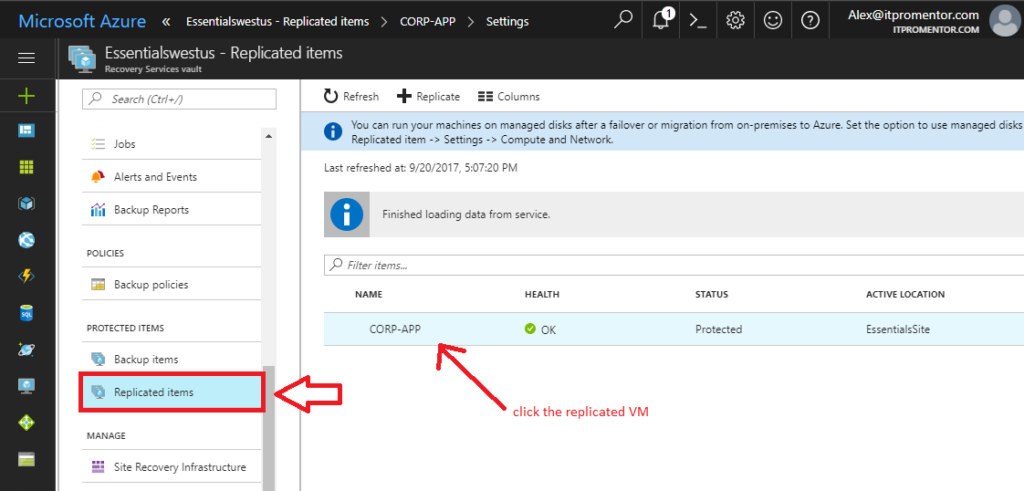
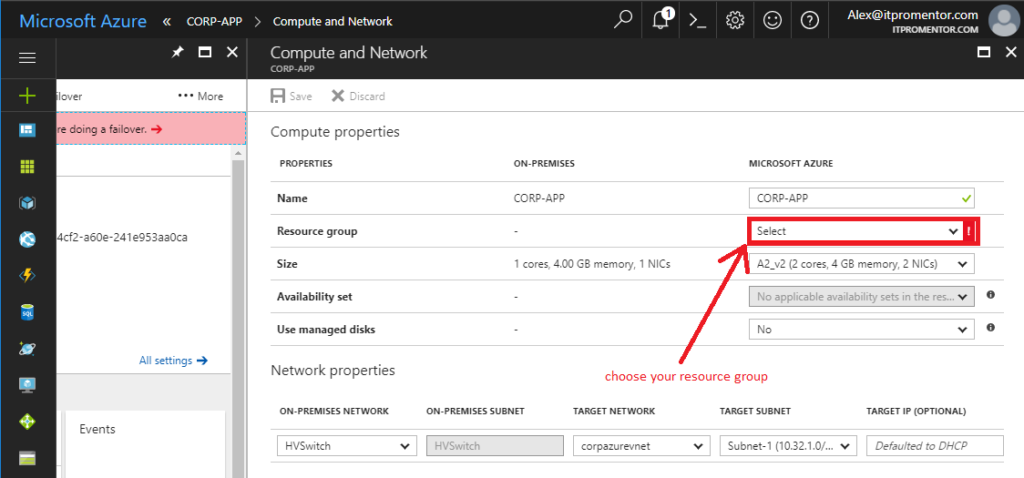
Step 1. Pre-configure virtual machines from the Recovery services vault > Replicated items
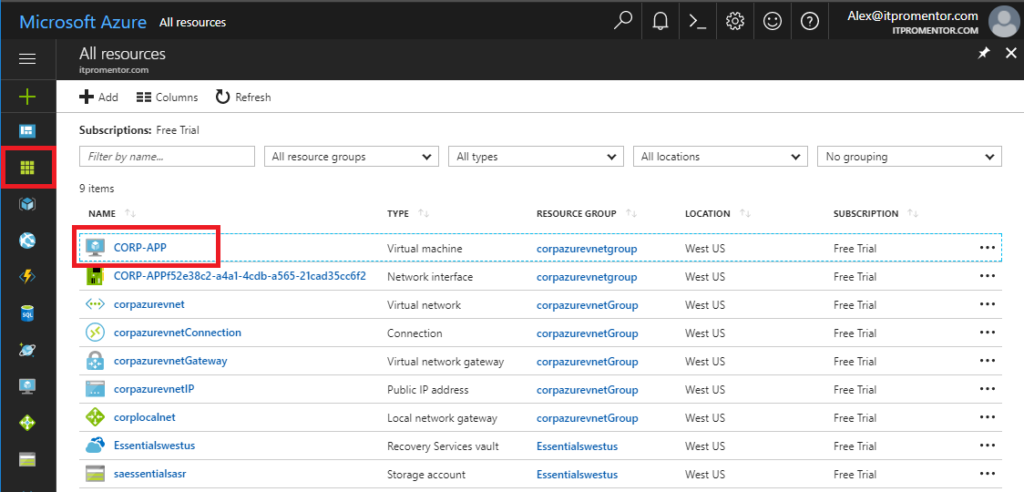
Sign-in to the Azure portal (https://portal.azure.com) and find your Recovery Services vault from All Resources. Scroll down to find Replicated items. Pick the first server you want to recover from the list.
Next you will need to configure a resource group for this server. Click the banner to configure. (This is the same as selecting Compute and Network.)
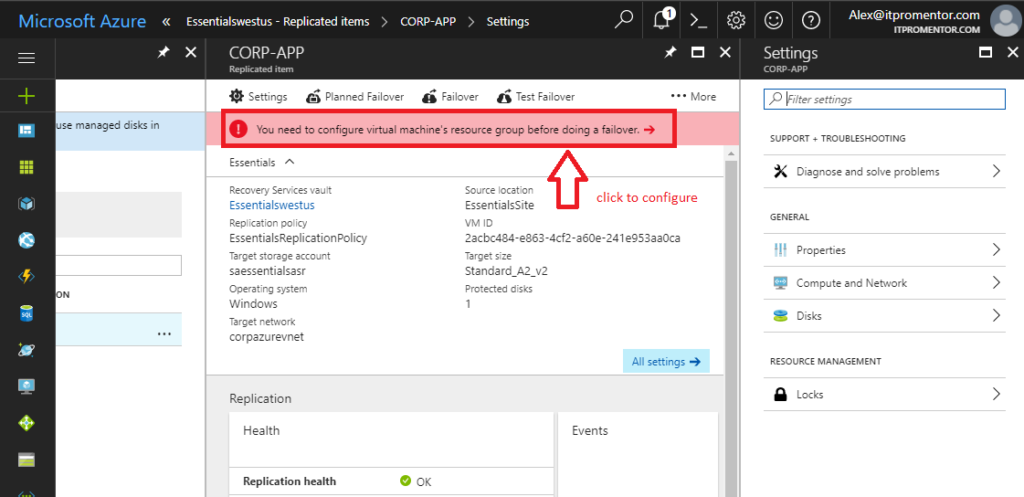
After you select your resource group, be sure to Save your selection. Optional: you can also pre-configure the IP address of the virtual machine under Target IP (optional).
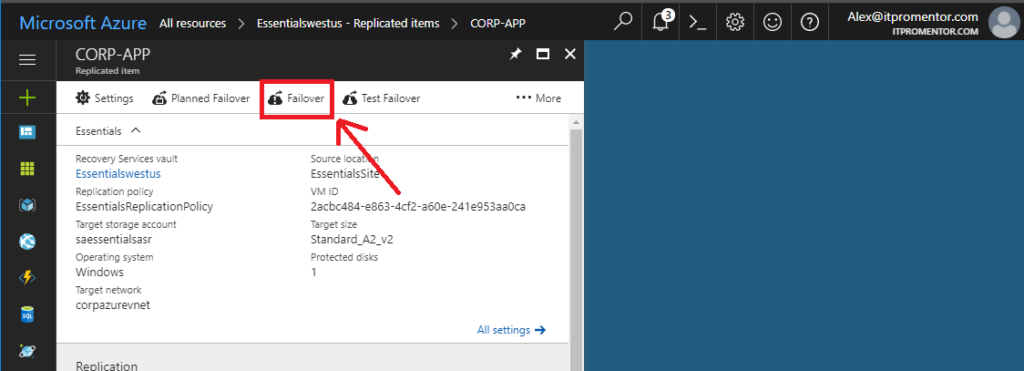
Step 2. Initiate Failover from the Recovery Services vault
Now we are able to pick Failover.
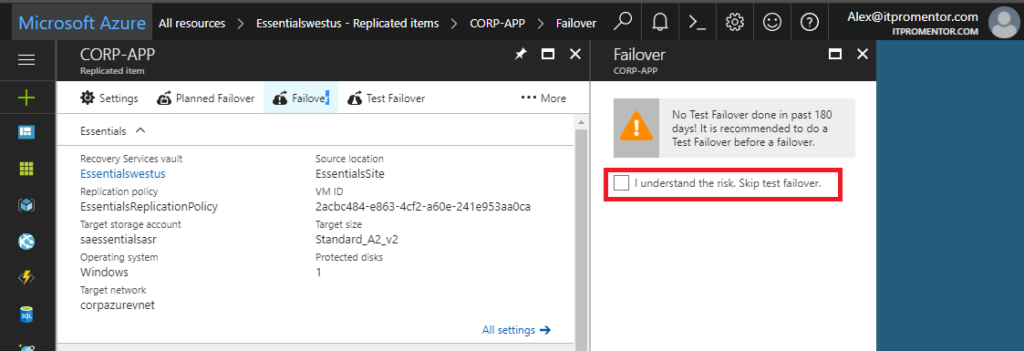
If you have not previously done a test failover, or it has been a while, you will need to accept the risk to continue.
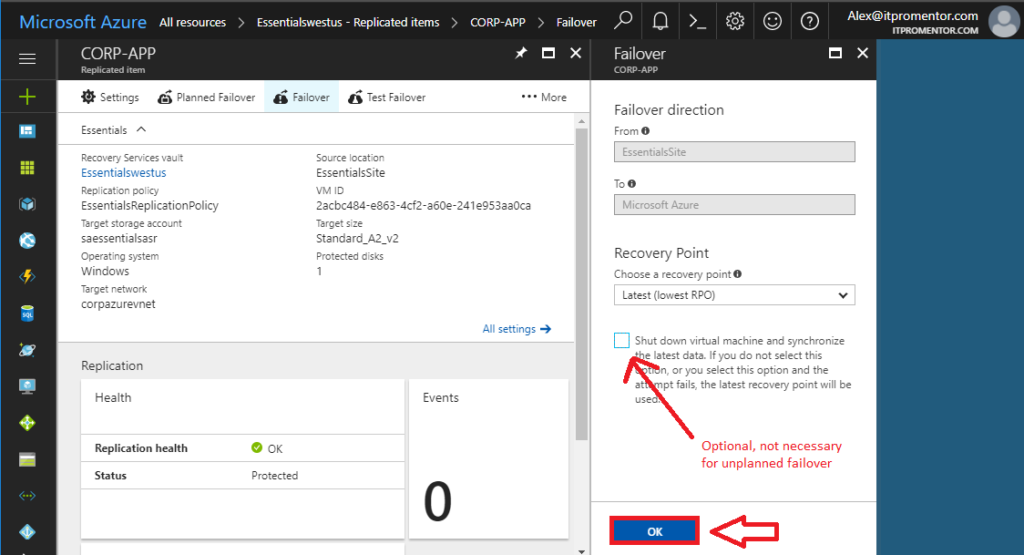
There are typically multiple recovery points available, you can choose the latest, or one from further back in time (e.g. if a machine was compromised in a ransomware attack). Since this is an unplanned failover, the option to shut down the virtual machine might be optional for you (if the host server is offline for example). Click OK after making your selections.
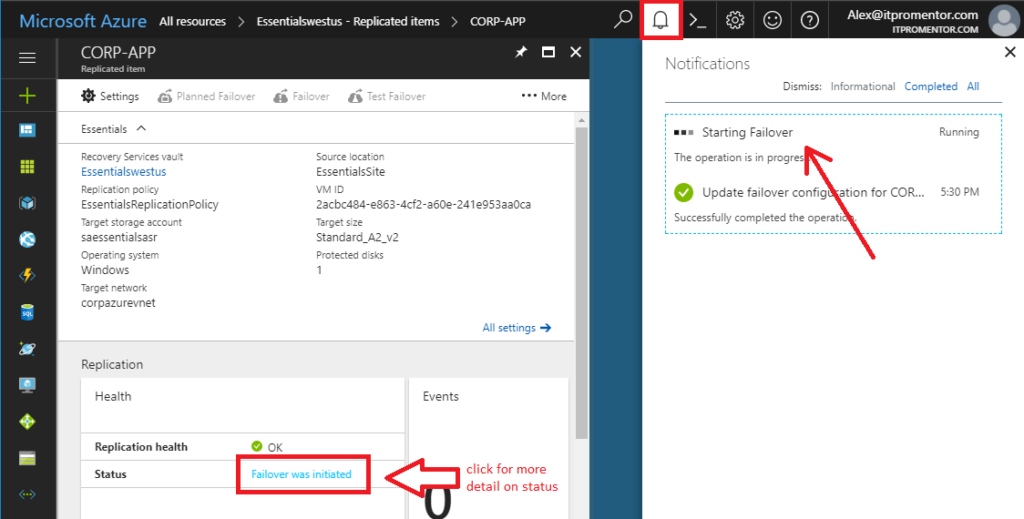
Now the status updates to Failover was initiated. You can click the status to see more detail about the process, or see the progress in the notifications area.
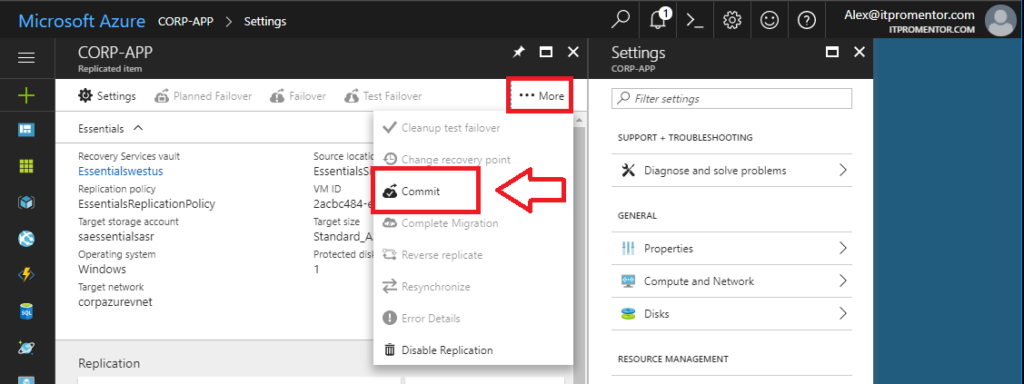
Step 3. Validate and Commit the failover
Once the status updates to Failover completed, you will be able to see the virtual machine running in the Virtual network.
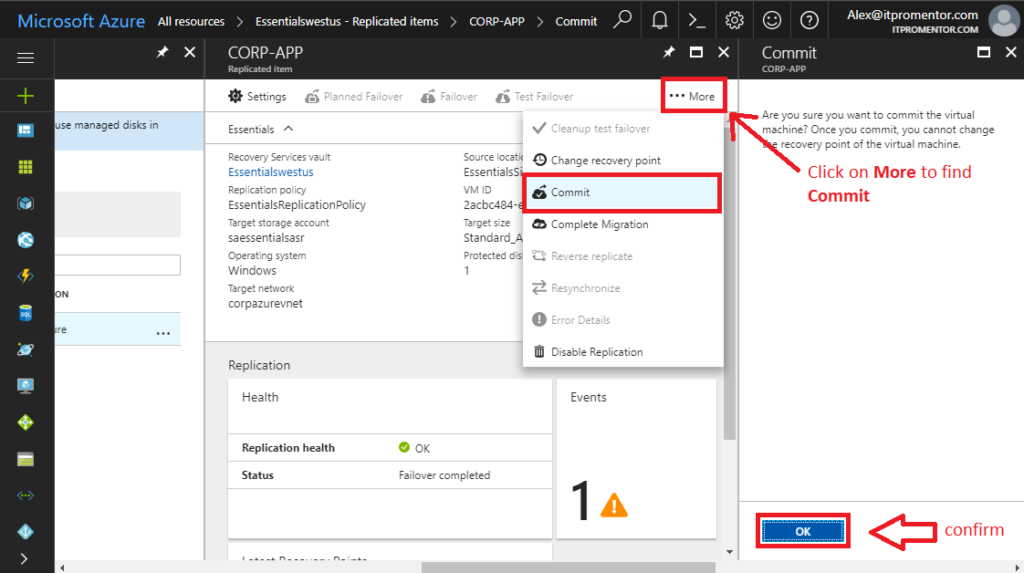
When you are satisfied with the restore, you can return to the Recovery Services vault > Replicated items area. Find the ellipses (More) and choose Commit. Click OK. This will finalize the failover, and you cannot choose a different recovery point (that option will become grayed out on this menu).
And that is basically it. Oh, except that you will need to figure out how your users are going to connect to this environment. With good DR planning, you would know this already (VPN, RDS, what DNS updates must be done, etc.) So after you have your VM(s) up and online, you may have additional work to enable remote connection, reconfigure DNS, validate, and so on. Just be aware of that.
Initiating failback to the on-premises host server
Once you have recovered the on-premises host server–repaired the hardware, or whatever was needed–you may need to failback and reverse replicate changes made after failover, to the original environment.
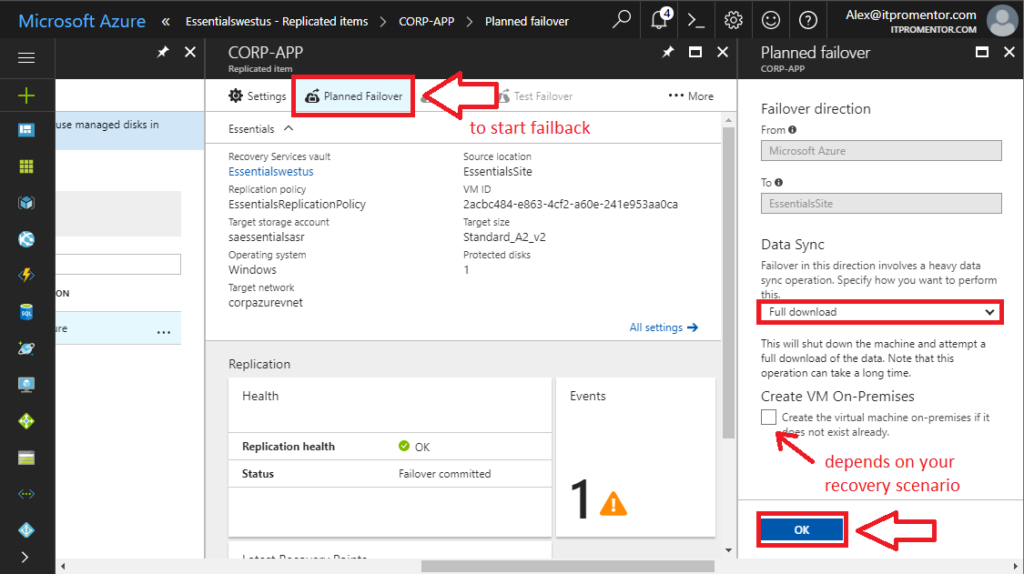
Now in this case you will have the option for Planned failover from the Recovery Services vault > Replicated items area. Select this to begin failback procedures. You can pick to minimize downtime, or do a full download (longer downtime), and you will see an option to create the VM on-premises if it does not already exist.
This depends on your scenario. It may be that you needed to setup a new Hyper-V host from scratch and register it with the vault, just like you did the first time you set this all up. But if you just had to repair some hardware, and were able to get items back online that way, then you don’t need this checkbox. Make your selections and click OK.
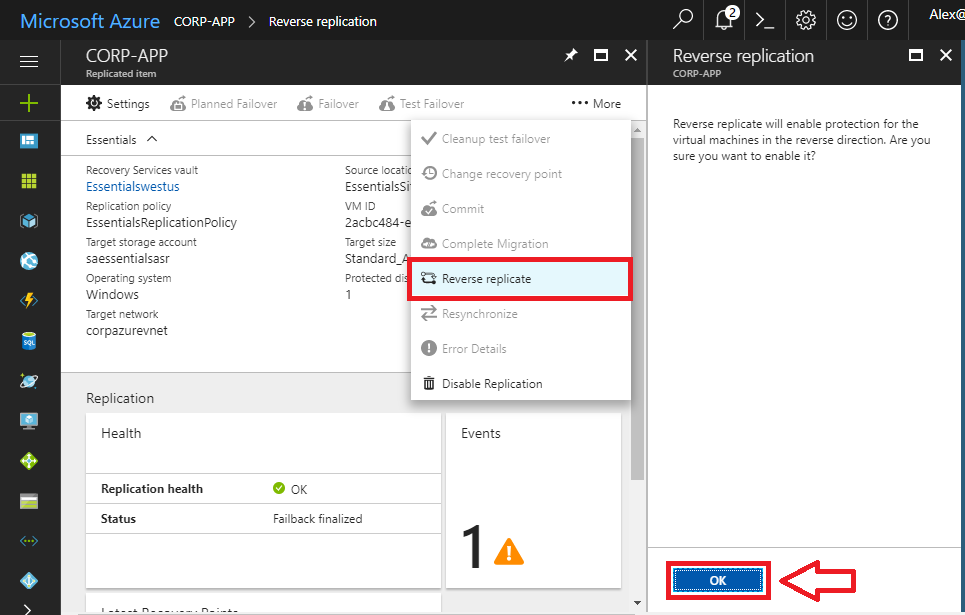
Similarly to before, you can watch the progress and the status, and when it is completed, you need to validate the VM and Commit the failover.
But you are not done yet! At the last stage, it will also be necessary to Reverse replicate. In the Essentials Wizard this is more aptly named “Reprotect”–basically this option will turn the replication back on from on-premises to Microsoft Azure Recovery Services. Click OK.
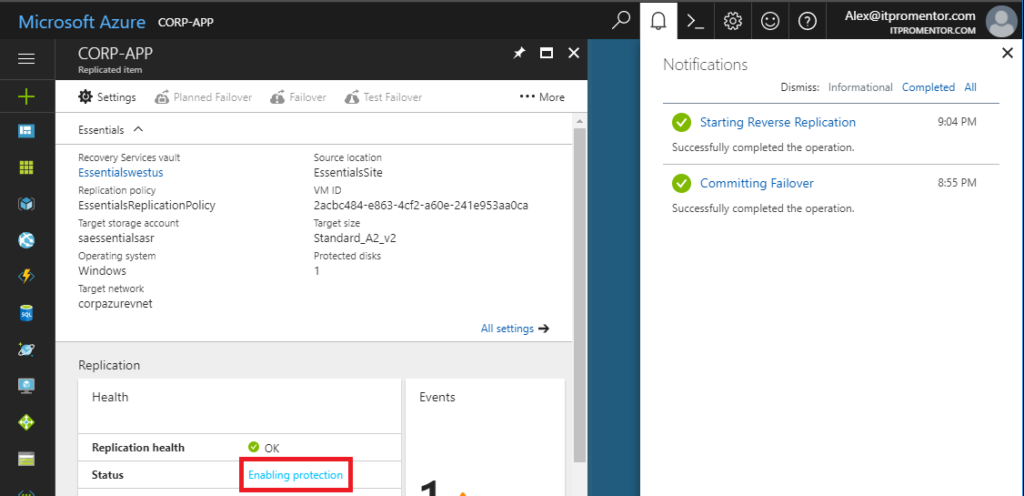
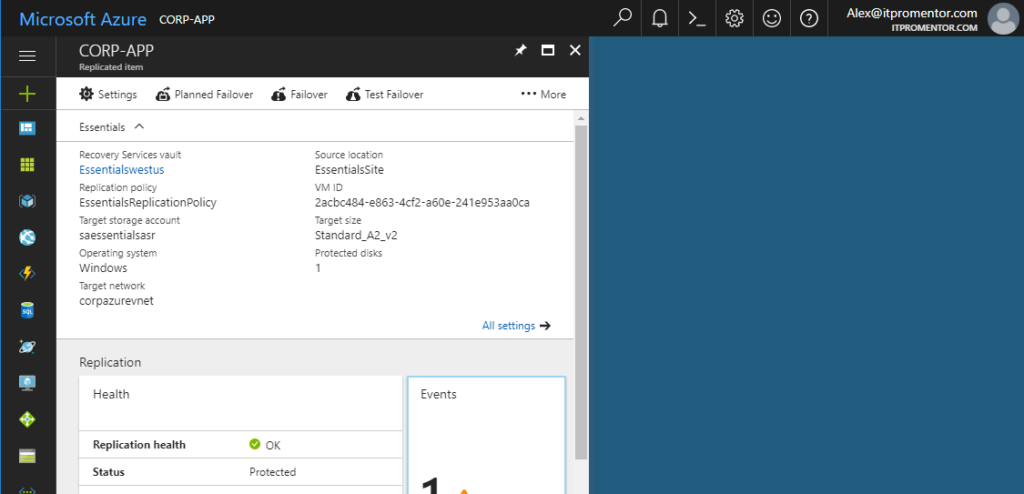
Now the status will update again to Enabling protection, and eventually you will see that it returns to its original, pre-disaster state.
Wheew, back to normalcy:
Summary
The process to initiate an Unplanned Failover / Site Recovery from the Azure portal has been covered in this tutorial. Note that if you architected your DR environment in advance, then you may even be able to leverage the on-premises Essentials tool, and the workflow is almost identical to running the Planned Failover.
NOTE: As mentioned, today there is a lot of literature and tutorials available for testing ASR failover scenarios, but not many for actual $h!#-hits-the-fan, “holy-crap-what-do-I-do-now” scenarios. I want to make an effort at establishing something that is more useful than demo material only. This may not be perfect, and could potentially use some further input or suggestion–comments are welcome!

Comment (1)
You’re on a roll Alex, great work! ;-)