Configuring Data Loss Prevention (DLP): An example automatically encrypting GLBA content via Email
If you have a subscription such as Microsoft 365 Business or Office 365 E3, then you can configure Data Loss Prevention (DLP) policies, which are great tools for helping your organization meet compliance standards. I especially recommend it for businesses in the financial or medical industries, due to laws and compliance bodies such as FINRA, HIPAA and others. DLP policies allow you to define certain conditions (e.g. sensitive information is being shared outside of the organization), and then apply some action based on the conditions.
Actions can include outright blocking the content from being shared completely, or encrypting it (e.g. email–which is today’s example), and you can have “Policy Tips” or other notifications to the end-user, and/or enable incident reports to a specified inbox–and admin or compliance officer for example, or, any combination of these things that you can dream up.
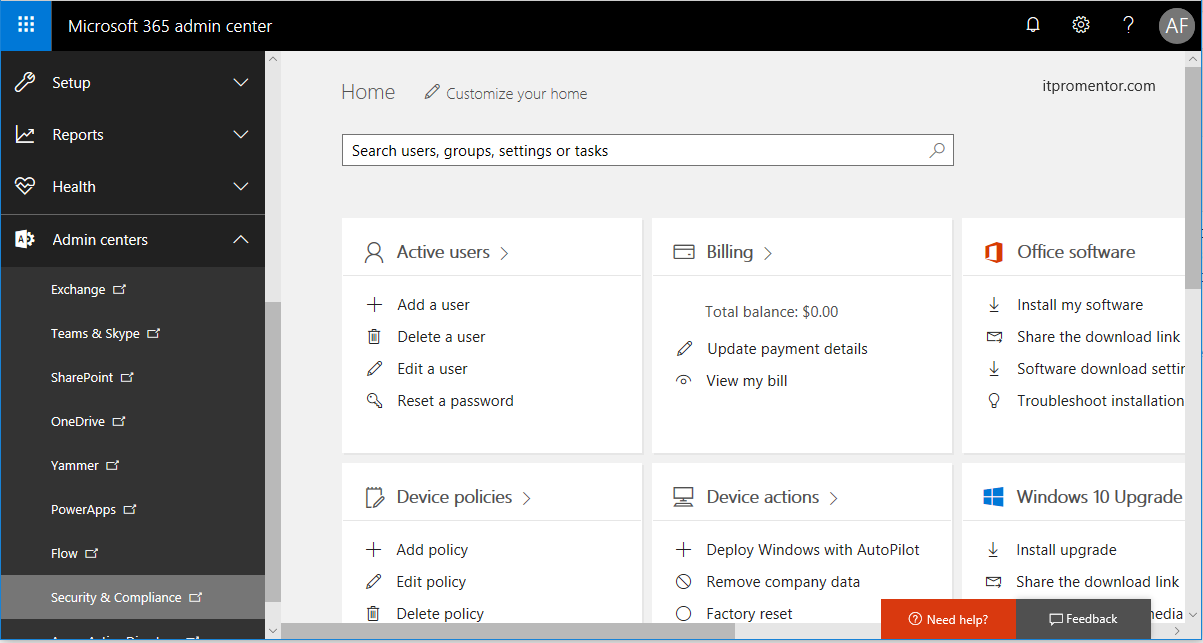
To get started with these polices, navigate your way to the Security & Compliance Admin center from the 365 Admin portal. You will notice that it is also possible to create DLP policies, for example, directly in the Exchange Admin Center in Exchange Online, but just know that if you create DLP policies using the Security & Compliance center, the rules do not “show up” in EAC–so you will be managing them through the Security & Compliance center always, however the advantage to this method is that you will have the options to protect content in locations throughout Office 365, and manage them all centrally. I also find that the interface is much easier and more intuitive than stepping through the same process to build policies via EAC, for instance.
Estimated time to complete: highly variable depending on your requirements. If you know what they are already and are familiar with the selections you need to make, maybe 20-30 minutes, depending. But you’ll spend a lot more time than that planning your deployment, for sure.
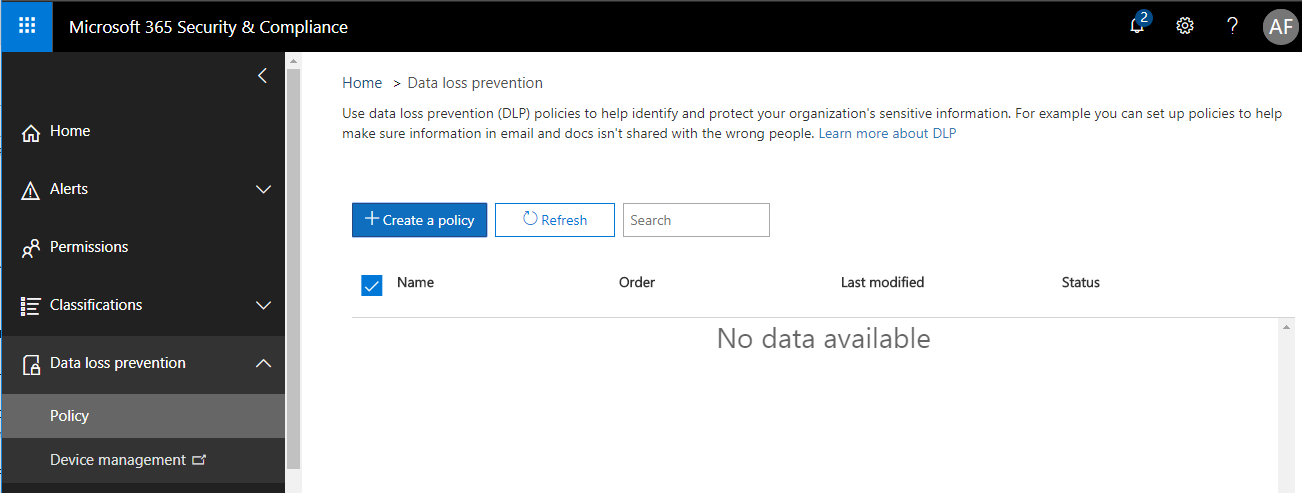
Under the Data loss prevention menu item on the left, choose Policy. Click + Create a policy.
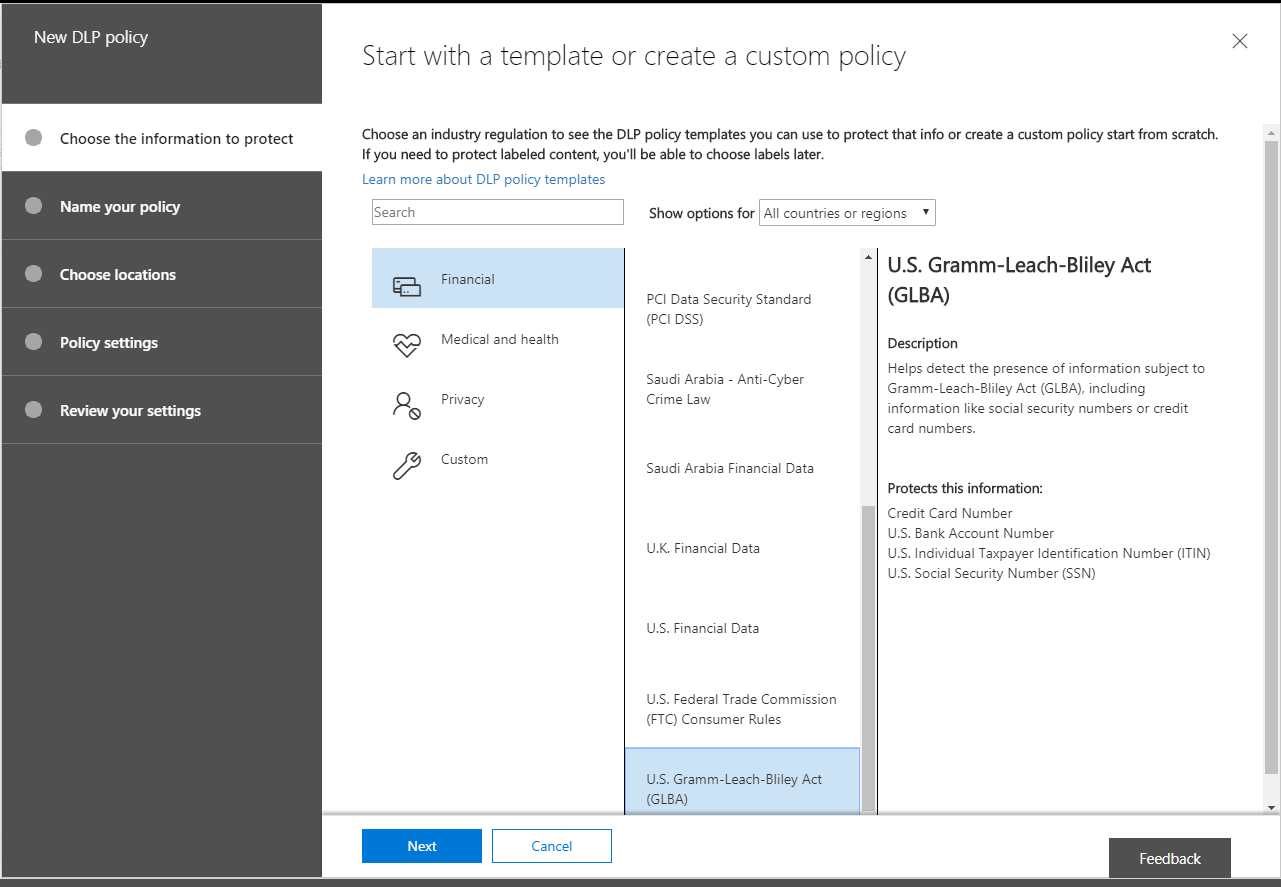
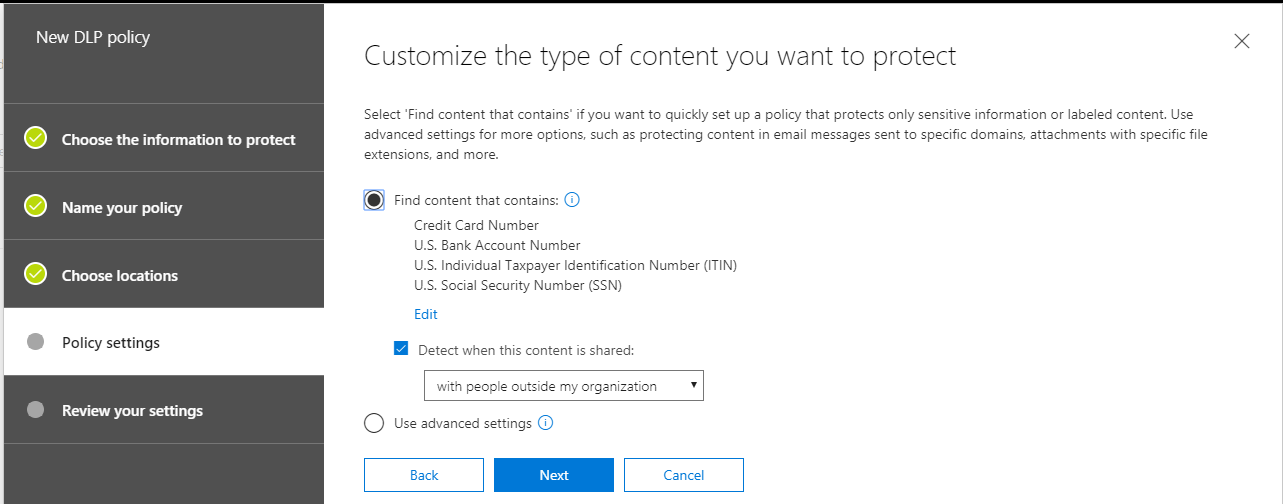
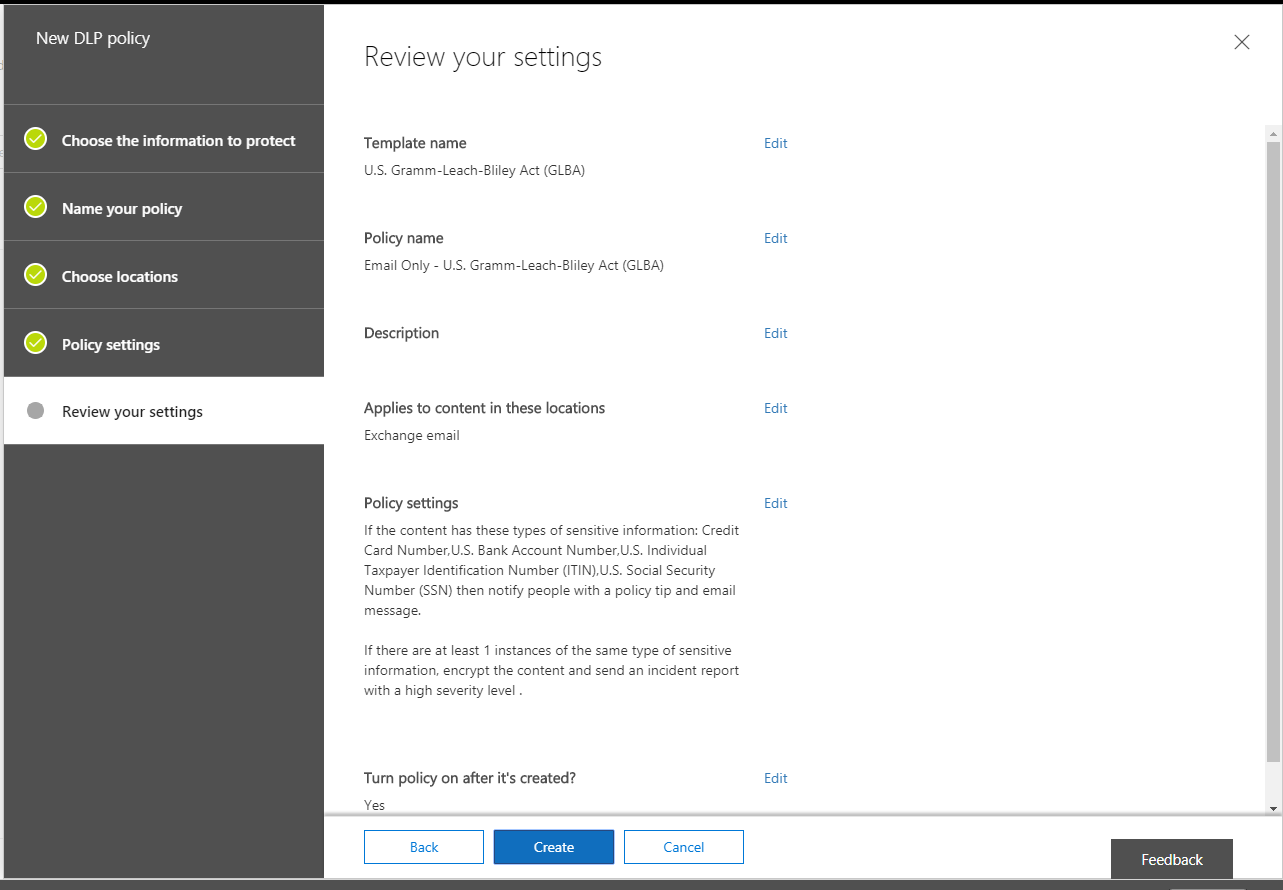
There are so many possible information types to choose from! Some are targeted as specific industries such as medical and health (e.g. HITECH/HIPAA/ePHI), others by country or region (e.g. GDPR for the European Union). By way of example only, we will choose a policy template from the U.S. financial industry, called the U.S. Gramm-Leach-Bliley Act (GLBA). This policy template watches for Credit Card numbers, U.S. bank account numbers, and U.S. tax payer identification numbers, including ITIN and SSN. These are just examples of the information types that are important to protect, but you may have others according to your corporate policies and compliance requirements.
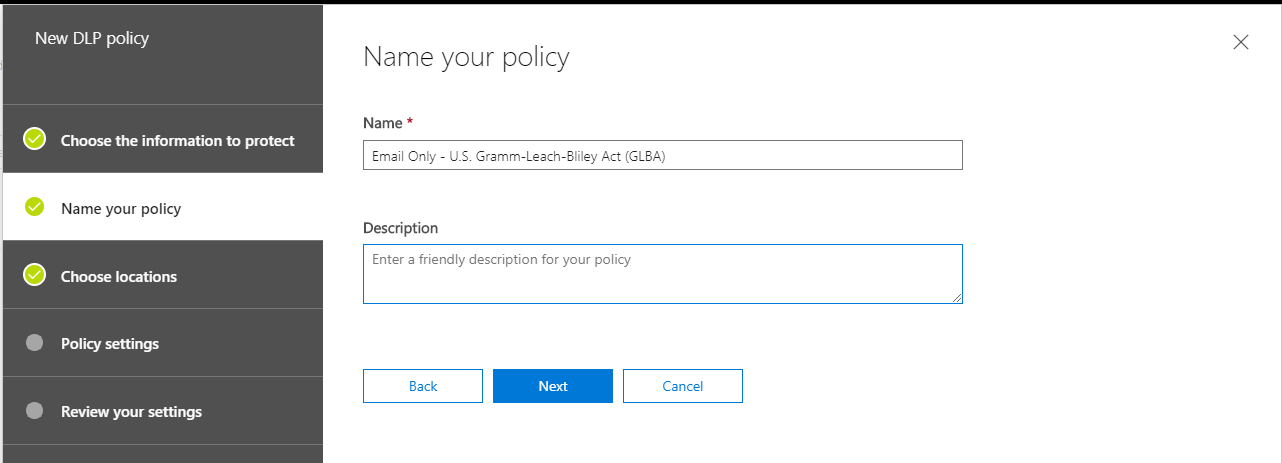
Now I am going to name my policy. Note that I want this to be a descriptive name for what the policy does or applies to. In this case, I plan to implement a policy which protects against sharing this type of information, specifically over email communication. So I will name it “Email Only – [Policy Template Name].”
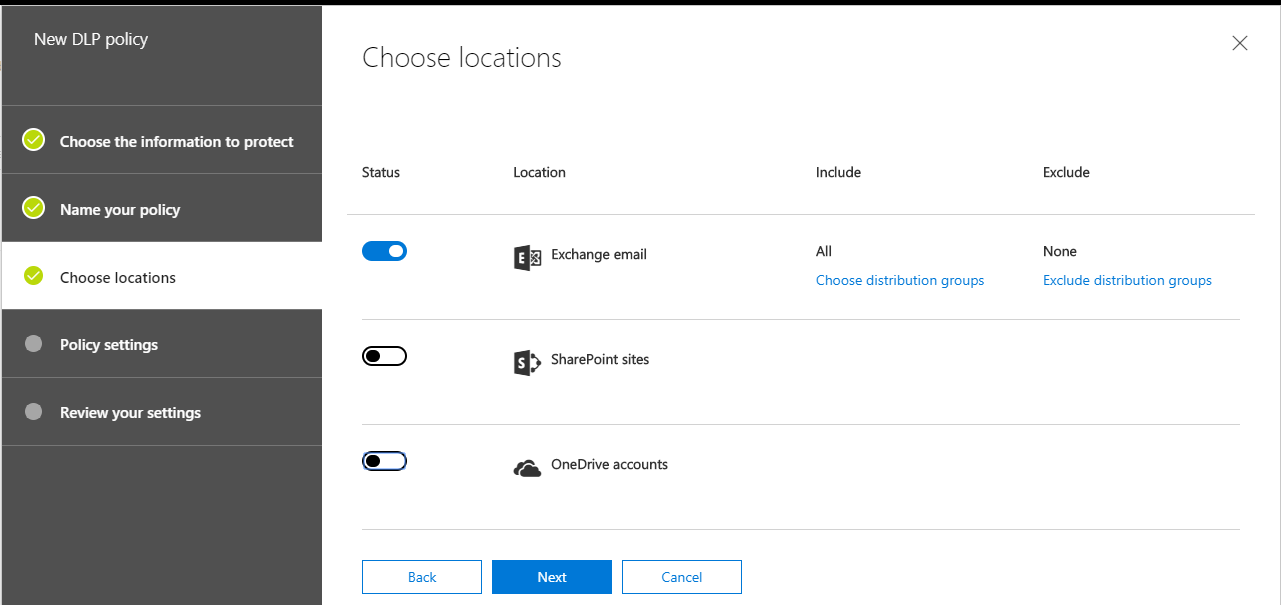
Now I can choose locations. Note that it is possible to implement protection across all of the Office 365 services and data locations, however in this example, I am going to proceed to choose only Exchange email. Your own requirements may be different.
Now we begin to dial in the particulars of the “conditions” — in this case I want to detect when the content is being shared with people outside my organization. This is usually even more important than sharing content internally with other Exchange users. Since email communications within an organization never really leave the Exchange server, there aren’t as many risks for data that is in-transit. Whereas, when the recipients are external to the organization, that content has to be transported over the internet, which is a much riskier business, particularly if the recipient organization is still using SMTP over port 25 (unencrypted). (NOTE: by default, Office 365 will always attempt to send the mail via TLS on port 587, and fall back to port 25 if the recipient server does not support TLS).
Wow, you can really do a lot with these policies. When it comes to “what action(s)” to take, just look at all the choices. You can show Policy Tips, which are like pop-ups that end users would encounter, explaining the sensitive nature of the communication, given the content. You can also choose to Send incident reports in email, or Restrict the access in some way–even outright Block it. In this policy, I am going to use Encrypt email messages–meaning that content matching this information type will have Office Message Encryption automatically applied on its way out the door.
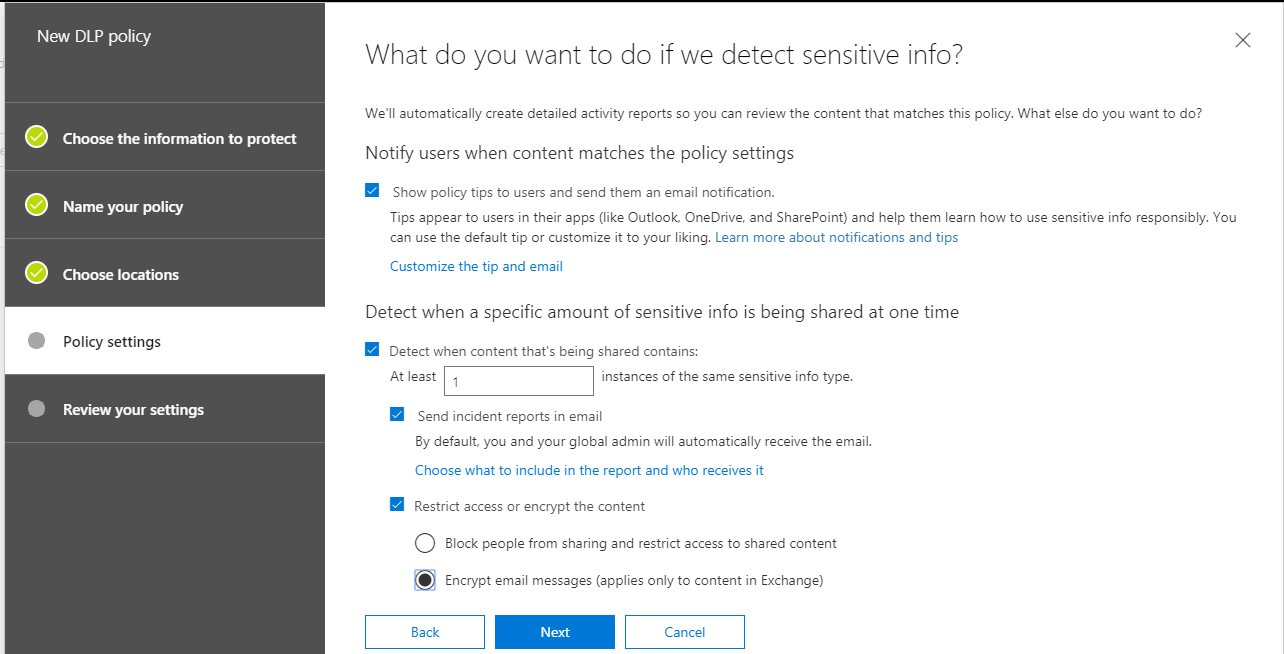
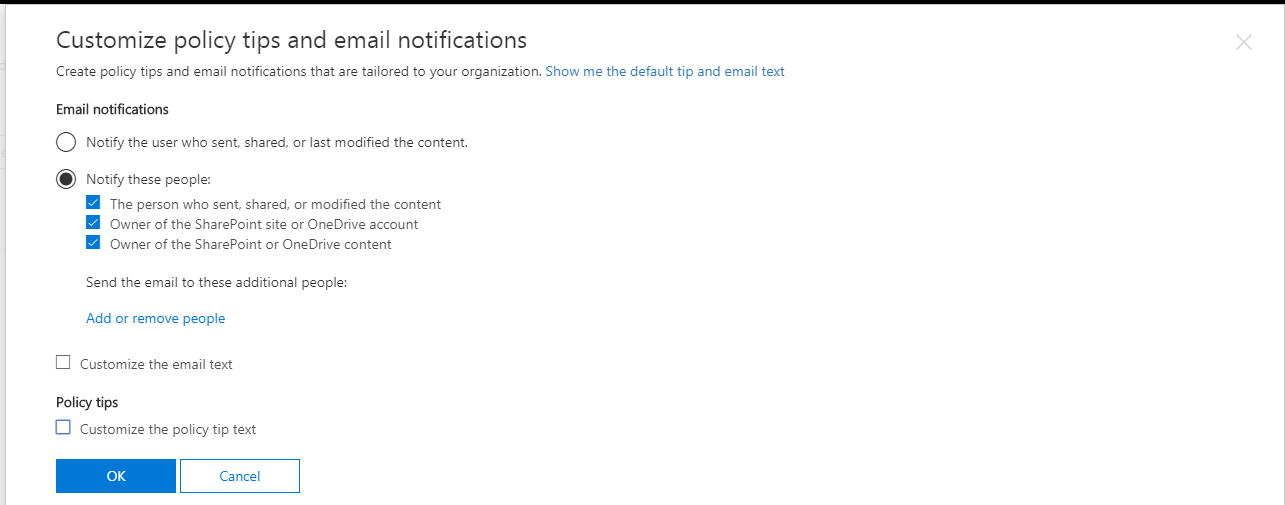
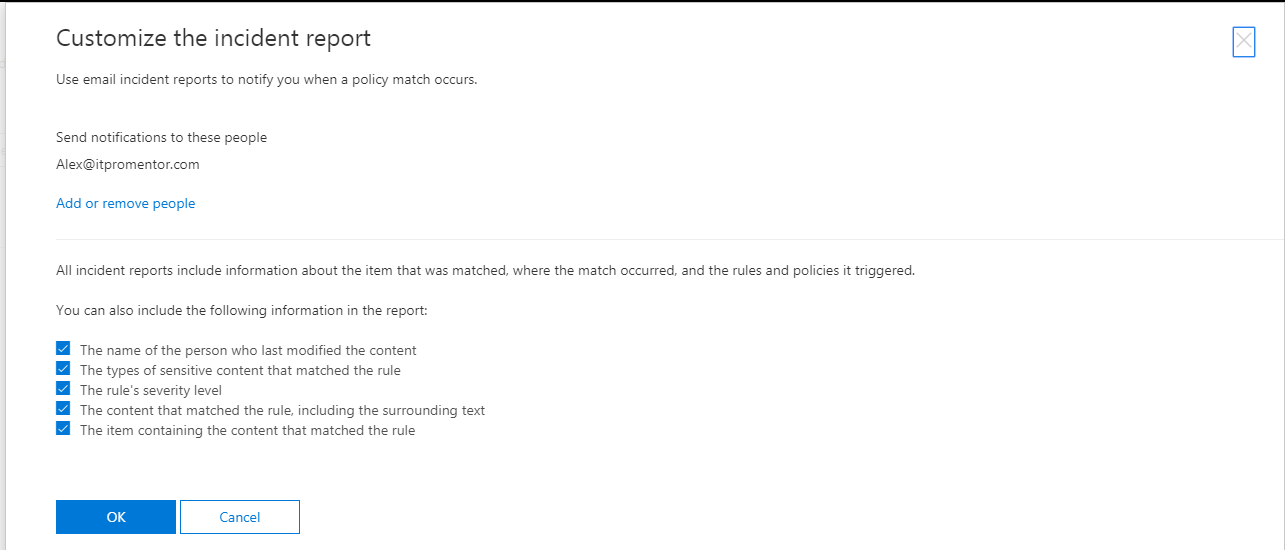
Notice that it is also possible to customize policy tips and email notifications, by selecting the link above to Customize the tip and email. Here you would also choose just exactly who is notified. Pro tip: I almost always like to setup a compliance management mailbox in Exchange online, so that it can collect a running record of incident reports. This can just be a shared mailbox, with permissions assigned to whomever is the compliance officer within the organization.
Another important note: you can choose what to include (or not include) with your incident reports. Be particularly careful here, for example your requirements may not actually require you to identify the specific content / text which was shared, just that the information type was shared, and by or with whom. It is a good idea in certain situations, not to have too much information available. Of course, every situation is different, and you will want to confer with your own legal counsel, etc. on such matters before implementing the policy.
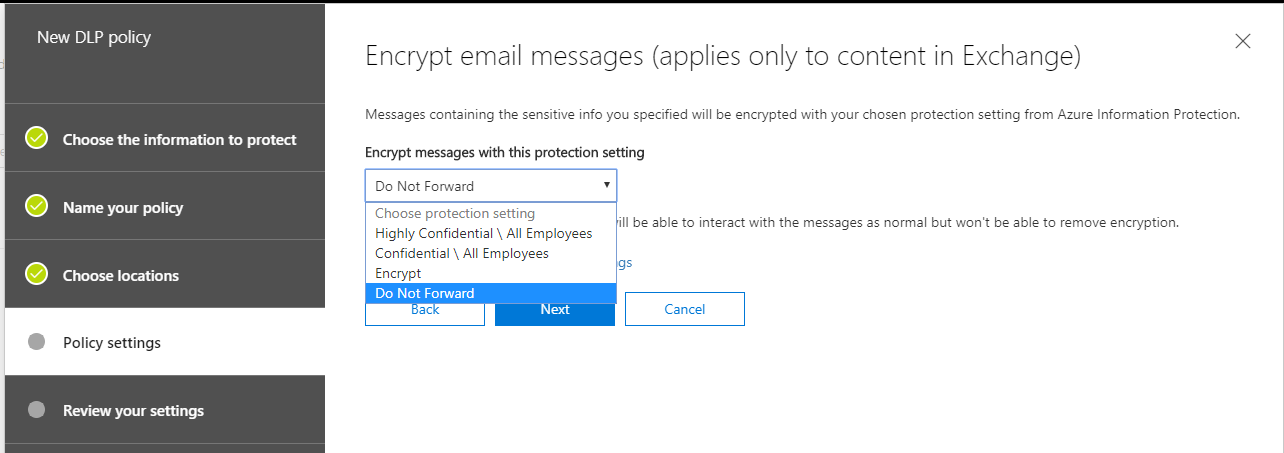
Remember that we were choosing to encrypt the email messages–well, there are basically two different “types” of encryption available here if the policy applies to external users. It is not possible to share encrypted content marked as Confidential or Highly Confidential with recipients outside of the organization. Therefore, you have two remaining options: Encrypt or Do Not Forward.
Encrypt: The Encrypt option is the weaker of these two–it will simply encrypt the message contents, meaning that a recipient will need to sign-in to view the email message at OWA (again, the message doesn’t really “leave” the server in this case). However, it is still possible to copy and/or forward any content within the message, or download encrypted attachments (although, encryption applies to the attachments as well by default–it can also be disabled by an administrator).
Do Not Forward: The stronger of these options is Do Not Forward. With this setting, recipients will not be able to download and re-distribute the information. They themselves will be able to sign into OWA and view the message, similar to the Encrypt option, above, but they will find it very difficult to get any of that information shared beyond themselves (however, they are allowed to reply to the sender/originator of the message). So, use this option if you want users to be able to share this type of sensitive data, but you don’t want their recipients to turn around and share it again.
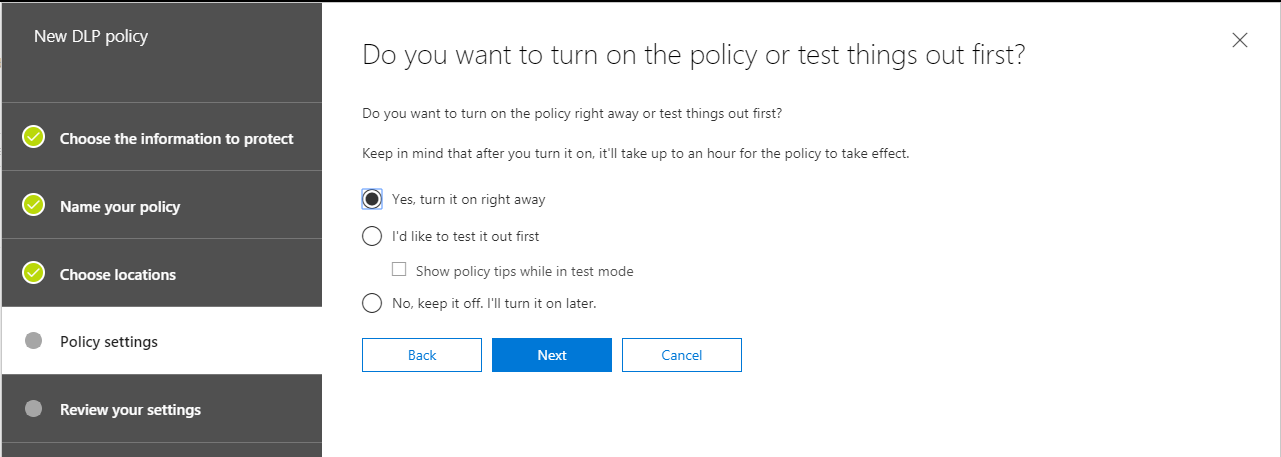
Proceeding to the last step, you will find that it is possible to test the policy first, and you can choose whether policy tips “show up” or not while doing this. Otherwise, it basically has the same effect as just turning it on (you just get the option to disable policy tips in test mode–that seems to be the only functional difference).
Finally, you can review your settings and Create the policy to finish.
The end user experience
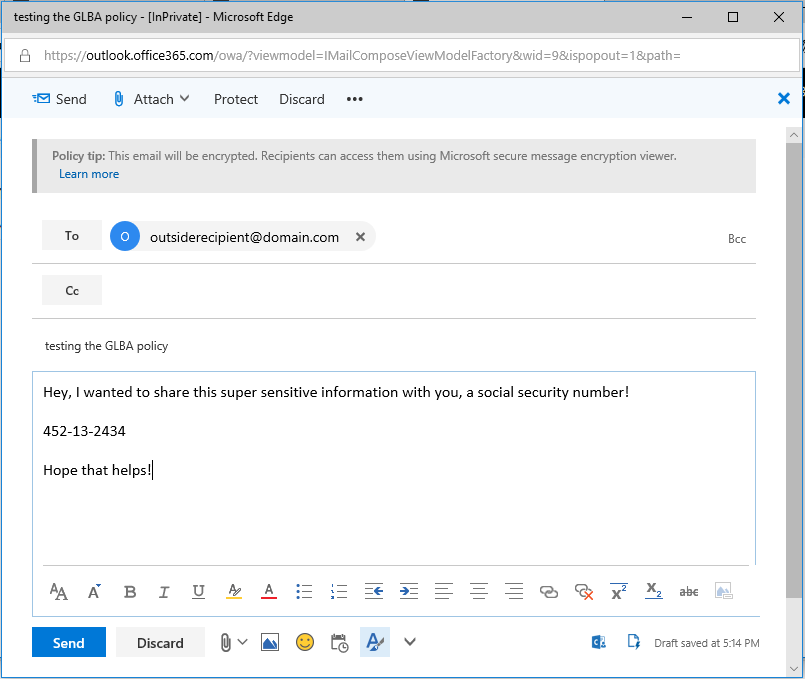
When an end-user drafts an email message or attaches a file containing sensitive content, a Policy Tip will appear in Outlook or Outlook Web Access, telling the recipient that this message will be encrypted:
If you had selected the option to notify the person sharing the content, then they would also receive a message that looks like this:
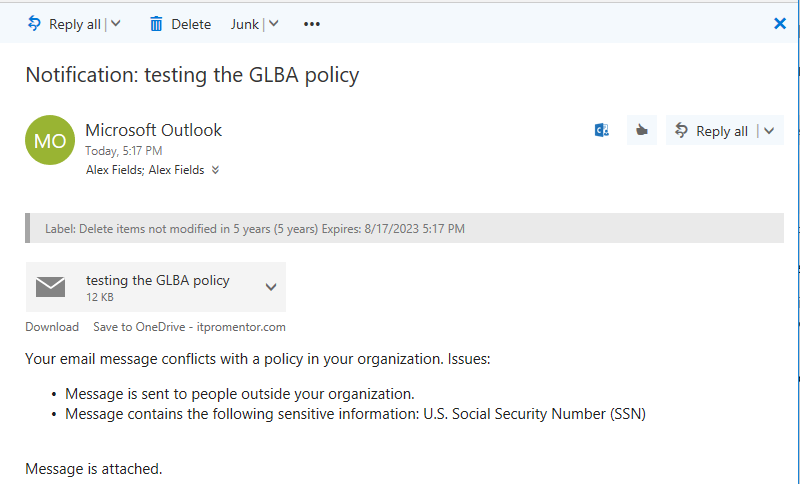
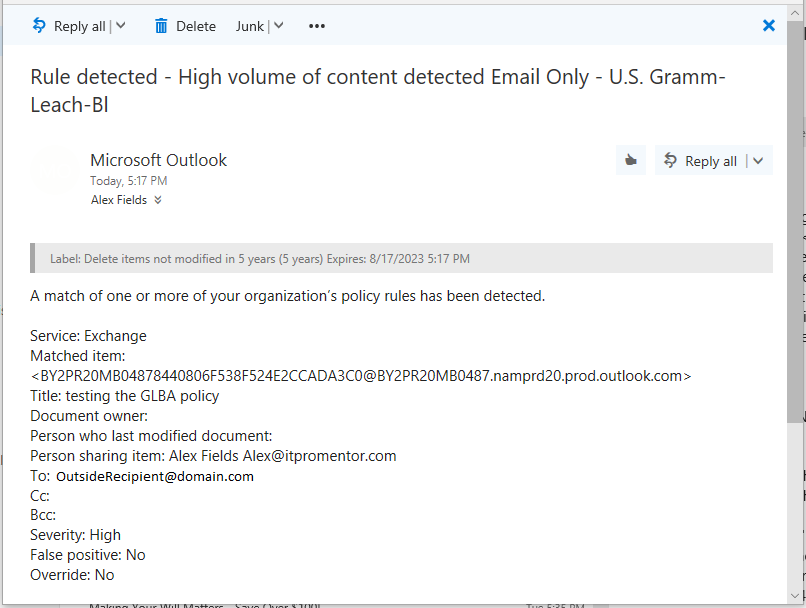
Finally, if you chose to file an incident report at an admin or compliance officer’s mailbox (which is highly recommended for meeting certain compliance requirements), that report will appear as follows:
The recipient experience, in this case, is determined by the fact that we chose to encrypt the message. That means they will not receive the actual message contents, but rather a link that will lead them to a Microsoft sign-in page.
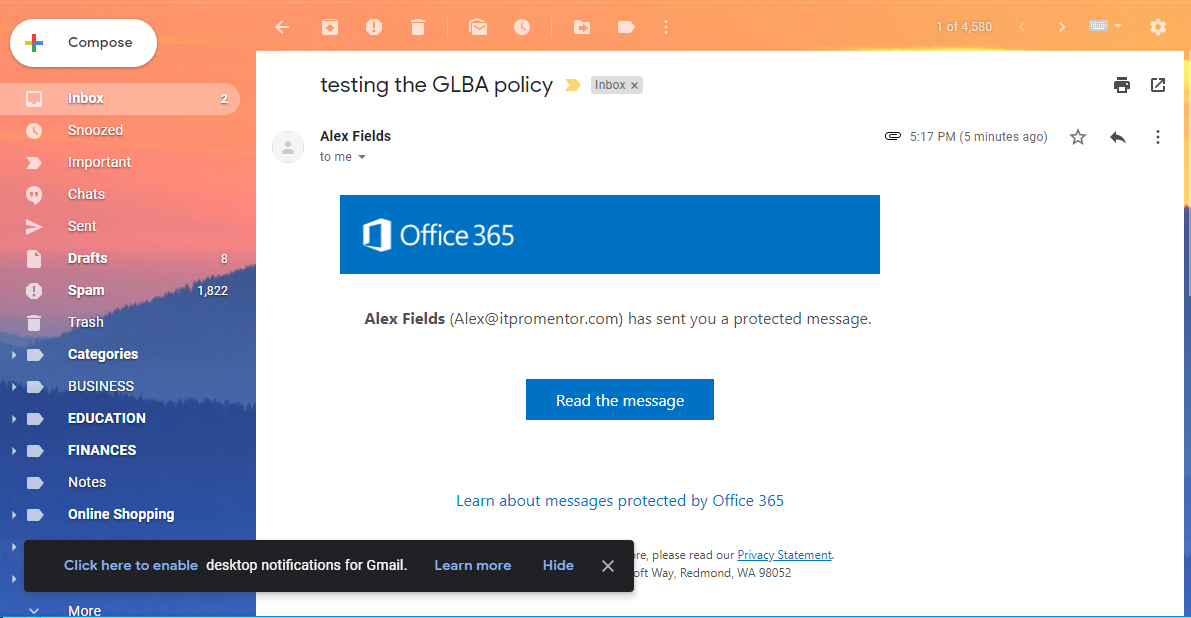
Basically during this process they are logging into Microsoft’s OWA, using either their public email identity (for example, a Gmail account as in the example above), a Microsoft account, or a one-time passcode, which is a temporary code sent to their inbox for verification purposes. In other words, the message never really left your Exchange server in the cloud.
In conclusion
Data Loss Prevention can be a powerful tool for your organization when it comes to meeting difficult compliance requirements, or as a way of just providing some “CYA,” even if you are not subject to compliance in your industry. The most difficult part of setting up these rules is going to be figuring out just what you want to begin with. Do you need to notify users when they share this type of content or not? Do you need to block content types from being shared at all, or do you just need to encrypt them? If so, how strict should this encryption be? Will you need to file an incident report for this information type with your compliance officer? Whatever your needs are, just be sure you have a full understanding of what you want to actually accomplish before you start implementing.
Oh, and one more pro tip: be sure you review the fine print for DLP policy templates such as GLBA.
Leave a Reply